
RadioButton and RadioGroup are widgets used in Android development for when the user needs to capture a single option from a set of options that are all displayed at the once in the user interface.
For each option that user can select from a RadioButton widget needs to be added to the layout. The RadioGroup is used to group the related RadioButtons together to ensure only one RadioButton in the RadioGroup can be selected at any one time.
Common use cases for the Android RadioButton and RadioGroup widget include:
- Multiple choice quiz or trivia app
- Defining a user profile on social media or a dating app
- Surveys or requesting user feedback in your app
I have created a tutorial on how to use the RadioButton and RadioGroup widgets in Android which includes examples with sample code.
In this tutorial on RadioButton and RadioGroup widgets I will cover the following topics:
- RadioButton & RadioGroup Attributes and Methods
- How to use the RadioButton and RadioGroup Widgets in Android
- How to Detect Click Events on a RadioButton in Android
- How to Set a RadioButton in a RadioGroup as Checked by Default
- How to Set a RadioButton as Checked Programmatically in Android
- How to Retrieve a RadioButton within a RadioGroup at an Index in Android
All of the code samples shared in this tutorial are available in the RadioButtonTutorial GitHub repository I created at the following link.
https://github.com/learntodroid/RadioButtonTutorial
RadioButton & RadioGroup Attributes and Methods
In this section of the post I have documented some of the common XML attributes and methods used for the RadioButton and RadioGroup widgets.
To get access to all of the XML attributes, methods and constructors available for these widgets I would recommend looking at the following links to the official documentation.
RadioButton
RadioButton Attributes
| No. | Attribute | Description |
|---|---|---|
| 1 | android:id | Identifier for the RadioButton, allows the View for the RadioButton to be located using the findViewById(int) method |
| 2 | android:text | Text displayed in the label of the RadioButton |
| 3 | android:onClick | Method name that is called when the user clicks on the RadioButton |
| 4 | android:checked | If set to “true” the RadioButton will show by default as checked, if set to “false” the RadioButton will show by default as unchecked |
| 5 | android:button | Change the appearance of the button by setting a drawable to the RadioButton |
RadioButton Methods
| No. | Method | Description |
|---|---|---|
| 1 | CharSequence getText() | Retrieve the text associated to the label of the RadioButton shown on screen |
| 2 | void setText(CharSequence) | Set the text of the label of the RadioButton to a new value |
| 3 | boolean isChecked() | Returns true if the RadioButton is checked, returns false if the RadioButton is not checked |
| 4 | void setChecked(boolean) | Sets the RadioButton to checked if the parameter passed is true, sets the RadioButton to unchecked if the parameter passed is false |
| 5 | void toggle() | Will set the RadioButton to checked if the RadioButton is currently unchecked, and will set the RadioButton to unchecked if the RadioButton is currently checked |
| 6 | void setOnClickListener(View.OnClickListener) | Registers a callback to be run when the RadioButton is clicked |
RadioGroup
RadioGroup Attributes
| No. | Attribute | Description |
|---|---|---|
| 1 | android:id | Identifier for the RadioGroup, allows the View for the RadioGroup to be located using the findViewById(int) method |
| 2 | android:checkedButton | The id of the RadioButton within the RadioGroup to load as checked by default |
RadioGroup Methods
| No. | Method | Description |
|---|---|---|
| 1 | int getCheckedRadioButtonId() | Retrieve the id of the RadioButton within the RadioGroup that is checked |
| 2 | void check(int) | Use the id to locate the RadioButton within the RadioGroup and set it to checked |
| 3 | void clearCheck() | Sets all RadioButtons under the RadioGroup to unchecked |
| 4 | int getChildCount() | The RadioGroup is a ViewGroup, this method will return the number of children of the RadioGroup |
| 5 | View getChildAt(int) | The RadioGroup is a ViewGroup, this method will return the View of the child at the index of the RadioGroup passed as a parameter |
| 6 | void setOnCheckedChangeListener (RadioGroup.OnCheckedChangeListener) |
Registers a callback to be run when the RadioButton within the RadioGroup is checked or unchecked |
How to Use the RadioButton and RadioGroup Widgets in Android
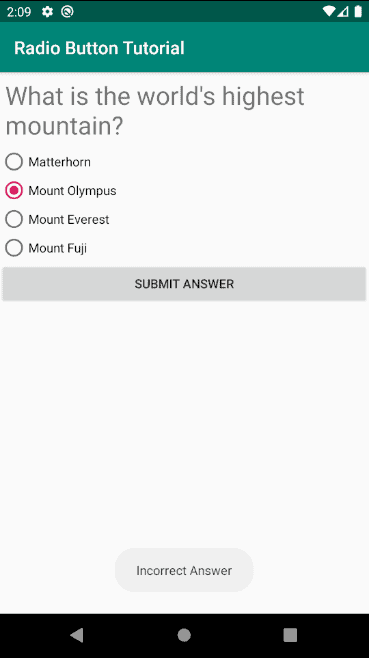
In the first section of this tutorial for showing how to use radio buttons in Android we will be creating a simple multiple choice quiz app that will look like the screenshot below.
In the app the user will be able to answer a question by selecting one of the answers shown as radio buttons. When the user selects the “Submit Answer” button, if the selected radio button is the correct answer a Toast with a message saying it is the correct answer will be shown. If it is not correct an incorrect answer Toast message will be displayed.
This section of the tutorial will be broken down into three steps.
- Step 1: Adding string resources for the quiz questions and answers in the strings.xml file
- Step 2: Creating the layout resource containing the quiz question and radio buttons for the answer
- Step 3: Creating the activity that will validate that the correct answer radio button is checked
Step 1: Adding String Resources for the Quiz Questions and Answers in the strings.xml File
In this step we will be adding a set of String resources to the strings.xml file located in the src/main/res/values directory.
In this strings.xml file we will be adding String resources for the following:
- The text for the question that will be shown inside a TextView
- The text for answers 1 – 4 that will be shown for each RadioButton
- The text for the Button used for submitting the answer
- The text to be shown inside the Toast message if the answer is correct, incorrect or is missing due to none of the RadioButtons being checked on submission
See the code sample for the strings.xml string resources file below.
Step 2: Creating the Layout Resource Containing the Quiz Question and Radio Buttons for the Answer
In this step we will be creating a layout resource for the MainActivity class that will be used to display the layout of the quiz.
The layout resource for the quiz app will include the following:
- A TextView for the question
- A RadioGroup containing 4 RadioButtons, each of the RadioButtons will be used to show an multiple choice answer to the question
- A Button for submitting the answer to the quiz question
See the code sample for the activity_main.xml layout resource below.
Step 3: Creating the Activity that will Validate that the Correct Answer Radio Button is Checked
In step 3 we will be creating the MainActivity class that will be used to validate that the correct RadioButton answer has been selected for the quiz question.
In the MainActivity class, first we will add a click listener to the Button used for submitting the answer to the quiz question.
When the Button is clicked it will retrieve the checked RadioButton from the RadioGroup using the getCheckedRadioButtonId() method.
As described in the RadioGroup documentation, the getCheckedRadioButtonId() method will return -1 if none of the RadioButtons inside the RadioGroup have been checked. If that is the case in our quiz app we will show a Toast showing the “Missing Answer” message.
Otherwise if a RadioButton for an answer has been selected we now have access to the identifier of the view for the selected RadioButton from the getCheckedRadioButtonId() method. To get the text of the answer from the RadioButton we will use the findViewById(…) method to access the RadioButton using the view identifier. From there we will use the getText() method on the RadioButton to obtain the answer associated to the checked RadioButton.
Now that we have the answer selected by the user we will then compare the selected answer with the correct answer and if they are the same we will show a Toast with the message text of “Correct Answer”. Otherwise if they are not the same, the Toast will display a message with the text “Incorrect Answer”.
See the code sample for the MainActivity class below.
How to Detect Click Events on a RadioButton in Android
If you have a RadioGroup containing a set of RadioButtons inside your Android app and you want to be able to immediately respond to a click event for your RadioButton you have a few options.
I have listed three options for achieving this below and I will share code samples for achieving each of these options.
- Option 1: Use the onClick attribute on each RadioButton
- Option 2: Set an OnClickListener to each RadioButton
- Option 3: Set an OnCheckedChangeListener to the RadioGroup
Option 1: Using the onClick Attribute on each RadioButton
The first option is to define the onClick attribute for each of the RadioButtons within a RadioGroup inside the layout resource file.
The onClick attribute will be set to the name of a method that will be defined inside the activity or fragment class that will be used to handle the click events to the RadioButton.
See the activity_main_onclick.xml layout resource file below showing each of the RadioButtons in the quiz app with the onClick attribute set to the “onQuizRadioButtonClicked” method.
When it comes to defining the method for handling the onClick event inside the activity or fragment class it will need to meet a particular method definition.
- The method will need to be public
- The method will need return void
- The method will need to take a single View parameter
For our quiz app I have created a onQuizRadioButtonClicked(View) method that will retrieve the RadioButton that has been clicked. Then it will validate if the RadioButton is currently checked using the isChecked() method on the RadioButton. If it is checked it will create a Toast message showing the text of the answer from the RadioButton.
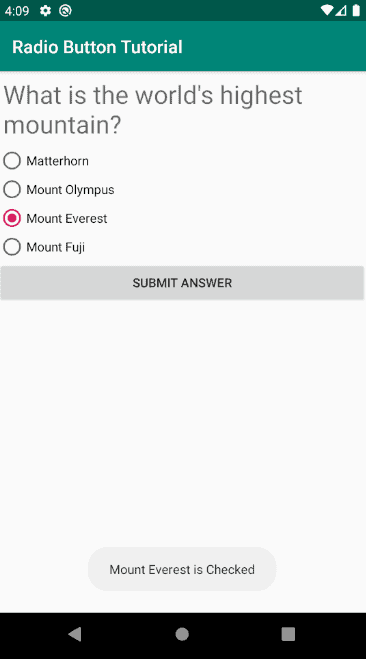
See the code snippet from the MainActivity class below containing the onQuizRadioButtonClicked(View) method.
Option 2: Set an OnClickListener to each RadioButton
Option 2 is fairly similar to option 1, the main difference is that instead of using the onClick attributes inside the layout resource file for each of the RadioButtons, we will implement an OnClickListener inside our Activity or Fragment class and use the setOnClickListener(…) method on each of the RadioButtons to use this listener programmatically.
See the activity_main_onclicklistener.xml layout resource file where we have assigned a unique id to each of the RadioButtons.
In the activity class we will implement the OnClickListener interface and override the onClick(View) method where we will reuse our code for creating a Toast message if the clicked RadioButton is checked.
Inside the onCreate(…) method of the activity we will obtain each of the RadioButtons for the answers and use the setOnClickListener(…) to our activity class containing the overridden onClick(View) method.
See the code sample for the activity class below.
Option 3: Set an OnCheckedChangeListener to the RadioGroup
Option 3 involves creating and setting an OnCheckedChangeListener to the RadioGroup containing the set of RadioButtons. The OnCheckedChangeListener will give us the RadioGroup containing the RadioButton that was checked as well as the identifier of the RadioButton that has had it’s checked status changed.
This option does not require us to define unique ids or the onClick attributes for the RadioButtons in the layout resource file. For option 3 we can use the same layout resource we created in the second step of the first section of this tutorial for creating the quiz app.
In the activity class in the onCreate(…) method we will use the setOnCheckedChangeListener(…) method on the RadioGroup and implement the onCheckedChanged(RadioGroup, int) method.
In the onCheckedChanged(RadioGroup, int) method, we will obtain the RadioButton using the identifier passed as an integer, then validate if it is checked using the isChecked() method and create the Toast message only if it the RadioButton is checked.
See the code sample for the activity class below.
How to Set a RadioButton in a RadioGroup as Checked by Default
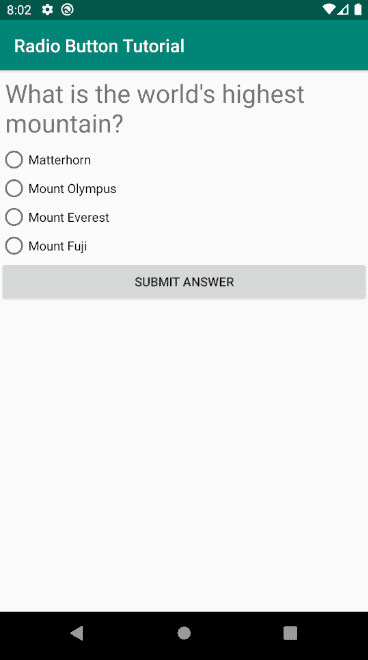
Unless you specify otherwise in your layout resource file or programmatically, all RadioButtons in your user interface will be shown as unchecked by default as per the screenshot below.
To load a particular RadioButton in a RadioGroup as checked you need to set the “android:checkedButton” attribute of the RadioGroup in the layout resource file to the id of the RadioButton.
See the sample layout resource file below showing the RadioButton for answer 2 being set as the checked button on the RadioGroup.
How to Set a RadioButton as Checked Programmatically in Android
In this section of the tutorial I will show you how to set a RadioButton as checked programmatically.
There are two ways to achieve this.
The RadioButton widget has a setChecked(boolean) method, which will set the RadioButton to checked if a boolean parameter of true is passed, or it will set the RadioButton to unchecked if the boolean parameter is false.
The other way is using the check(int) method on the RadioGroup widget. This will set the RadioButton associated to the integer identifier to checked.
See the code sample below showing two different methods for setting a RadioButton as checked programmatically in Android.
How to Retrieve a RadioButton within a RadioGroup at an Index in Android
In both of the methods in the code sample above for checking the RadioButton programmatically, the code selects a random RadioButton within the RadioGroup.
This is achieved by counting the RadioButtons within the RadioGroup using the getChildCount() method on the RadioGroup and passing that number to a random number generator.
We use the random whole number between zero and the child count minus one to locate the RadioButton by using the getChildAt(int) method on the RadioGroup which will return the RadioButton at the index provided.
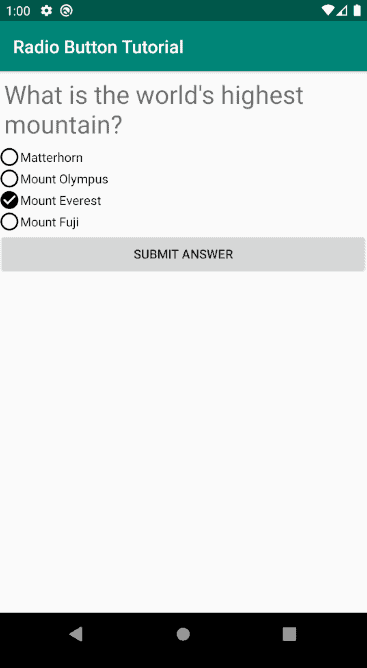
How to Customize the Button Shown in the RadioButton in Android
It is also possible to customize the image shown for the RadioButton in Android. In this section of the tutorial I will how to customize the Button shown in the RadioButton to look like the screenshot below.
First you will need to add vector assets to your drawables folder for a checked and an unchecked RadioButton. To add vector assets in Android Studio right click on the “res” directory and hover over “New” and select “Vector Asset”. Then select the button next to the “Clip Art” field and search for icons you can use for the RadioButton and follow the wizard to create the two drawables.
After you have created the two drawables, next you will need to create a selector drawable resource to instruct which drawable to show based on the checked state of the RadioButton. To create a selector in Android Studio, right click on the res/drawables directory and hover over “New” and select “Drawable resource file”. Enter a file name and set the root element as a selector and select the “OK” button.
See the sample selector I created below that includes both drawables as items that are selected based on the android:state_checked attribute being set to “true” or “false”.
Finally you will need to update the layout resource file containing the RadioButtons to set the android:button attribute for each RadioButton to the selector drawable.
See the sample layout resource below.