CameraX is a powerful Android Jetpack library that can drastically simplify the development effort for creating apps that use the camera. As a part of the series of blog posts for creating apps from scratch, I have created a tutorial walking you through how to create a QR code scanner app for Android using the CameraX and ZXing libraries.
To create a QR code scanner app in Android using CameraX and ZXing perform the following steps.
- Retrieve the Dependencies for CameraX and ZXing with Gradle
- Request Permission to Use the Camera
- Set up a Live Preview of the Camera With CameraX
- Set up Image Analysis to Scan Frames From the Camera for QR Codes Using CameraX and ZXing
- Test It Out on the Emulator or on Your Device
In this tutorial for creating a QR code scanner app in Android using the CameraX and ZXing libraries I have documented each of these steps and have included code samples written in Java to help you along the way.
Tutorial for Creating a QR Code Scanner Android App in Java
This tutorial for creating a QR code scanner Android app in Java will be broken down into five steps. All of the code shared in this tutorial for the QR code scanner app for Android is available in GitHub for free at the link below.
https://github.com/learntodroid/AndroidQRCodeScanner
Retrieve the Dependencies for CameraX and ZXing with Gradle
For the QR code scanner app we will be creating in Android will we require two dependencies CameraX from the Android Jetpack library and the ZXing library for bar code scanning.
The CameraX Android Jetpack library, which is currently in beta at the time of writing (August 2020), is a support library that makes it easier to build Android apps that use the camera. CameraX reduces the complexity of having to factor in specifics of the device when designing an app that uses the camera.
We will be using CameraX to show a live preview from the camera inside the app. In addition to this, we will use the image analysis capabilities from CameraX to retrieve the image frames retrieved from the device’s camera to process with a QR code scanning library.
To learn more about what CameraX from the Android Jetpack library is all about check out this short video below from the Android Developers YouTube channel.
To retrieve the CameraX dependencies using gradle, add the following dependencies to your app level build.gradle file.
The CameraX library requires you to have Java 8 in your app, so you will need to include the Java 8 dependencies in your app level build.gradle file. This can be down by adding a compileOptions section inside android block after the buildTypes section as per the sample build.gradle file below.
ZXing, also known as Zebra Crossing, is an open-source free to use bar code scanning library for Java and Android. ZXing can process images for scanning different sorts of codes such as UPCs, EAN codes as well as QR codes.
To retrieve the ZXing dependency using gradle, add the following dependency to your app level build.gradle file.
Request Permission to Use the Camera
Because we will be using the camera in our Android app to scan for the QR code we will need to add the permission for the camera inside the app’s manifest file.
See a sample app manifest below that requests the use of the camera permission with the “uses-permission” tag along with a request to use any camera available on the device with the “uses-feature” tag.
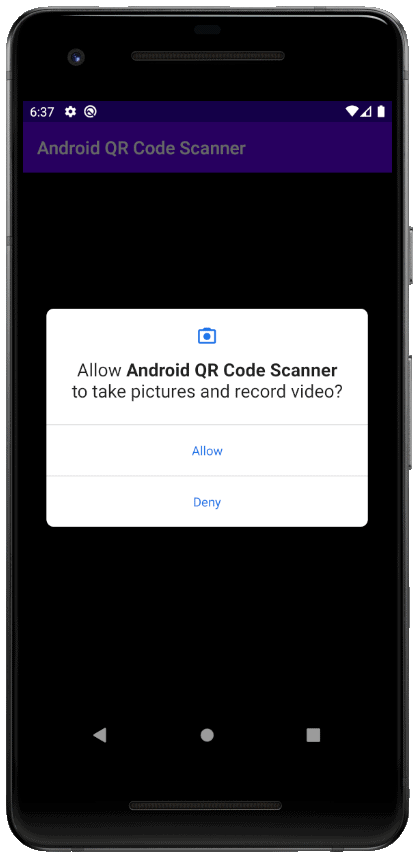
In addition to this due to the fact that Android considers the camera permission to be a dangerous permission, we will need to request the user’s consent to use the camera permission at run time through a prompt started from our activity.
To achieve this we will create the method “requestCamera()” to check that we have the consent from the user to use the camera and if we don’t to prompt them in the user interface. The method will be called inside the onCreate() method.
If the user has already given us permission to use the camera we will call the “startCamera()” method we will implement later for starting the camera preview. If this permission has not already been granted by the user we will display a prompt to request permission to use the camera.
In the activity class we will override the onRequestPermissionsResult(…) method to check if the user has provided consent to use the camera in the popup, if so we will then call the “startCamera()” method.
See the code sample below for checking that the user has provided consent to use the camera in the activity.
Set up a Live Preview of the Camera With CameraX
Next, we will use the CameraX Jetpack support library to create a live preview from the camera inside the Android app after we have confirmed that the user has authorized us to use the camera.
Creating a live preview from the camera is one of the three main use cases that have been simplified for developers using the CameraX library, the others being image analysis and image capture.
First, we will need to update the layout resource file for our activity or fragment to include a PreviewView widget from CameraX. See a sample activity layout resource below.
Next, we will implement the startCamera() method to initialize the preview from the camera using a ProcessCameraProvider.
We will also create a new method bindCameraPreview(…) which will be invoked from the startCamera() method. The bindCameraPreview(…) method will be used to set up and initiate the camera preview to be displayed inside the PreviewView widget.
In the bindCameraPreview(…) method we first, set up the PreviewView widget to use the surface view implementation mode using the setPreferredImplementationMode(…) method.
Then we will create a new CameraX Preview object using the builder. We will then create a new CameraX CameraSelector object using the builder using the back lens of the camera.
For the Preview object we will need to set the surface provider as a newly created surface provider from the PreviewView widget using the setSurfaceProvider(…) method.
Then at the end of the bindCameraPreview(…) method, we will invoke the bindToLifecycle(…) method on the cameraProvider and pass the CameraSelector object and the Preview object as parameters.
See the code sample below which shows the implementation of the startCamera() and bindCameraPreview(…) methods.
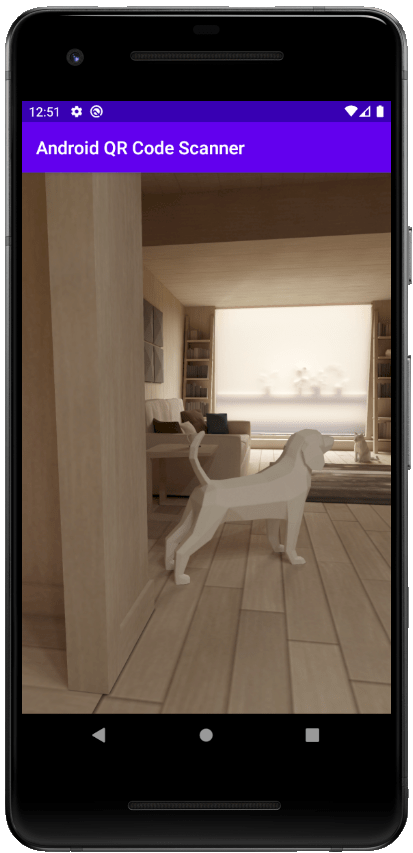
Now if you run your Android app in the emulator, you should see a preview of a house that you can navigate around by holding the ALT key and using the WASD keys while using the mouse to look around.
Set up Image Analysis to Scan Frames From the Camera for QR Codes Using CameraX and ZXing
In this step of the tutorial for creating a QR code scanner app in Android we will use the image analysis capabilities available in CameraX along with the ZXing library to scan image frames from the camera to locate QR codes.
Before we create any code for image analysis we will first create a listner we will use in the custom image analyzer class we will create to inform the Activity when a QR code has been located in an image frame our when a QR code could not be located.
See the code sample for the QRCodeFoundListener listener below.
Next, we will create our own custom image analyzer class that we will use to inspect individual frames from the camera retrieved using CameraX and analyse those frames using the ZXing library to attempt to locate a QR Code.
To use this class for image analysis using CameraX it will need to implement the ImageAnalysis.Analyzer interface from CameraX and override the analyze(…) method.
In the analyse(…) method we will first need to check the image frame from the camera is in a compatible format. If this is the case then we will retrieve the image from the CameraX buffer and convert it into a byte array.
Once we have the byte array we will convert the byte array into a format usable by the ZXing library to scan for QR codes which will require us to create a PlanarYUVLuminanceSource object then pass it to a HybridBinarizer object to generate a BinaryBitmap.
If a QR code can be located in the BinaryBitmap using the QR code reader library from ZXing library we will invoke the onQRCodeFound(…) method on the QRCodeFoundListener listener while passing the text from the QR code as a parameter.
If no QR code be found we will invoke the qrCodeNotFound() method on the QRCodeFoundListener listener.
See the code sample for the QRCodeImageAnalyzer class below.
Next, we will make the following changes the main activity class.
- We will add a Button to the layout resource that will be shown only when a QR code has been located with the camera, which when selected will display the text that was read from the QR code
- We will then update the bindCameraPreview(…) method to utilize the CameraX library to use the custom image analyzer class we created for image analysis
See the layout resource below for the activity that has been updated to include a Button.
In the onCreate() method we will initialize the button to start as invisible then add an OnClickListener(…) to create a toast message of the text from the QR code retrieved from a string variable on the class.
Then, we will update the bindCameraPreview(…) method to create a new ImageAnalysis object from the CameraX library using the builder. Then we will use the setAnaylzer(…) method on the ImageAnalysis object and provide an object of the custom image analyzer class we created in a previous step.
In the bindCameraPreview(…) method when creating an instance of the QRCodeImageAnalyzer class we will implement the onQRCodeFound(…) and qrCodeNotFound() methods from the QRCodeFoundListener listener. These methods will be responsible for storing the text retrieved from the QR code in the activity class along with updating the visibility status of the button depending on whether a code has been located or note.
At the end of the bindCameraPreview(…) method, we will need to update the bindToLifecycle(…) method call on the cameraProvider object to include the ImageAnalysis object we created as a parameter.
See the code sample for the MainActivity class below.
Test It Out on the Emulator or on Your Device
Next, we will test that the QR code reader works on the emulator or on your device. Before we start, you will need to have some QR codes to test with.
qr-code-generator.com is a great free-to-use tool available in a web browser that allows you to generate QR codes with whatever text you enter.

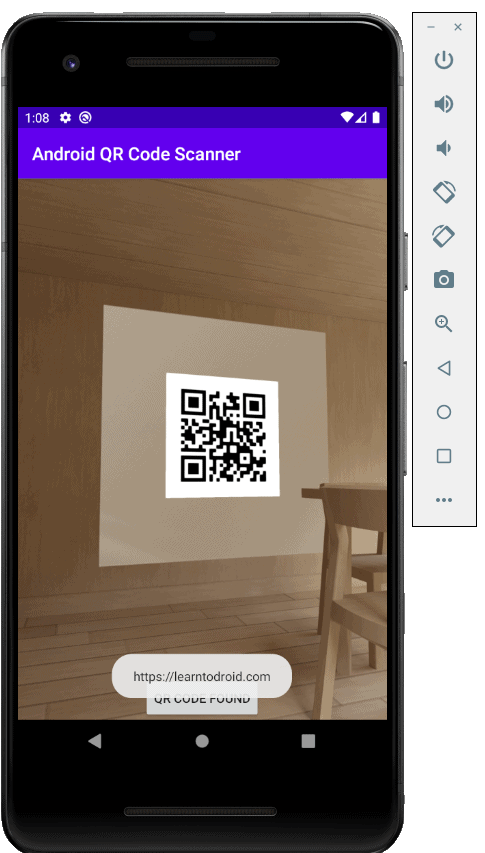
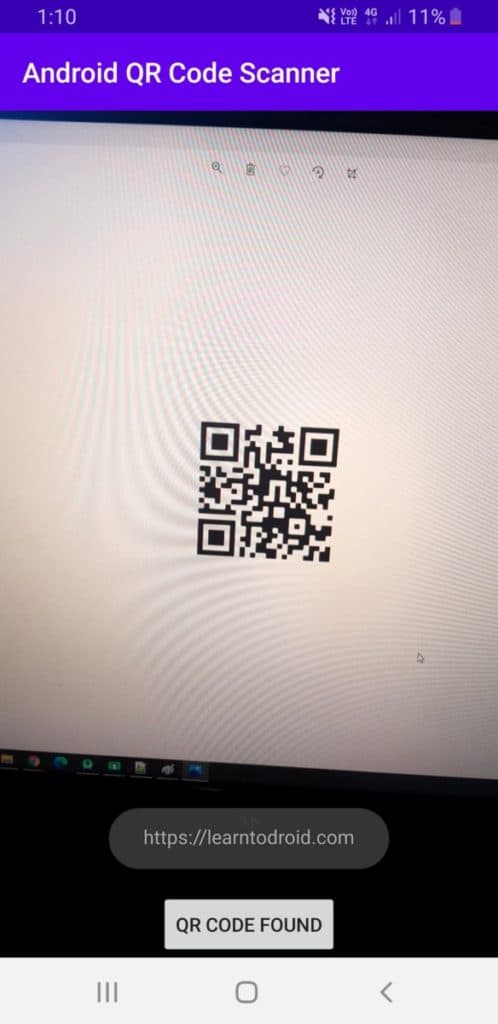
If you have your QR code scanner running on your mobile device, simply point the camera at the screen showing a QR code you have generated and it should display the “QR Code Found” button which when clicked will display the text in a toast message.
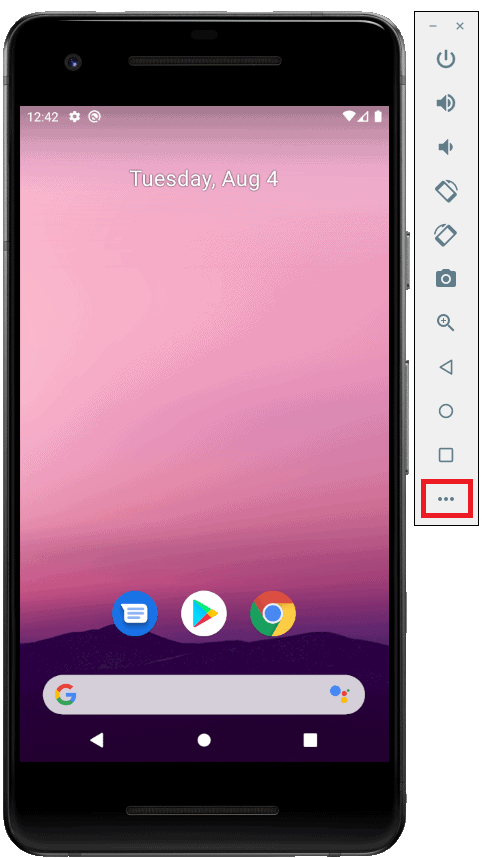
If you want to use the Android emulator to test the QR code scanner works, you will first need to go into the emulator settings by selecting the icon on the emulator with three dots.
Then you will need to go into the camera settings of the emulator and add an image of the QR code as the wall image by selecting the browse icon.
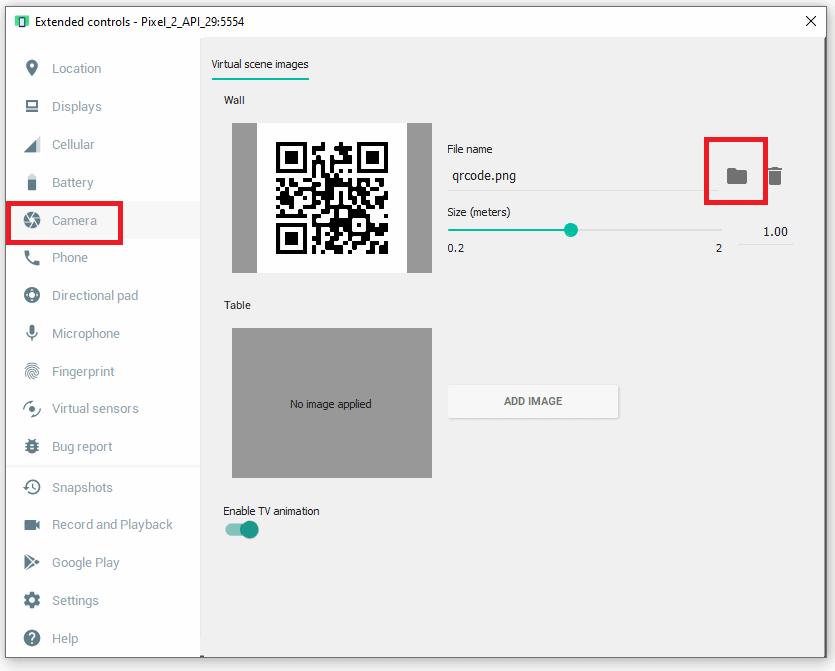
Then you will be able to run your QR code scanner app in the Android emulator and you will need to navigate into the dining room that contains the wall image with your QR code.