
Firebase Authentication simplifies the process of adding user sign in and registration functionality into your Android app. Firebase Authentication provides a backend and an SDK for managing user authentication in multiple different ways including using a simple email address and password.
Model View ViewModel (MVVM) is a software architecture pattern that helps you structure your Android project into classes that provide a clear separation of concerns and improves the extensibility and maintainability of your code.
I have put together this tutorial on how to use Firebase Authentication to add user registration, sign-in and sign-out functionality to an Android app while structuring the Android project using the MVVM design pattern.
We will use multiple Android architecture components from the Jetpack library to implement this app including the navigation architecture component, ViewModel and LiveData.
In order to create an Android app that uses Firebase Authentication that follows the MVVM design pattern we will need to:
- Retrieve Firebase Authentication and Jetpack dependencies for Navigation, LiveData and ViewModel using Gradle
- Create a Firebase project and enable email address and password authentication
- Implement a Repository that interacts with the Firebase SDK for registration, sign-in and sign-out
- Implement a ViewModel that interacts with the Repository for user sign-in and registration
- Implement a View that interacts with the ViewModel for user sign-in and registration
- Implement a ViewModel that interacts with the Repository for user sign-out
- Implement a View that interacts with the ViewModel for user sign-out
In this post, I will walk you through each of these steps in detail and provide code samples embedded in this blog post that are also available for free on GitHub.
I have also created a video of this tutorial that is available on YouTube which I have embedded below.
What is Firebase Authentication?
As mentioned in the introduction, Firebase Authentication provides a cloud-hosted backend and an SDK to simplify the process of adding user authentication and management to an Android app.
Firebase Authentication also has cross-platform support for iOS, web, and Unity along with language support for Node.js, C++ and Java.
In the app we will create we will use the email address and password authentication method provided by Firebase Authenitication.
In addition to email address and password authentication, Firebase Authentication also offers phone based authentication and federated identity allowing users to sign into your Android app using different Google, Facebook, Twitter or GitHub credentials.
Another strength of Firebase Authentication is that if you are using other platforms available in the Firebase Console you can control access to these resources with the user credentials created using Firebase Authentication.
For a brief overview of what Firebase is and what it offers check out the YouTube video published by the Firebase team embedded below.
If you would like to learn more about Firebase Authentication take a look at the documentation available on the Firebase website.
What is Model View ViewModel (MVVM)?
As mentioned in the introduction, Model View ViewModel (MVVM) is a software architecture pattern that provides a clear separation of concerns for your code.
- The Model is made up of the data models, business logic, and application data.
- The View is the structure, layout, and appearance of what a user will see in your app.
- The ViewModel is used by the View to transform data in the model to display in the View.
For a visual representation of the MVVM architecture of an Android app see the diagram below available in the Jetpack architecture documentation.
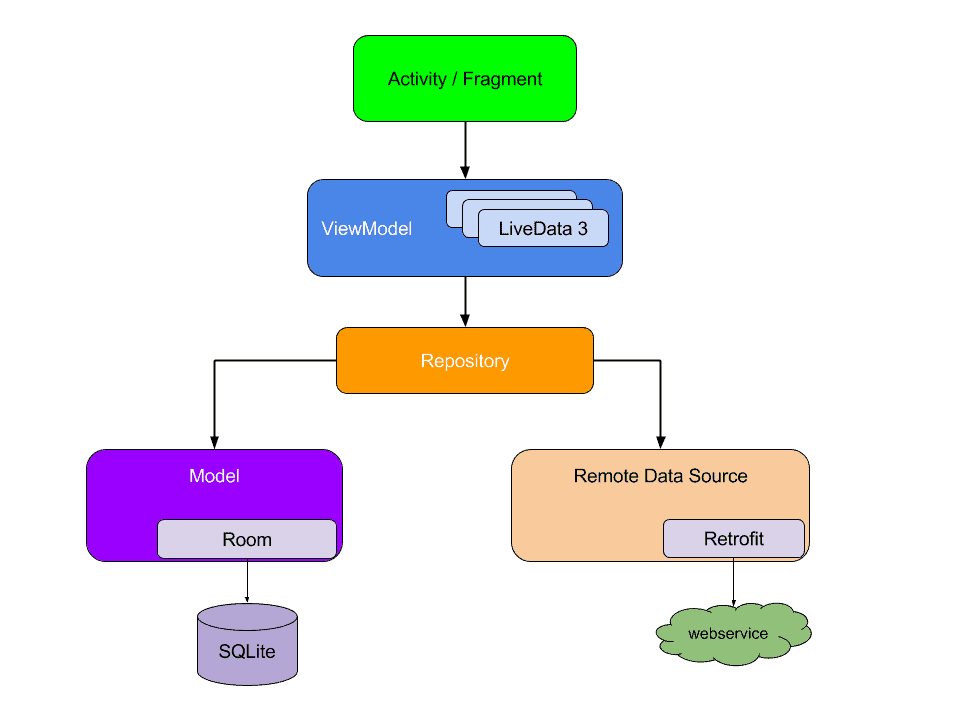
As you can see the Views consisting of Activities and Fragments interact with ViewModel which in turn communicates with the Repository to retrieve data from local and remote sources.
Data is shared between the local sources, remote sources, the repository, the ViewModel, and the Views using LiveData. The Views observe the LiveData in the ViewModel class for changes which when detected will update the user interface in the View with the newest data. The Repository interacts with local and remote sources to update the LiveData in the Repository which the ViewModel accesses using a getter method.
LiveData and ViewModel are both Jetpack architecture components we will use in this tutorial in addition to the Navigation Jetpack architecture component to build this app.
For the purposes of this tutorial, we will not use Room from the Jetpack library or Retrofit for interacting with external web services. Instead, we will use the Firebase Authentication SDK in the Repository class to interact with the Firebase Authentication APIs.
The Firebase Authentication MVVM Android App
We will be building an Android app that uses the Firebase Authentication platform for user registration and sign-in and using an email address and a password.
For a quick demo of the Android app watch the short embedded YouTube video below.
The app will start showing a fragment containing a login and registration form. If the user doesn’t have credentials they will be able to register for the first time by entering an email address and password and selecting the register button.
If the registration is successful, the user will be automatically signed in with these credentials and they will be navigated to another fragment which will display the email address of the user logged in and a button to log out. If the registration fails, the user will receive a Toast message showing the error.
If the user already has credentials they can enter their existing email address and password and select the login button.
If the login credentials are correct the user will also be navigated to the same fragment used on a successful registration showing the logged in user’s email address and a log out button.
When the user selects the log out button after they have registered and logged in they will be signed out of their Firebase Authentication session and they will be navigated back to the login/registration form.
Firebase Authentication Android App MVVM Tutorial
Retrieve Dependencies using Gradle
In order to use any of the Firebase libraries in our Android app including Firebase Authentication we will need to retrieve the dependencies for Firebase into our Android project using Gradle.
We will need to make changes to the project level and the app level build.gradle file as per the instructions provided in the Firebase documentation.
In the project level build.gradle file we will need to add a new classpath to the dependencies section as per the sample build.gradle file below.
In the app level build.gradle file, we will need to apply a plugin at the start of the build.gradle file and add the dependencies for the firebase-auth and firebase-analytics libraries, the Jetpack navigation architecture component, and the Jetpack lifecycle extensions library as per the sample build.gradle file below.
Create and Setup the Firebase Project in the Firebase Console
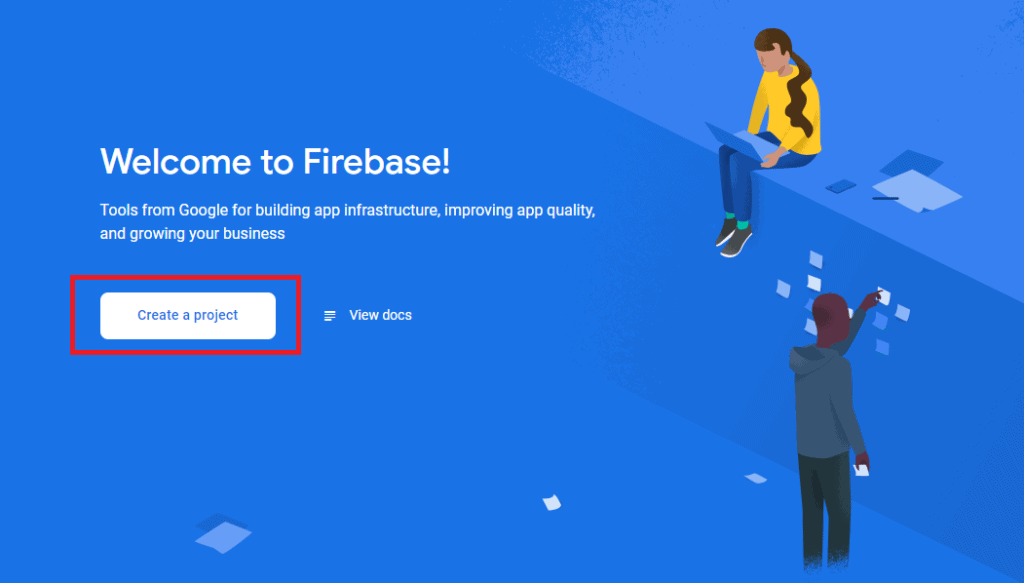
In order to use the Firebase Authentication platform for managing users in our Android app we will first need to create a new Firebase project in the Firebase Console in a web browser.
To create a Firebase project, you will require a Google account and you will need to navigate to the Firebase Console at the following link and log in using your Google account.
https://console.firebase.google.com/u/0/
Follow the instructions in the web browser to create a new Firebase project. You will need to provide a name for the Firebase project, enable Google Analytics for your Firebase project, and link a Google Analytics account to your Firebase project.
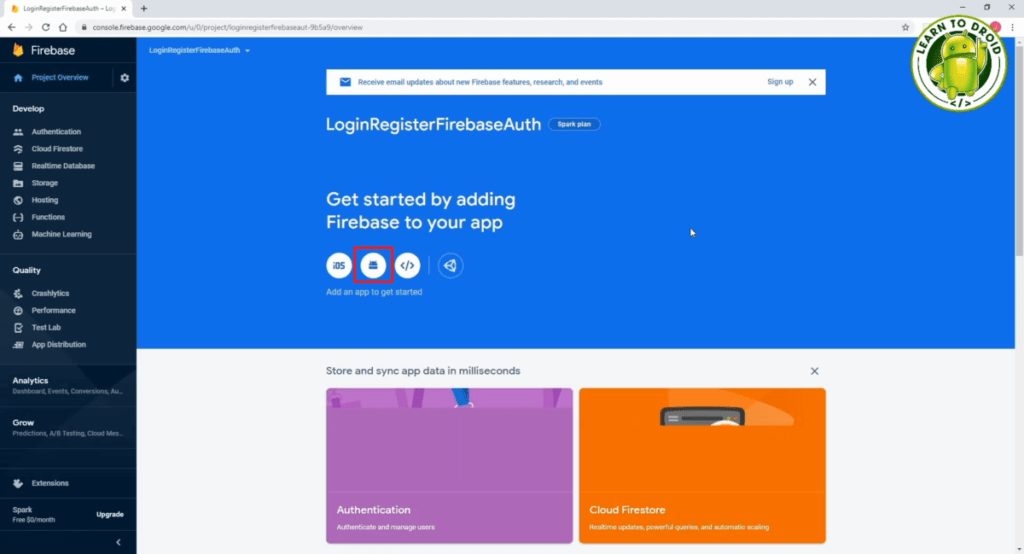
Next we will add our Android app to Firebase, select the Android icon under “Get started by adding Firebase to your app” in the project home page in the Firebase console.
To add your Android app you will need to enter the Android package name of your app. You may also optionally add a nick name for you app in the Firebase console.
You will need to also add a debug signing certificate SHA-1 which is required if you want to use certain functionality offered by Firebase such as dynamic links, invites, and Google sign-in or phone number support in Firebase Auth.
To get the debug signing certificate SHA-1 from your Android project in Android Studio, you will need to select the tab on the right most section of Android Studio, select your project name, app, Tasks, android then double click on signingReport. The SHA-1 value will be visible in the Gradle logs.
Next, you will need to download the google-services.json file, that contains API keys used by your Android app to interact with the Firebase APIs via the SDK. Once you have downloaded the google-services.json file copy into the app directory.
Then you will able to establish connectivity between your Android app and Firebase servers by run your Android app in the emulator or on a device.
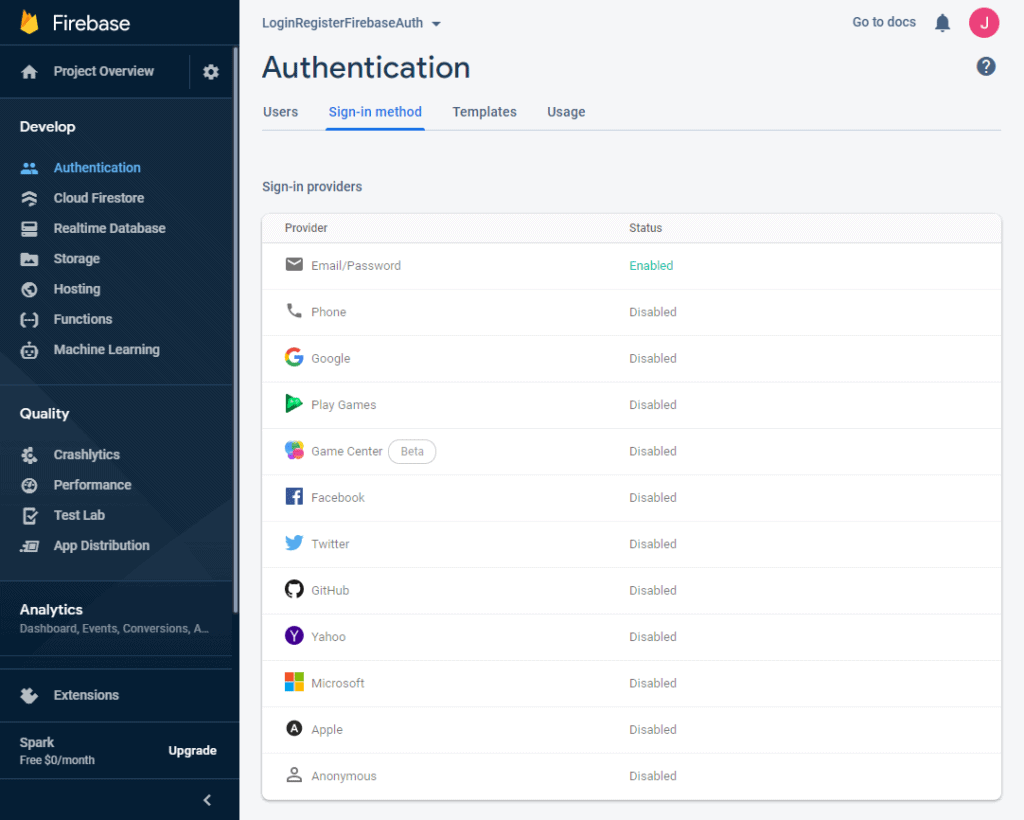
Then you will need to go into the Firebase Authentication section of the Firebase Console for your project. To do this, select the “Set up sign-in method” button, select the “Email/Password” option, toggle the “Enable” option and select the “Save” button.
I have embedded a video below that shows how to create a new Firebase project, add Firebase to your Android app, and enable the email address and password authentication method in Firebase Authentication.
Creating the Repository
Setting up the AuthAppRepository
Next, we will start writing the code for the Android app. We will start by implementing the Repository that will use the Firebase SDK to interact with the email address and password sign-in, registration, and log out functionality.
We will add four class level variables to the AuthAppRepository.
The first variable will be of the type Application which we will initialize as a parameter inside the constructor and we will use to locate the main executor when calling the Firebase Authentication library.
The second variable will be of the type FirebaseAuth which we will initialize in the constructor using the FirebaseAuth.getInstance method from the Firebase SDK. This variable will be used to invokes methods from the Firebase Auth SDK for sign-in, registration and log-out.
The third and fourth variables will be of the type MutableLiveData and they will be used for storing the FirebaseUser that is signed-in as well as a Boolean value indicating if the user has logged out.
These two variables will be initialized as empty in the constructor and because they are mutable (meaning they can change over time) they will get updated using the postValue method when a user successfully signs in or registers or when a user is logged out.
Getters have been implemented in the Repository class for both MutableLiveData variables so that they can be accessed via the ViewModel classes we will implement later in the tutorial.
At the bottom of the constructor, we will check if a FirebaseUser is currently signed in by calling the getCurrentUser method on the FirebaseAuth variable. If a user is already signed in the FirebaseUser record will be updated in the relevant MutableLiveData variable using the postValue method, in addition to this, the logged out status will also get updated in the MutableLiveData variable to false using the postValue method.
See the code excerpt from the AuthAppRepository class showing the class level variables and the constructor.
Implementing Email and Password Registration using FirebaseAuth
Next, we will implement the user registration functionality using an email address and password within our Android app using the Firebase Authentication SDK. We will do this by creating a new method called register inside the AuthAppRepository class which will take two String parameters, an email address and a password.
In the register method, we will use the FirebaseAuth variable initialized in the constructor and call the createUserWithEmailAndPassword method and pass the email address and password as parameters.
After that, we will invoke the addOnCompleteListener method using the main executor retrieved from the Application variable as the first parameter and we will create a new OnCompleteListener as the second parameter.
In the OnCompleteListener we will override the onComplete method and use the parameter from the onComplete method to check if the task was successful.
If the task was successful, we will update the MutableLiveData for the FirebaseUser by invoking the postValue method and passing the current user obtained with the getCurrentUser method on the FirebaseAuth variable.
If the task not successful, we will create a Toast message containing the details of the error from the task parameter.
See the code excerpt from the AuthAppRepository class showing the implementation of the register method.
Implementing Email and Password Sign-in using FirebaseAuth
In this section of the tutorial, we will add a new method to implement the user sign-in functionality using an email address and password using the Firebase Authentication SDK.
In the AuthAppRepository class, we will add a new method called login that will take two String parameters, an email address and a password.
In the login method, we will use the FirebaseAuth variable initialized in the constructor and invoke the signInWithEmailAndPassword method passing the email address and password as parameters.
Just like we did for the register method, we will invoke the addOnCompleteListener method using the main executor retrieved from the Application variable as the first parameter and we will create a new OnCompleteListener as the second parameter.
In the OnCompleteListener we will override the onComplete method and use the parameter from the onComplete method to check if the task was successful.
If the task was successful, we will update the MutableLiveData for the FirebaseUser by invoking the postValue method and passing the current user obtained with the getCurrentUser method on the FirebaseAuth variable.
If the task not successful, we will create a Toast message containing the details of the error from the task parameter.
See the code excerpt from the AuthAppRepository class showing the implementation of the login method.
Implementing Sign-out using FirebaseAuth
We will now add one more method to the AuthAppRepository class called logOut which will be used to invoke user sign-out functionality using the Firebase Authentication SDK.
The logOut method will take no parameters and we will use the FirebaseAuth variable initialized in the constructor and call the signOut method.
After the signOut method is called, we will update the MutableLiveData for the Boolean for tracking if the user has been logged out, by invoking the postValue method and passing the value true.
See the code excerpt from the AuthAppRepository class showing the implementation of the log out method.
Complete AuthAppRepository Class
See the code for the complete AuthAppRepository class below.
Creating the ViewModels
Creating the ViewModel for the Login and Registration Form
In this section of the tutorial, we will create our first ViewModel for our Android app that will be based by the user sign-in and registration form.
The ViewModel class we create called LoginRegisterViewModel will extend the AndroidViewModel class and will contain a constructor the accepts an Application as a parameter.
In the constructor, we will initialise a variable to the AuthAppRepository by creating a new AuthAppRepository object and passing the Application from the constructor parameter as a parameter.
Also in the constructor, we will initialise a MutableLiveData variable for the logged in FirebaseUser by setting the variable to the MutableLiveData variable retrieved from the AuthAppRepository using the getter method.
Then we will create two public methods which will act as wrappers around methods we already built in the AuthAppRepository.
We will create a login method in the ViewModel which takes an email address and password as String parameters and inside that method we will simply call the login method on the AuthAppRepository passing both paramaters.
We will repeat the same for the register method in the ViewModel.
The last thing we will do in this ViewModel class is create a getter method that will be used for exposing the MutableLiveData for the FirebaseUser that is currently logged in back to the View.
See the code for the complete LoginRegisterViewModel class below.
Creating the ViewModel for the View Where the User is Logged In
Next, we will create our second ViewModel to be used in the View where the user is already logged in.
As we did above, the LoggedInViewModel class will extend the AndroidViewModel class and take an Application parameter in the constructor.
We will initialise the AuthAppRepository in the constructor as we did previously and we will set up the MutableLiveData for both the FirebaseUser that is currently logged in along with the MutableLiveData of a Boolean value for indicating if the FirebaseUser has logged out. Both of these MutableLiveData variables will be initialized in the constructor using the getter methods exposed in the AuthAppRepository.
We will add one wrapper method in the ViewModel called logOut and this will simply call the logOut method from the AuthAppRepository.
Finally, we will add getter methods for both of the MutableLiveData variables so they can be used in the View.
See the code for the complete LoggedInViewModel class below.
Creating the Views
Creating the Login and Registration View
Implementing the Fragment Layout Resource
Now we will create a Fragment for displaying the sign-in and register form using an email address and password.
We will start by creating the fragment layout resource file.
The fragment layout resource will a LinearLayout with a vertical orientation which will contain:
- An EditText with the inputType of “textEmailAddress” for capturing the user’s email address
- An EditText with the inputType of “textPassword” for capturing the user’s email address
- A Button with the label “Login” that will be used to sign-in the user with the provided email address and password
- A Button with the label “Register” that will be used to register the user with the provided email address and password
See the sample fragment layout resource fragment_loginregister.xml below.
Implementing the Fragment Class
Next, we will implement the Fragment class for the LoginRegisterFragment.
In the onCreate method of the Fragment class, we will connect the View to the ViewModel by initializing a class variable for the LoginRegisterViewModel using the get method while passing the LoginRegisterViewModel class name as a parameter.
We will then watch for any changes made to the MutableLiveData for the FirebaseUser variable which the View retrieves from the ViewModel which in turn is retrieved from the AuthAppRepository.
This is done by adding an observer to the MutableLiveData in the onCreate method by invoking the getUserLiveData method on the LoginRegisterViewModel and calling the observe method passing the parameter of this and a new Observer which overrides the onChanged method.
When the FirebaseUser in the MutableLiveData changes from a sign-in or registration event, this will flow through to the observer in the LoginRegisterFragment.
In the observer, we will check if the FirebaseUser is not null which means we have successfully logged in, and if that occurs we will use the Jetpack Navigation architecture component to navigate to another View that displays the current user that is logged in and a Button to log out.
In the onCreateView method, we will add an OnClickListener to the login Button and the register Button.
When the register Button is clicked, we will check the email address and password are both at least 1 character each, then we will call the register method on the LoginRegisterViewModel passing the email address and password from the EditTexts.
When the login Button is clicked, we will check the email address and password are both at least 1 character each, then we will call the login method on the LoginRegisterViewModel passing the email address and password from the EditTexts.
See the code for the complete LoginRegisterFragment class below.
Creating the Logged In User View
Implementing the Fragment Layout Resource
Next, we will create a fragment layout resource for the LoggedInFragment.
In the LoggedInFragment, we will display a TextView in the center of the screen that will show the email address of the user that is currently logged in.
At the bottom of the LoggedInFragment, we will show a Button with the text “Log Out” that when selected will sign-out the user and navigation them back to the login and registration form.
See the sample fragment layout resource fragment_loggedin.xml below.
Implementing the Fragment Class
Next, we will implement the Fragment class for the LoggedInFragment.
In the onCreate method of the Fragment class, we will initialize a class variable containing the LoggedInViewModel.
We will also add an observer to the MutableLiveData containing the FirebaseUser and we will add an observer to the MutableLiveData containing the Boolean logged out status.
In the observer for the MutableLiveData for the FirebaseUser, when the FirebaseUser value is retrieved into the View we will update the TextView with the email address of the user that is logged in and we will enable the sign-out Button to be selected. If the user is null, we will disable the sign-out Button.
In the observer for the MutableLiveData for the Boolean value for the logged out status, when this is set to true, we will navigate the user back to the LoginRegisterFragment using the navigation architecture component.
In the onCreateView method, we will add an OnClickListener to the log out Button.
When the log out Button is clicked, we will call the logOut method on the LoggedInViewModel which will communicate with the AuthAppRepository to log the user out and result in the MutableLiveData being updated to contain the logged out value set to true.
See the code for the complete LoggedInFragment class below.
Setting up the Navigation Graph
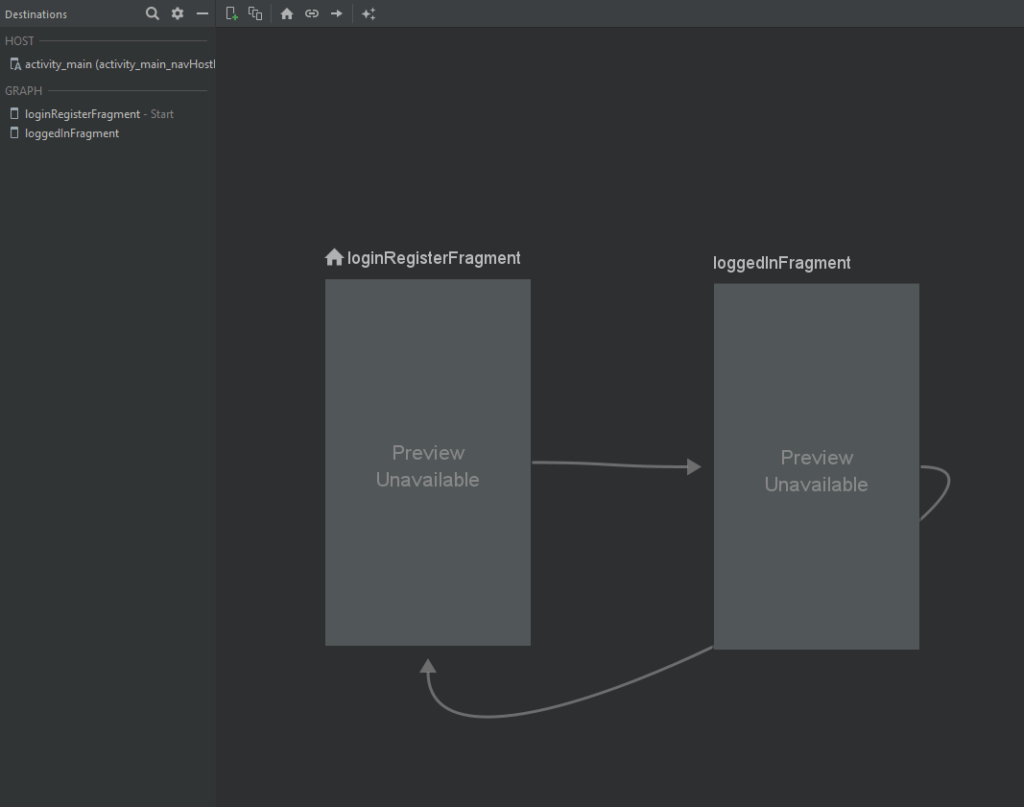
Finally, for the navigation to work, we will need to create a navigation graph containing the two fragments we just built as destinations with two actions between them.
First, we will need to create a navigation graph resource in the “res” directory with the name “nav_graph”.
After that, the MainActivity layout resource will need to be updated to contain a NavHostFragment.
See the sample activity_main.xml Activity layout resource file below.
Once this is complete, open the navigation graph in the navigation editor and add the LoginRegisterFragment and the LoggedInFragment as destinations.
After that, create an Action between the LoginRegisterFragment destination and the LoggedInFragment, then create an Action between the LoggedInFragment destination and the LoggedInFragment.
The end result should look something like the screenshot from the navigation editor below.
The screenshot above is based on the following code in the nav_graph.xml navigation resource file.