Using a version control system (VCS) such as Git is useful for many different use cases during Android app development including enabling virtual teams of developers to work independently through branching and merging, reverting changes to code that have caused defects or performance degradation and facilitating code reviews via pull requests.
Manually remembering the changes you have made to your code of your Android app over time is a difficult task and when you working with a team of developers it becomes outright impossible this is why many developers opt to use a VCS.
Git stands out as the most popular, feature rich, open source, free to use tool for handling the tasks mentioned above as well as many others. GitHub provides a hosting solution for your Git repository and offers all the features of Git in addition to features to enhance collaboration between developers using the code repository.
In this article I will take you through the how to use Git and GitHub for your Android app code base directly within the Android Studio IDE.
Before we go into the tutorial I will share with you some more information about Git and GitHub.
If you prefer to watch a video of this tutorial, I have embedded the tutorial I created and uploaded to YouTube for this post below.
I have also created another YouTube tutorial for branching and merging with Git and GitHub in Android Studio you can watch below.
What is Git?
Git is software development tool that handles version management of source code. It allows you to track changes you make your code over time and simplifies the software development process for teams that may be spread across the globe and working on the same code base.
Git is a distributed version control tool, this means a developer is able to clone, pull or fetch changes to the code base which downloads the code from the server to their local machine for them to build upon. Developers can even work on the code base an offline manner and when they ready to share their changes they follow the code merge process in Git.
Git offers support for branching and merging, this allows developers to contribute their code changes on their own individual branches then merge them with the main line branch (master) to integrate their changes, this substantially simplifies the code merging process.
Git is open source and free to use and is the most popular VCS used in software development across the globe.
What is GitHub?
GitHub is a company that provides hosting for Git repositories along with other features the enhance collaboration between a development team.
GitHub supports public and private GitHub repositories.
Public repositories on GitHub are used by many open source projects to assist developers from the open source community in contributing to the shared code base. I personally use a public repository for sharing code samples I have written for tutorials on this website. You can check out the code I have written on GitHub at https://github.com/learntodroid
Private repositories can be used to which GitHub users have access to review and contribute to your GitHub repository.
All the native features of Git can be used with GitHub such as code commits and branches. Merging of branches can be initiated within GitHub by raising a pull request.
https://github.com/aritraroy/UltimateAndroidReference
GitHub has many other great features including the following.
- README.md rendering for your code base documentation
- Bug and feature trackers
- Project wikis
- Social features such as watching, starring and forking GitHub repositories
- Search feature for finding public GitHub repositories
- Project management features
- Web hooks
- Notifications
- And much more
How to Setup Git in Android Studio
In the first part of the tutorial I will show you how to setup Android Studio with the source code version control tool Git.
Step 1: Download and Install Git
Android Studio will use a Git executable installed on your local machine to for interact with your Git repository. If you don’t already have Git installed on your machine you will need to complete this step first, otherwise you can skip directly to Step 2.
To download Git, in your web browser navigate to the downloads page on the official Git website and download the appropriate version of Git based on your operating system.
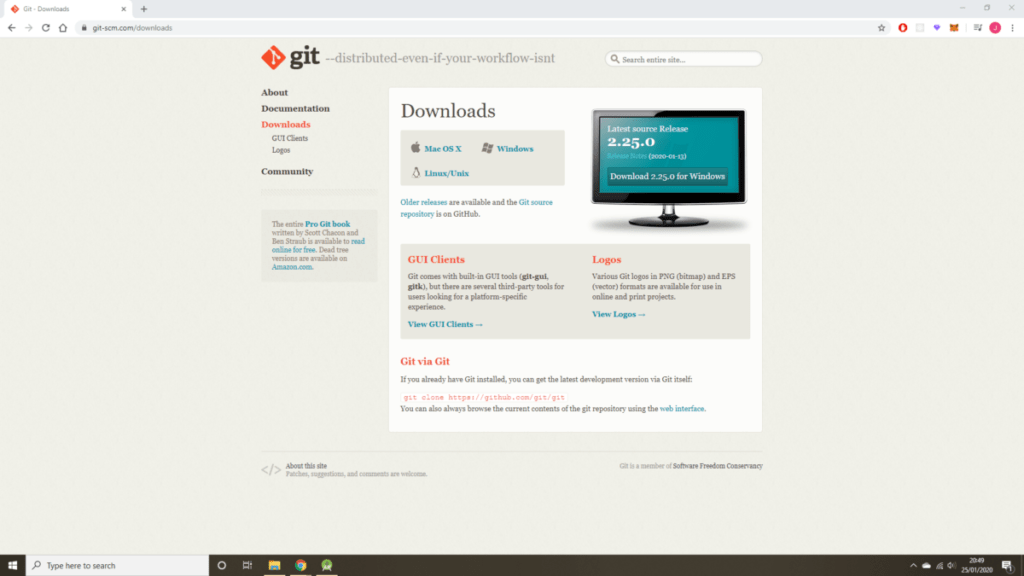
https://git-scm.com/downloads
Follow the simple steps shown on the web page to install Git on your local machine after it has successfully downloaded.
Step 2: Configure the Path to Git in Android Studio
The second step in setting up Git in Android Studio involves providing the path to Git on your local machine to Android Studio so that it can interact with Git.
First, launch Android Studio, then select the “File” menu and click the “Settings” menu item.
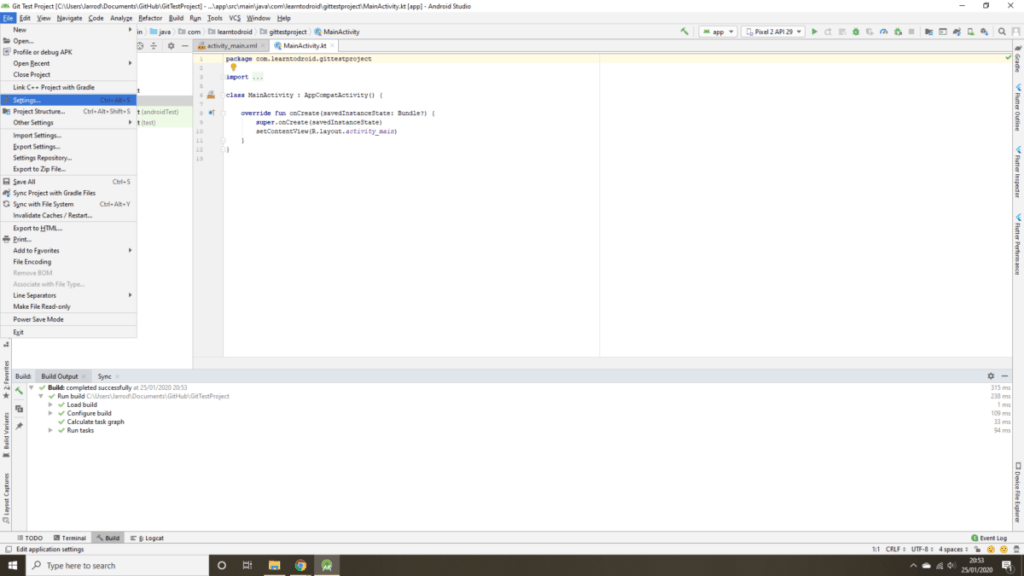
In the settings screen, expand the “Version Control” option and click on “Git”. In the “Path to the Git executable” field enter the path to Git executable on your local machine.
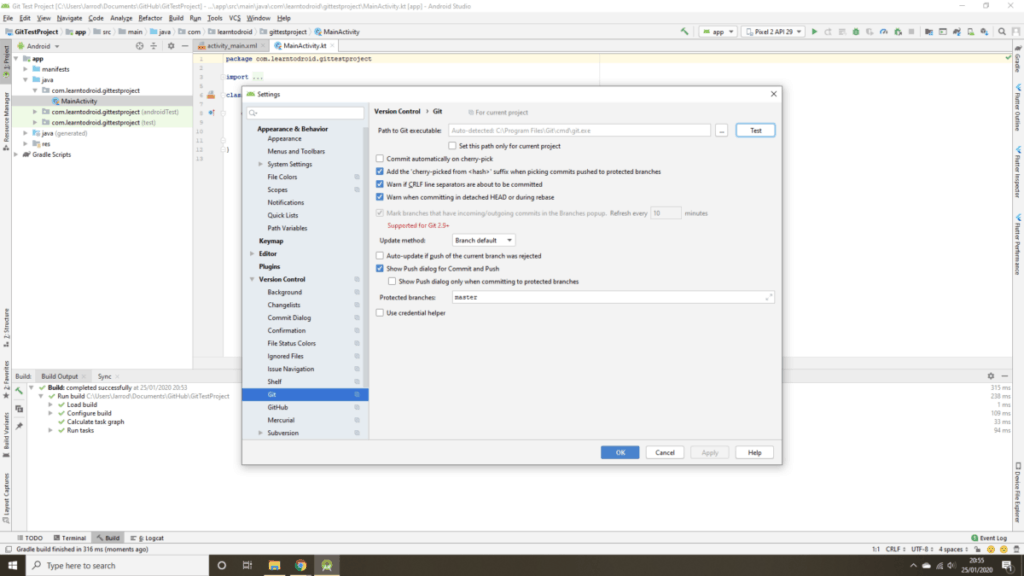
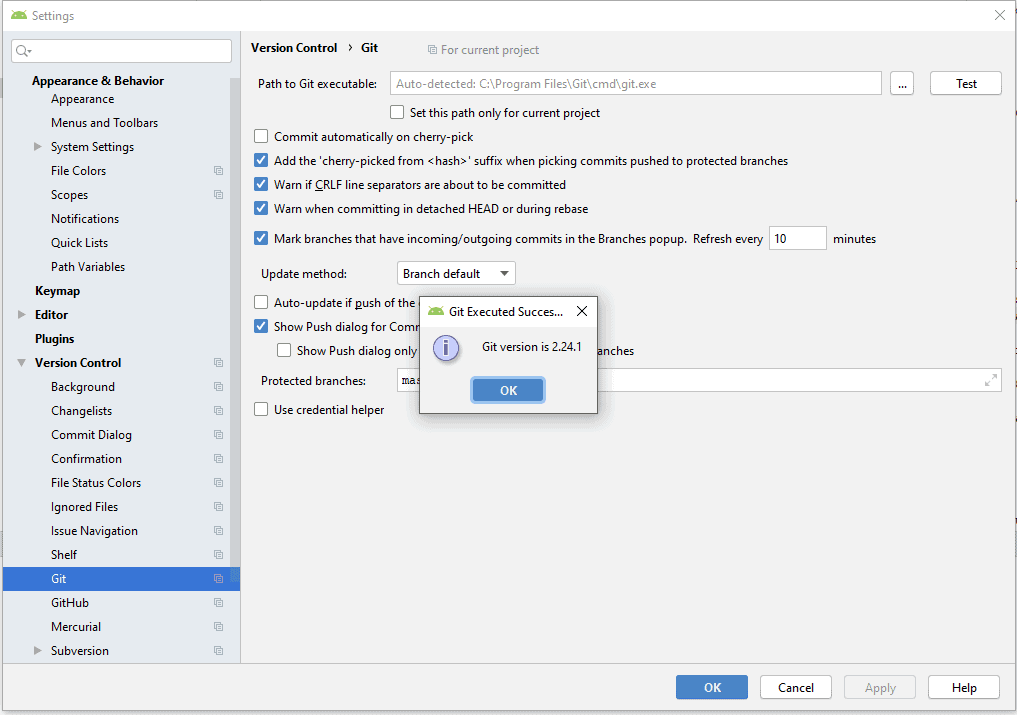
To verify that the path to the Git is correct, select the “Test” button to the right of the “Path to the Git executable” field. If it is successful you should see the version of Git pop up, if it fails correct the Git path and select the “Test” button again.
Select the “OK” button to close the settings screen.
Now that you have setup Android Studio so that it can access Git, you can proceed to the next section of the tutorial below that will cover creating and contributing to a new Git repository.
How to Create and Contribute to a New Git Repository in Android Studio
In this section of the tutorial, I will show you how to create a new Git repository and contribute code changes to this Git repository inside Android Studio. After this I will show you how to create a repository in GitHub and how to push code changes into the GitHub repository using Android Studio.
Step 1: Creating a Git Repository in Android Studio
In the first step in this section of the tutorial we will be creating a new Git repository in Android Studio. A Git repository is used to track the history of changes to files within your project.
Before we create a Git repository we will first need an Android Project. You can use an existing Android Project or create a new Android Project using by selecting the “File” menu, hovering over “New” and selecting “New Project” and following the wizard to create the project.
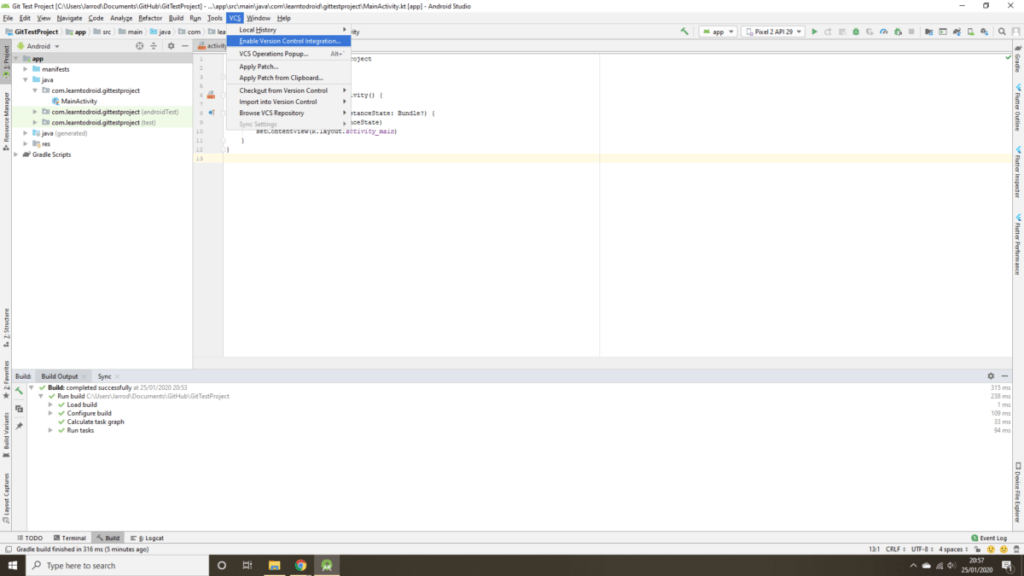
Once you have your Android Project open in Android Studio, select the “VCS” menu and click on the “Enable Version Control Integration…” menu item.
In the “Enable Version Control Integration” dialog, for the version control system select “Git” from the drop down list. Then select the “OK” button.
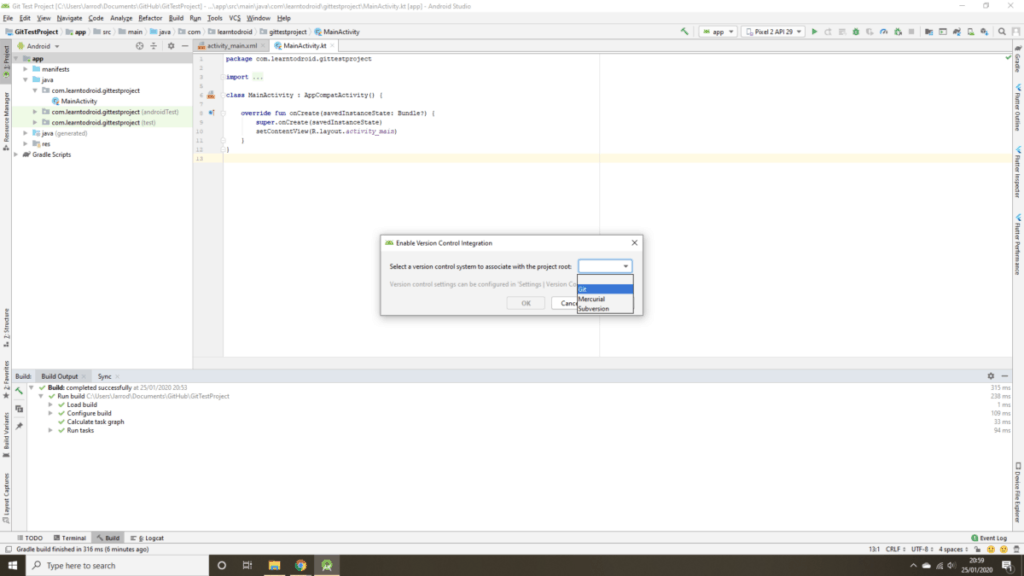
You have now successfully created your Git repository inside your Android Project.
Step 2: Contributing Changes to a Git Repository in Android Studio
Now that you have created the Git repository, next we will cover contributing code changes to your Git repository.
In this section we will be using Git to add files from our Android Project to our code repository so that they can be tracked. This will involve two steps, the first step we will make a “git add” command within Android Studio which will stage files in our Android Project to be added to the Git repository. Secondly we will use the “git commit” command to lock in the “git add” command by creating a snapshot in the Git repository of the change made.
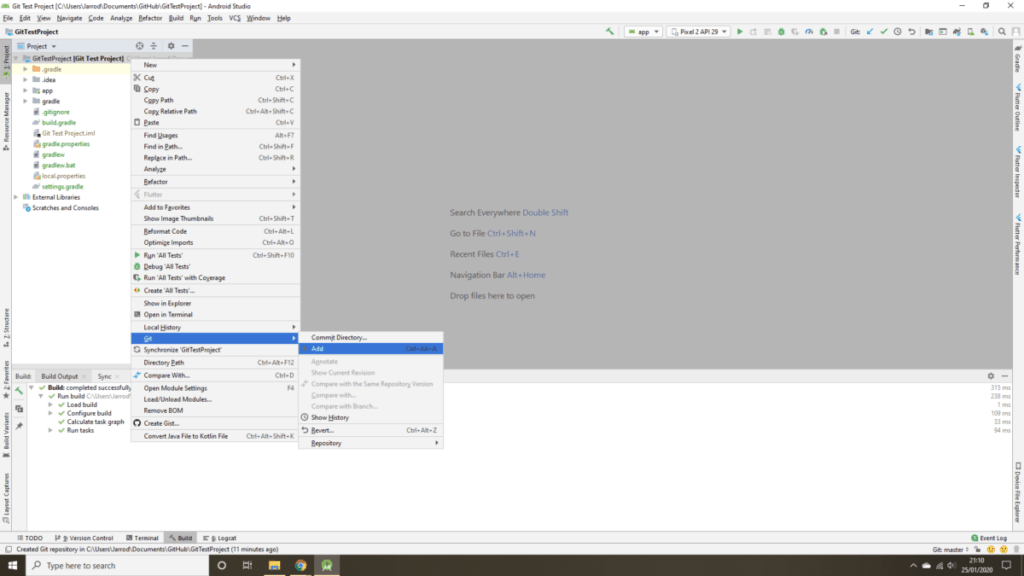
To add files from your Android Project into to the Git repository you first need to get into the Project View in Android Studio. In the left side bar, select “Project view” from the drop down list.
Next right click on the Android Project name, hover over the “Git” menu item and click the “Add” menu item.
Next we will commit these added files to the Git repository.
In Git a commit is used to group together a series of changes made to a repository such as adding, removing or modifying files and taking a snapshot of the changes made into an entry in repository. Commits in Git require a commit message describing the change that is being made.
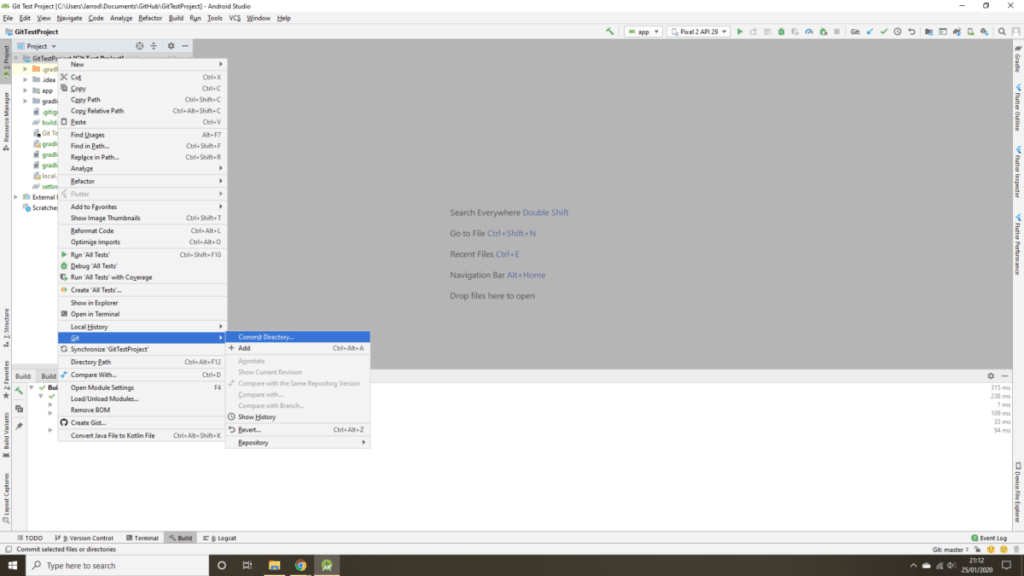
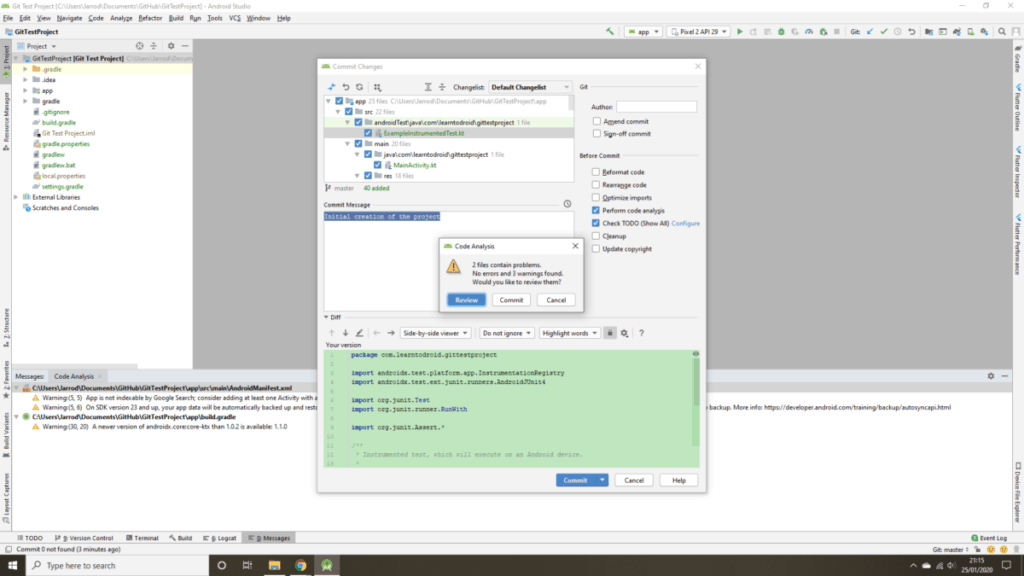
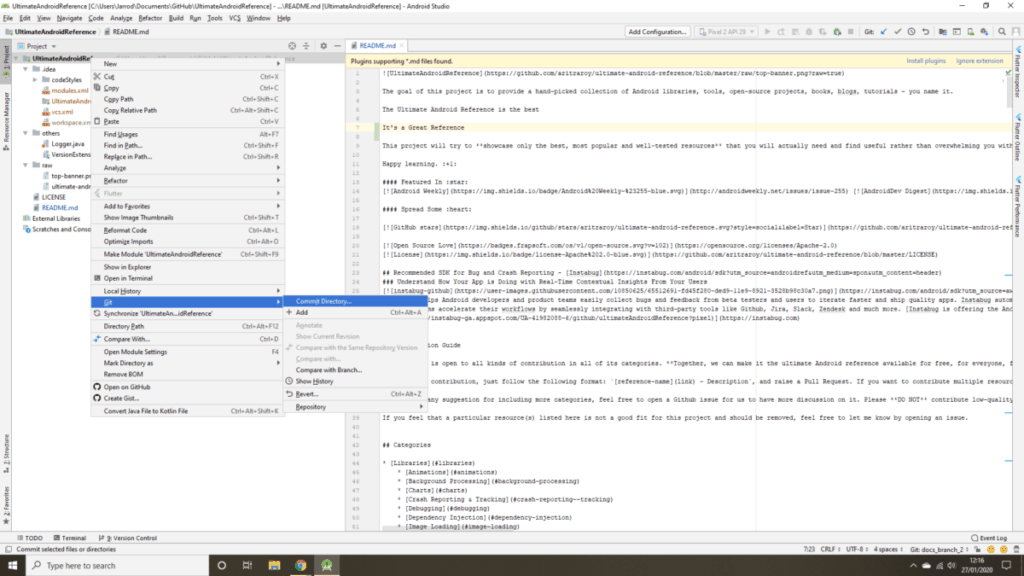
To commit these files that have been added using Android Studio, right click on the Android Project name, hover over the “Git” menu item and click the “Commit Directory…” menu item.
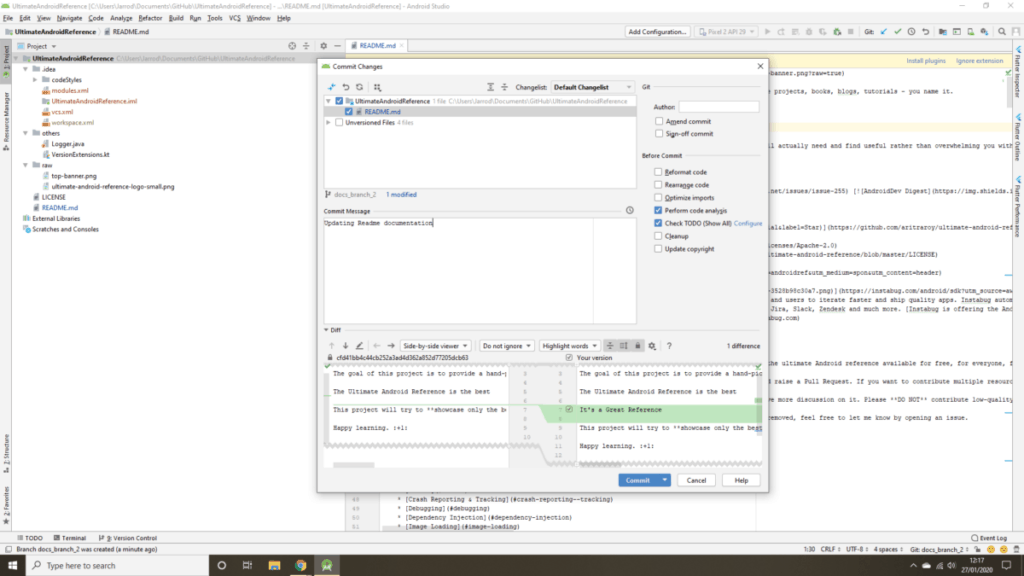
Next we are presented with a pop up showing the changes that are going to be committed to the Git repository.
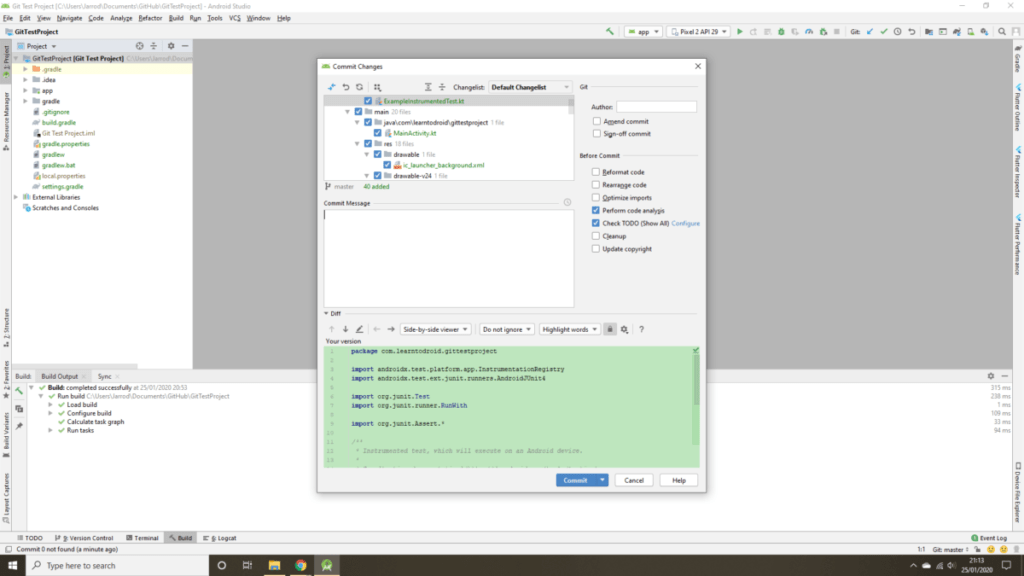
Enter a “Commit Message” describing the change being made and select the “Commit” button.

Before Android Studio will start the commit transaction, it will do some form of code inspection which may result in some warnings or errors found. A “Code Analysis” dialog will appear after Android Studio has finished inspected the code which may show warnings and errors. If there are no errors, select “Commit”, otherwise correct the errors and retry the commit by repeating these steps.
To see that the commit has been successfully made, in the bottom section of Android Studio, select “Version Control” and select “Log” to review your commit transaction.
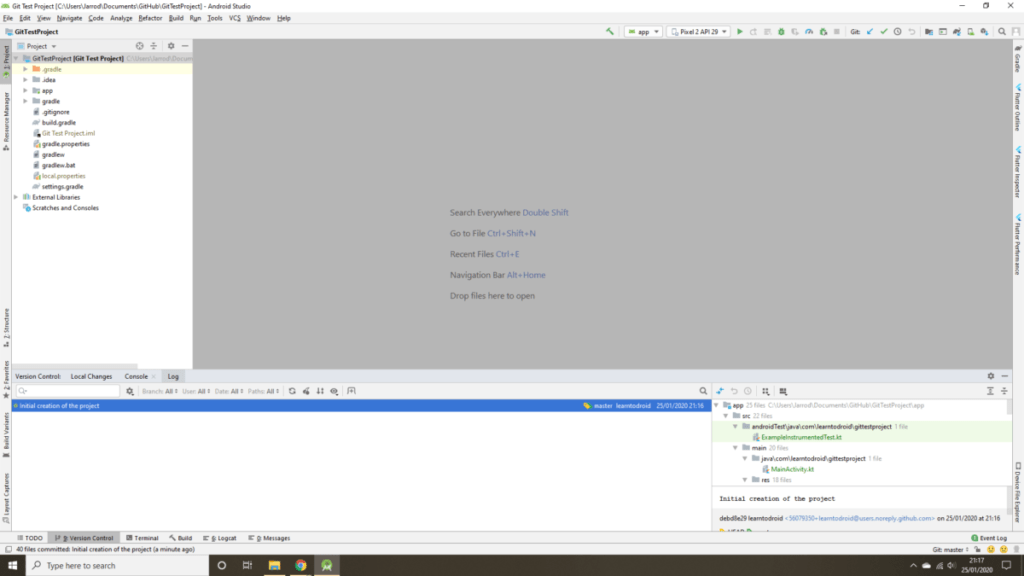
You have successfully created a snapshot in your local Git repository containing the files of your Android Project that you have added.
Step 3: Creating a GitHub Repository
In this section of the tutorial we will be creating a GitHub repository to enable us to share code with other developers and access our code base over the internet.
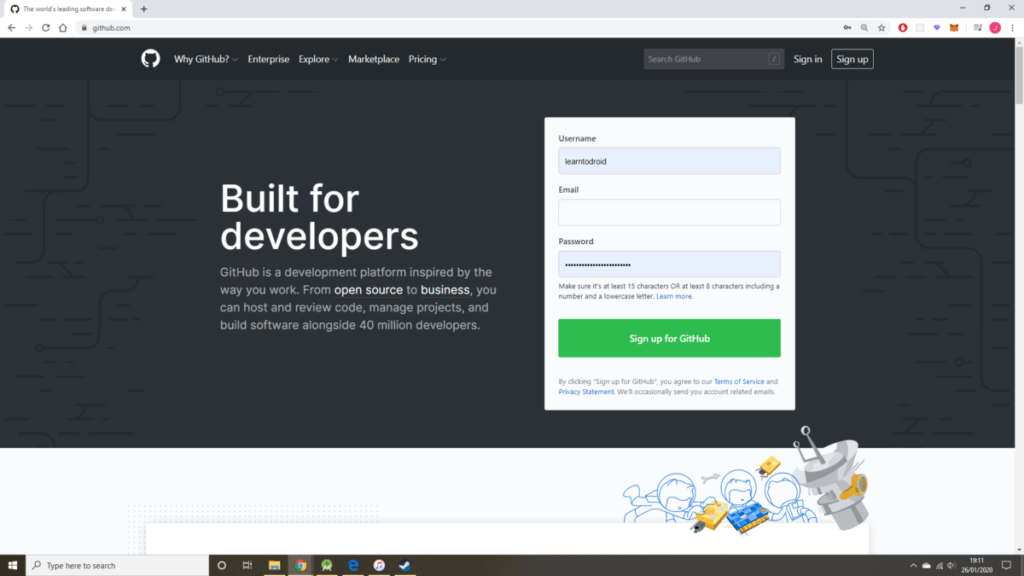
First navigate to Github.com in your web browser to create a new GitHub account if you don’t already have one or log in to your existing GitHub account.
After logging in, select the “+” drop down list in the upper right section of the screen and select “New repository”.
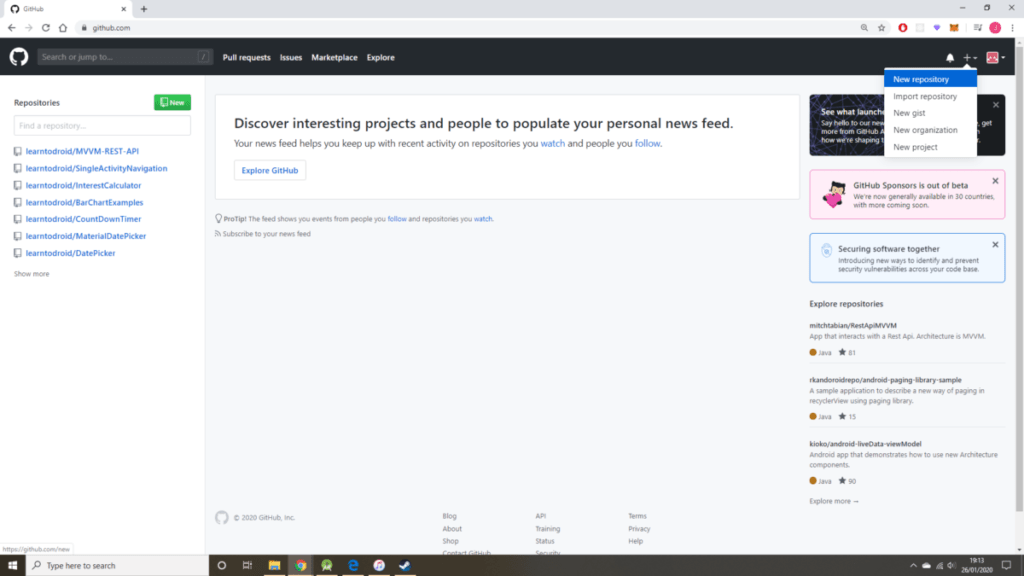
Now you will be presented with the screen used to create a new GitHub repository.
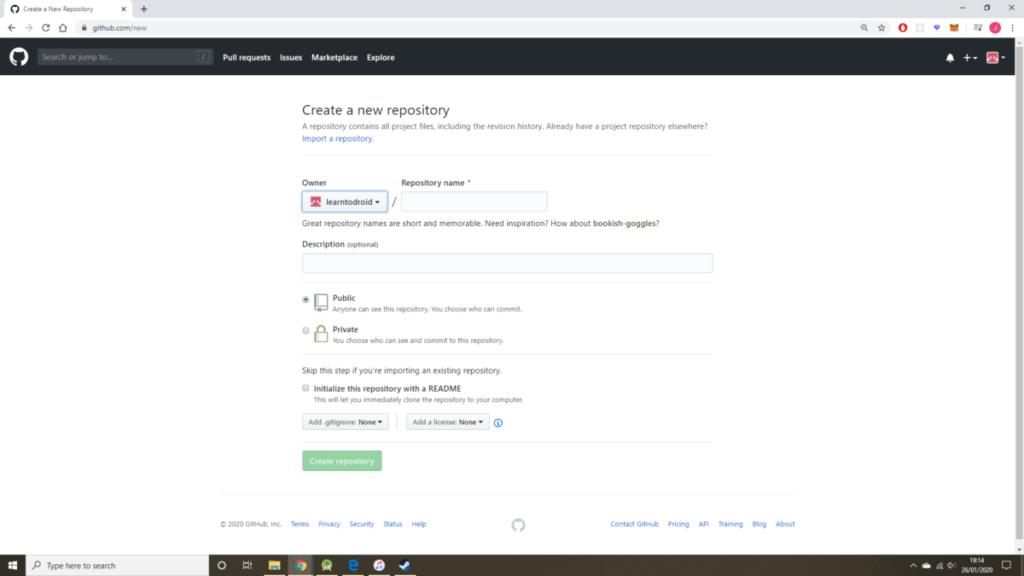
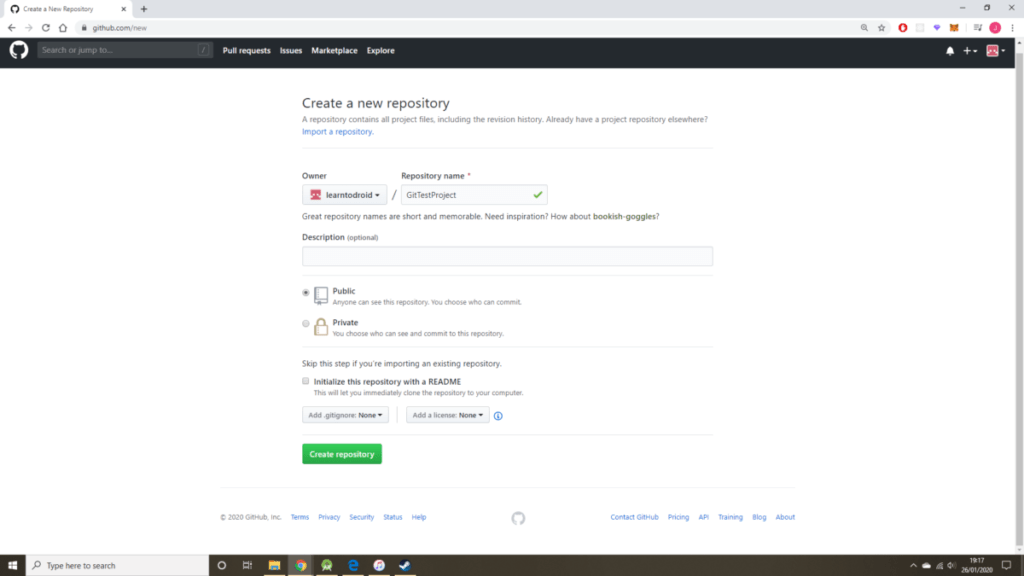
You will need to enter a name for your code repository.
Your code repository can be set to public or private. Public is open to everybody to access, private will allow you to control which users of GitHub are able to access your code repository.
You can enter a description for your GitHub repository but this is optional, this will be displayed when users look up your repository on GitHub.com
It is also optional to define the README file for your GitHub repository upfront, which is used for documentation that can be styled with a markup language and shown on GitHub.com
You are able to select a predefined .gitignore file if you wish. These .gitignore files are created by the GitHub team for different programming languages and they allow you to specific the names of files, names of directories or file extensions that you don’t want to be tracked in your GitHub repository.
You can also optionally select a license for your GitHub repository, so that it is clear to developers reading your project what restrictions are placed on them for using your code.
Once you have completed the form select “Create repository”.
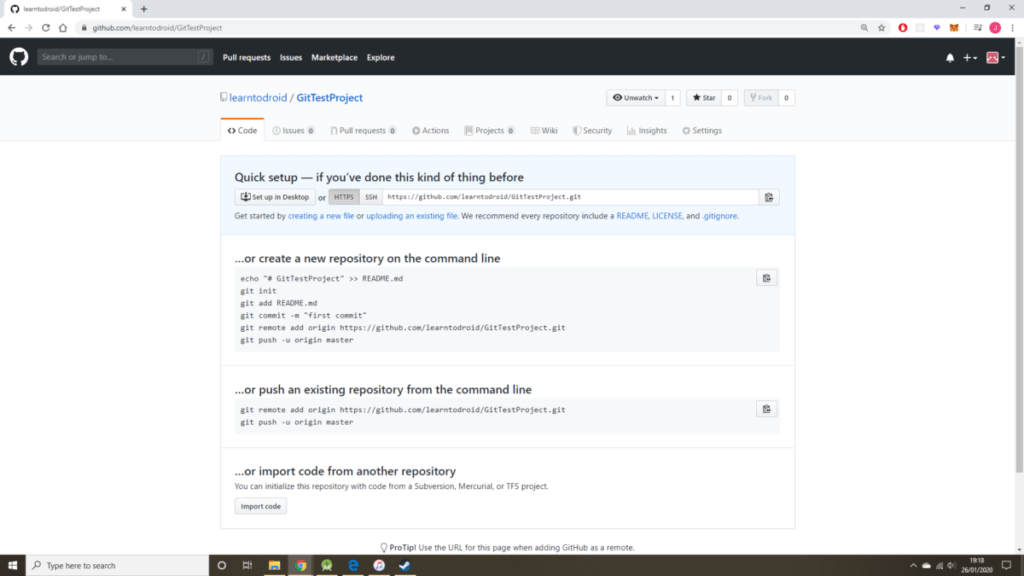
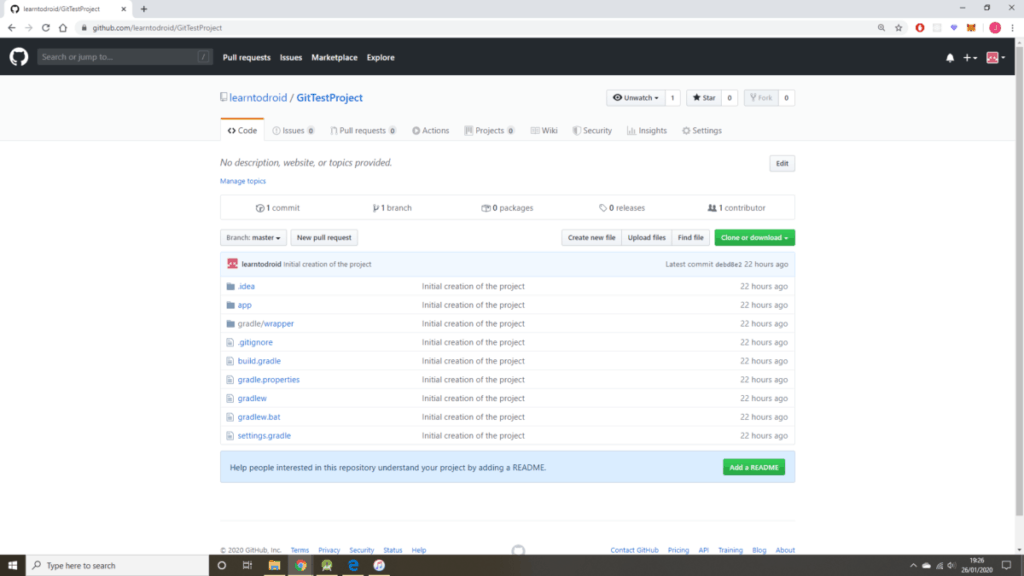
Now you see that your new GitHub repository has been created. If like me you didn’t choose to enter or provide a .gitignore file, license or README file you will see an empty repository as per the screenshot below.
Step 4: Push Code Changes to a GitHub Repository from Android Studio
In this section we will use Android Studio to push the changes made in our local Git repository into the GitHub repository that was created in step 3.
If we were to do this via the command line we would use a “git push” command. “git push” allows us to publish our local changes to a central repository.
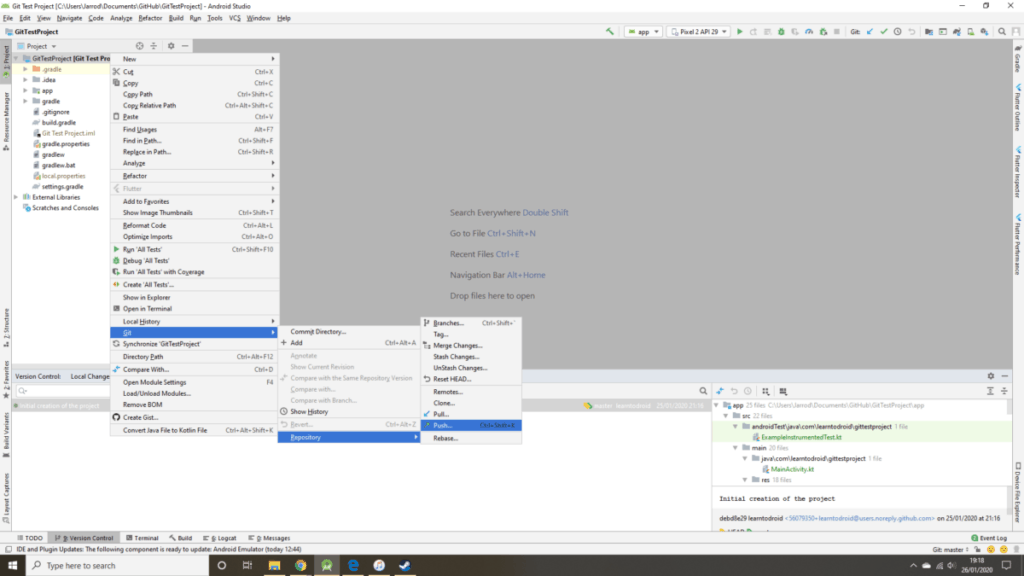
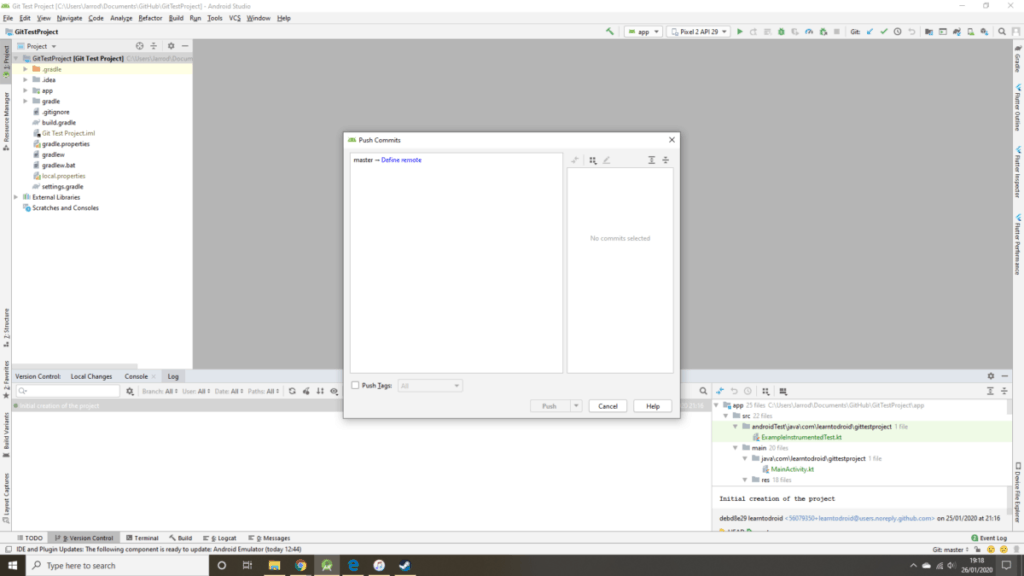
To push our local changes to our GitHub repository using Android Studio, first right click on the Project, hover over the “Git” menu item, hover over “Repository” and select “Push”.
You will be presented with a pop up screen with the title “Push Commits”. Click on “Define remote”.
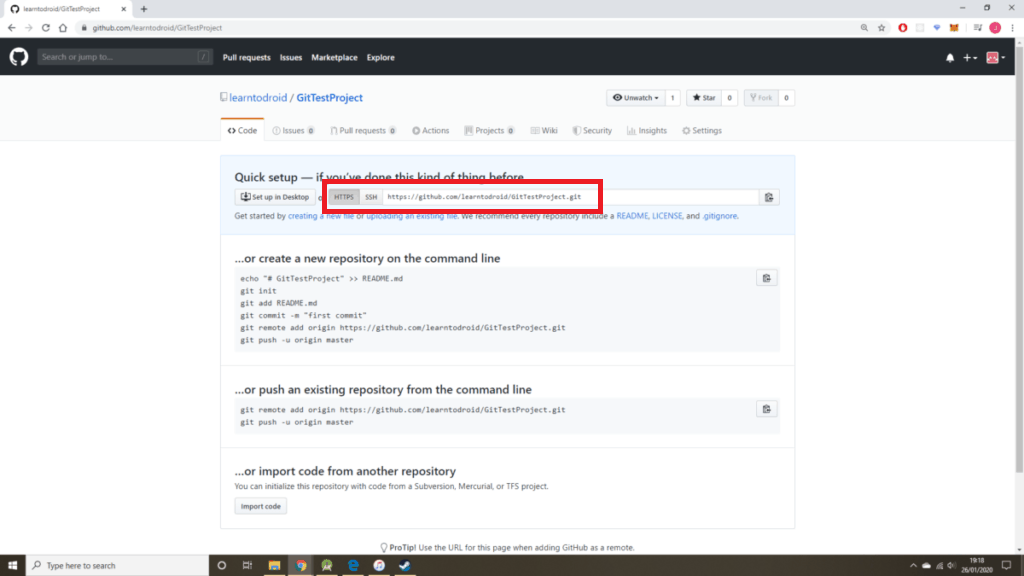
Open your GitHub repository in your web browser and copy the repository URL (ending in .git) in the section highlighted by the screenshot below.
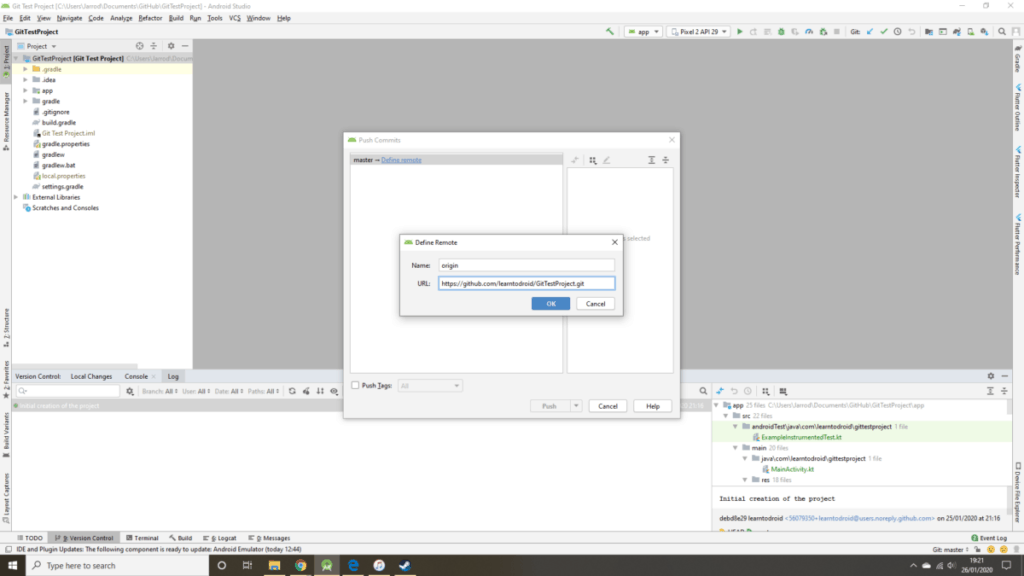
Enter this URL into the URL requested in the “Define Remote” pop up screen in Android Studio and press the “OK” button.
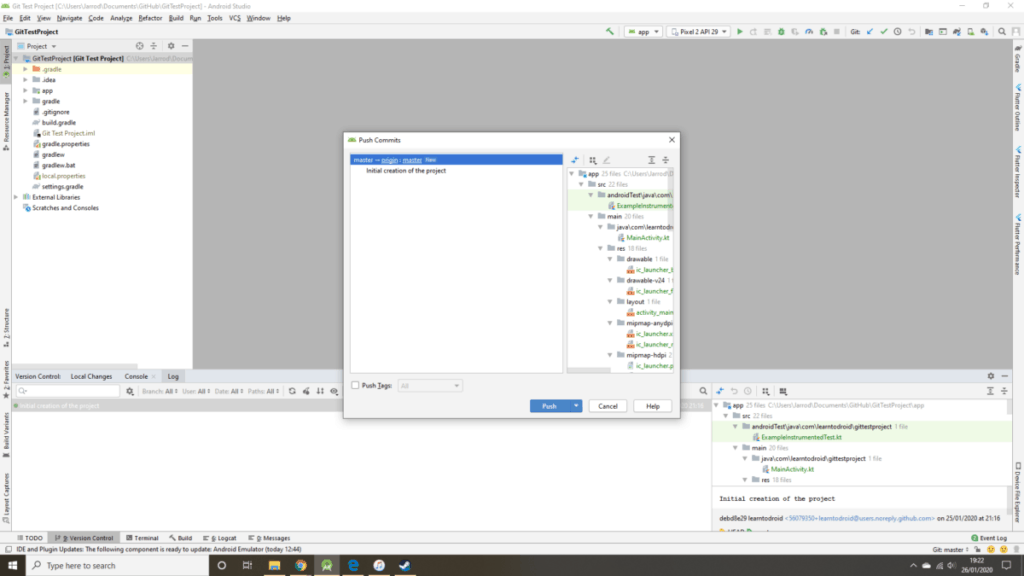
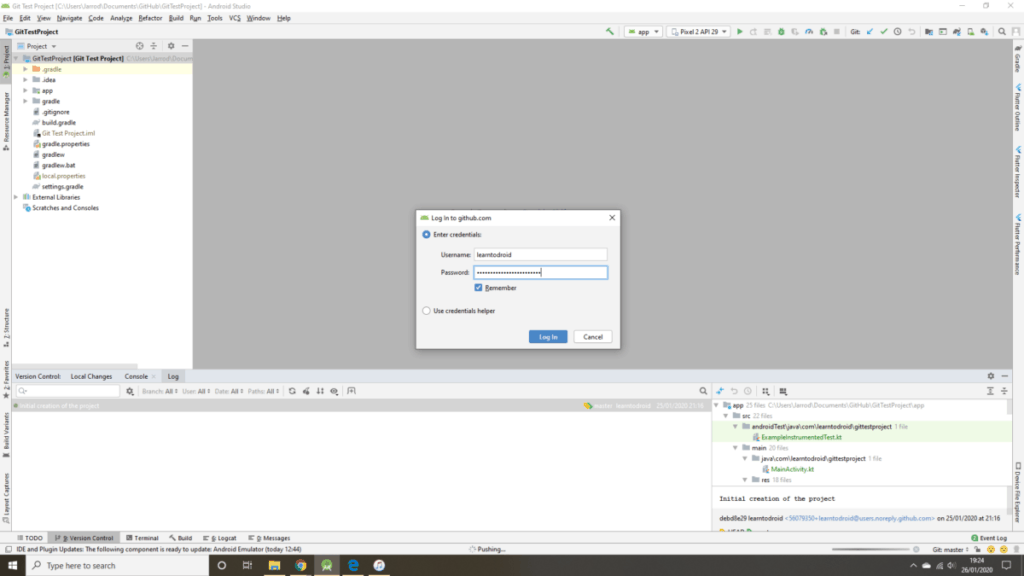
Once the URL has been successfully added select the “Push” button.
When prompted enter your GitHub user name and password credentials and select “Log In”.
If successful you will see a “Push successful” confirmation message in the bottom right corner of the screen.
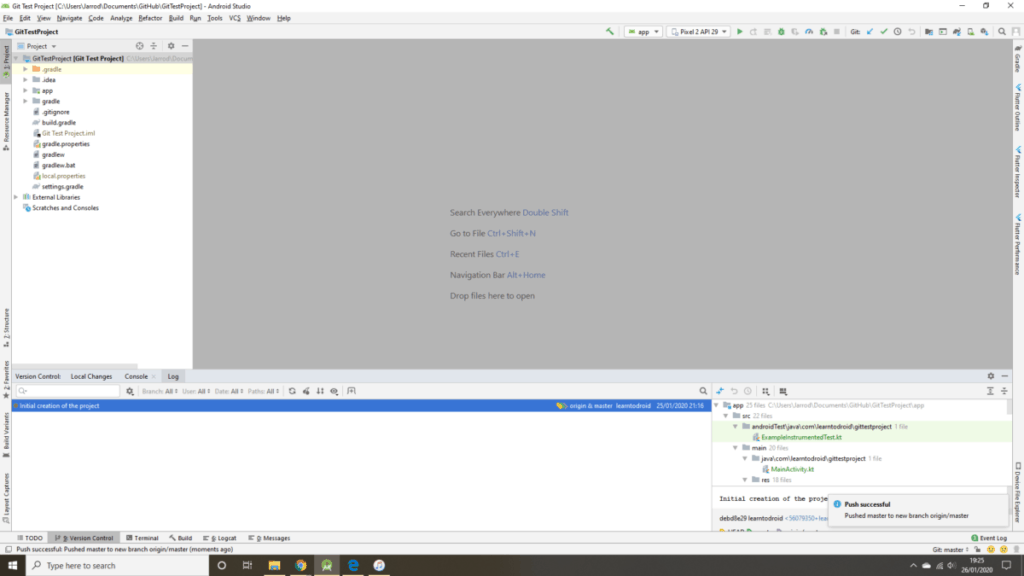
Next you can access your GitHub repository via the web browser and check that your code is available.
How to Contribute to an to Existing Git Repository in Android Studio
In this section of the tutorial we will go through how to make code contributions to an existing Git repository using Android Studio.
Step 1: Find or Create a Git Repository to Contribute to
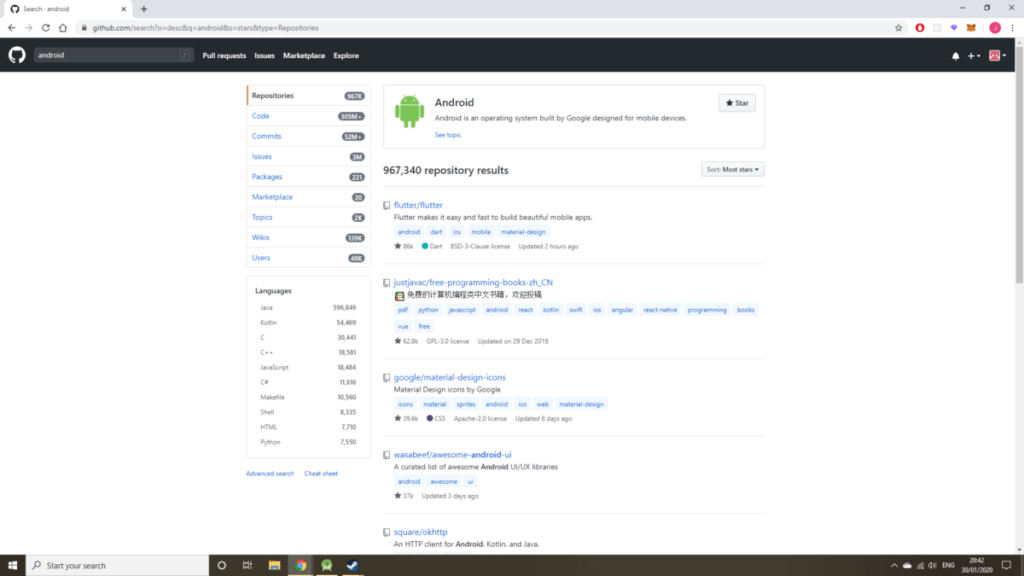
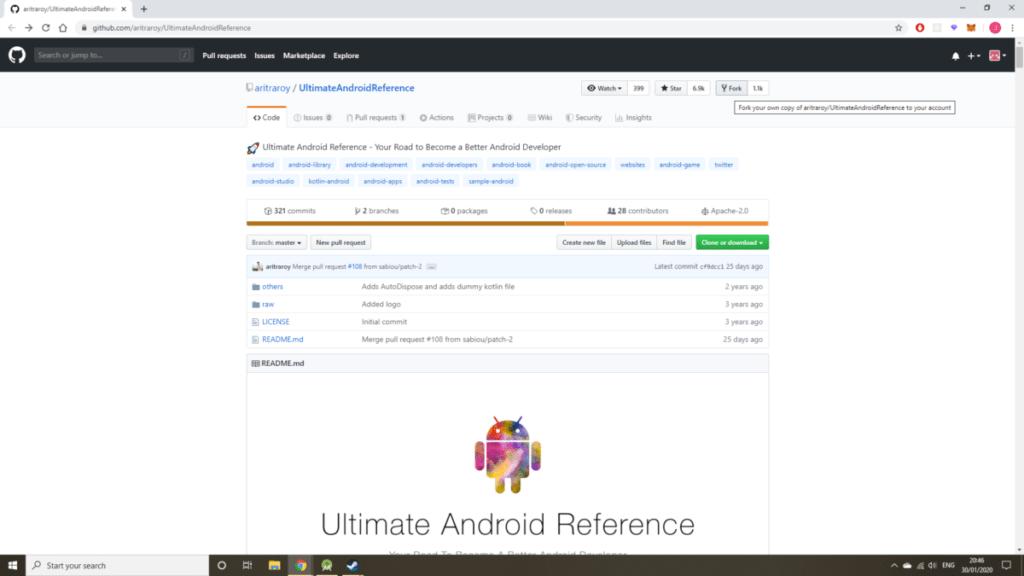
The first step of this process is to have a Git repository you wish to contribute to. If you don’t have a repository already, what I have done for this section of the tutorial is to search for a code repository on GitHub that relates to Android using GitHub’s explorer. GitHub allows you to search for repositories by topics or keywords and it allows you to sort the results by most stars, recently updated and much more.
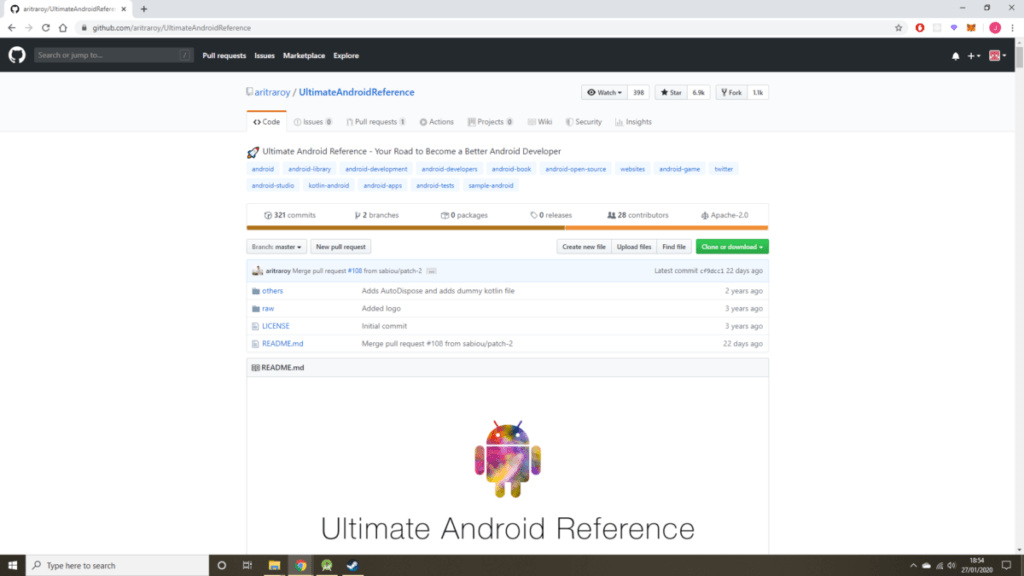
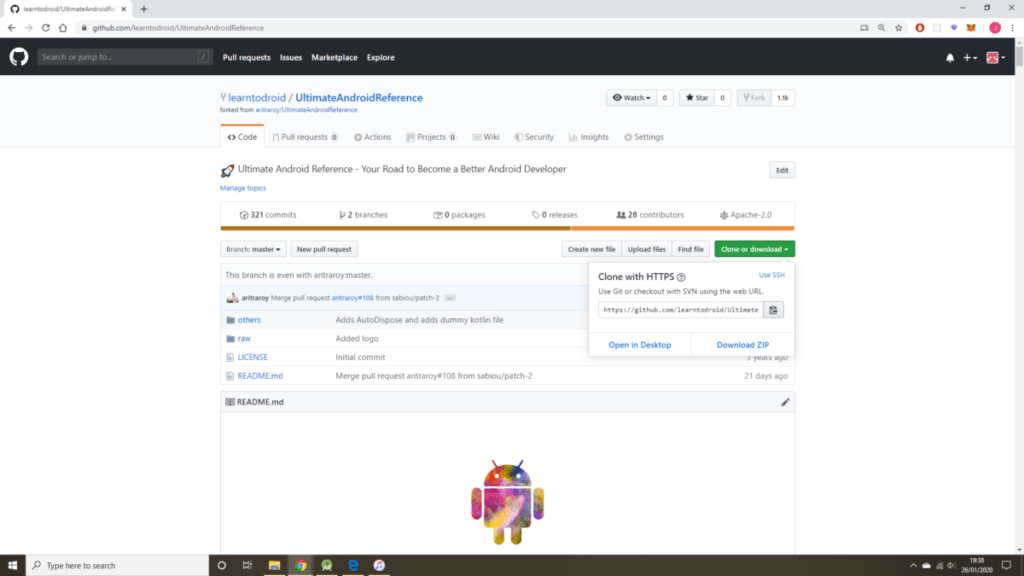
I ended up deciding on the GitHub repository Ultimate Android Reference by Aritra Roy which contains handy links to useful Android libraries that you can make use of when developing your Android Projects.
In order to take a copy of this repository so that I can make further changes to it at my own leisure I will need to fork the GitHub repository by selecting the “Fork” button.
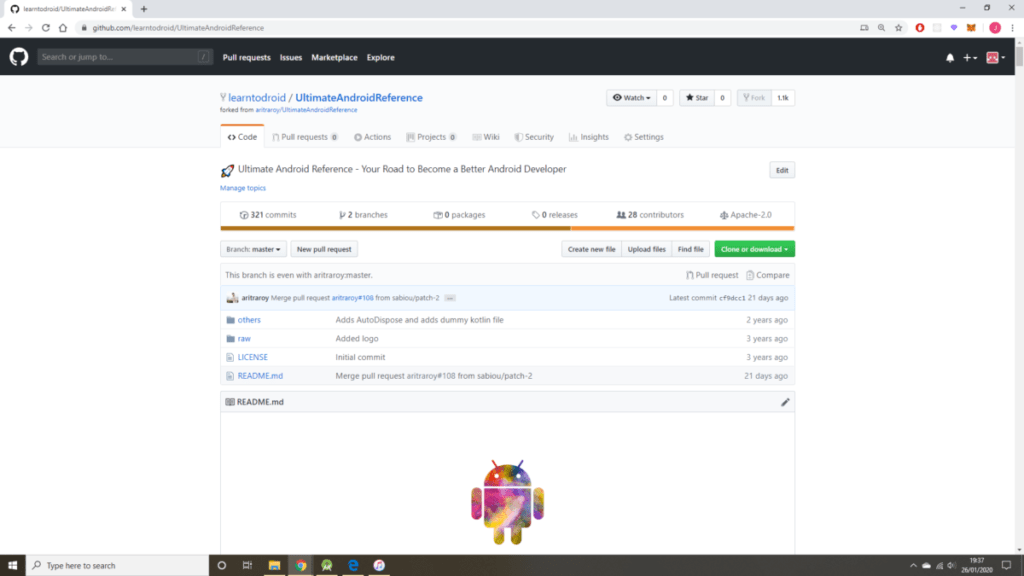
Once you have forked the GitHub repository you will see a copy of the repository has been generated against your user profile in GitHub which in my case is located at the link below.
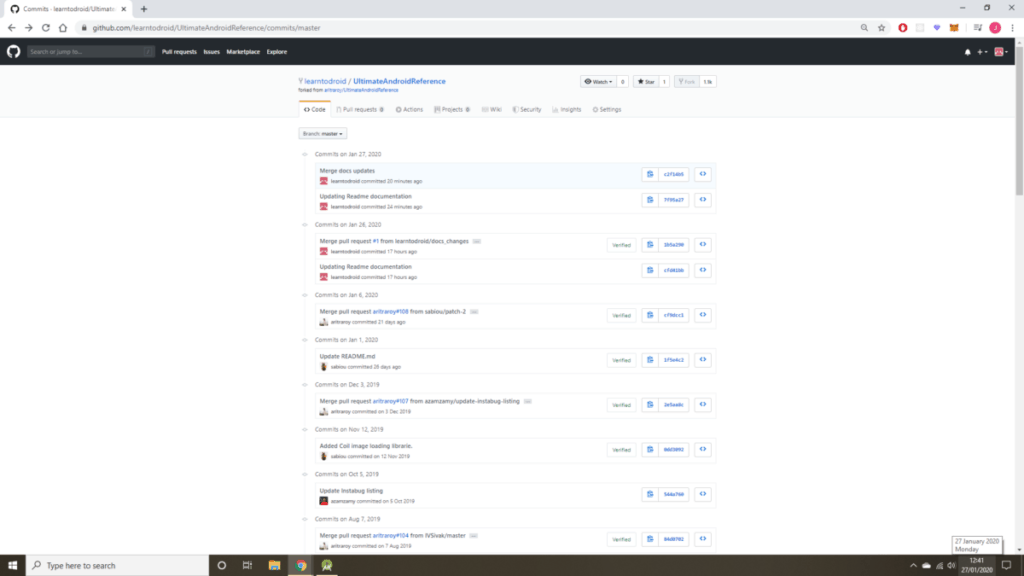
https://github.com/learntodroid/UltimateAndroidReference
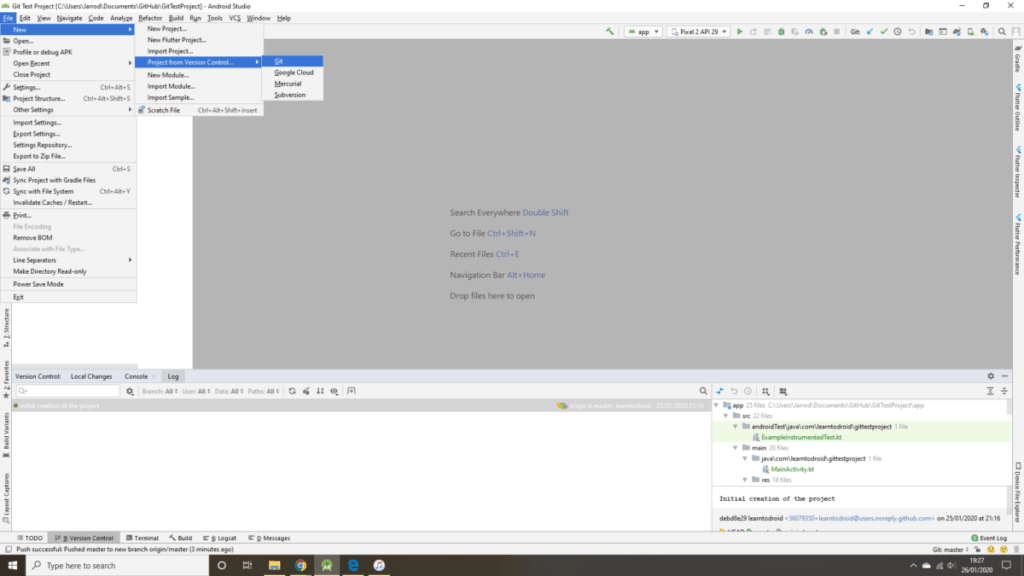
Step 2: Clone the Git Repository Using Android Studio
Next before we can make contributions to the Git repository we will need to clone the repository using Android Studio.
To create a new project in Android Studio containing the code from the GitHub repository, select the “File” menu, hover over “New”, hover over “Project from Version Control…” and click “Git”.
You will be presented with a “Clone Repository” pop up screen asking for the URL of your Git repository to clone from.
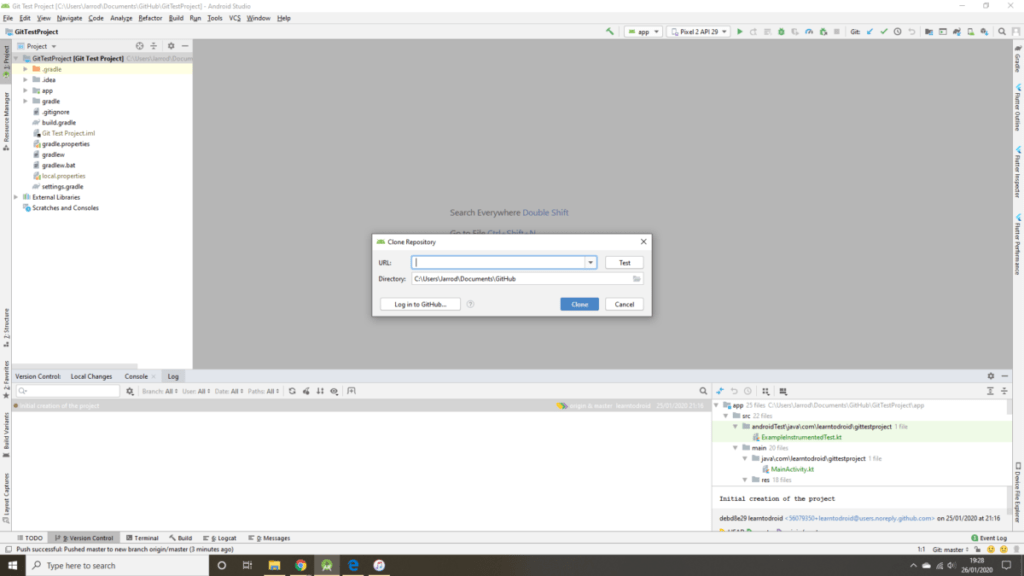
To get the URL for your GitHub repository, open the GitHub repository you want to clone inside the web browser.
Select the “Clone or download” button and copy the GitHub repository URL.
Paste the GitHub repository URL into the “Clone Repository” popup and select the “Clone” button.
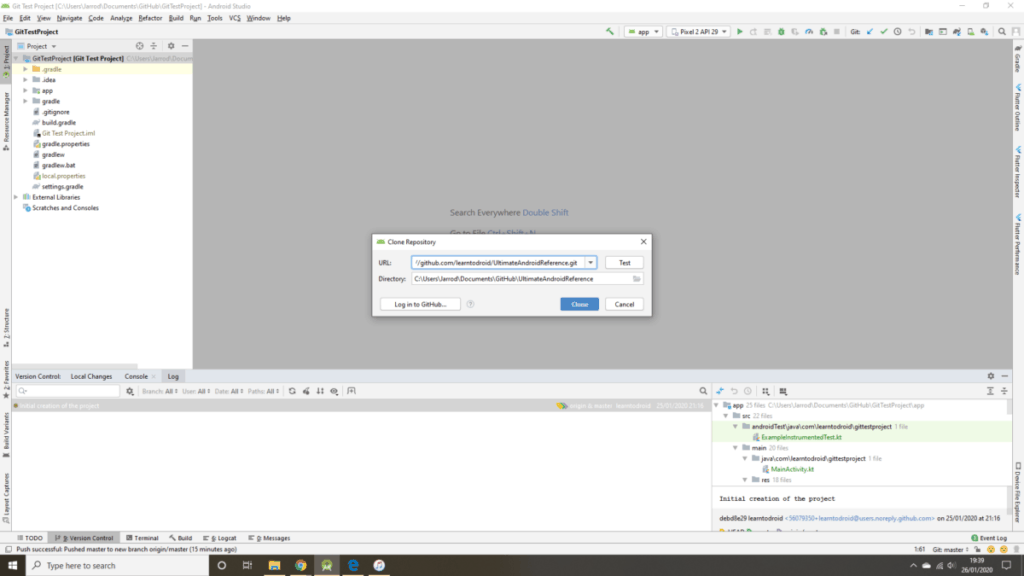
Now you will see the code from the code repository available inside your Android Project in Android Studio.
Step 3: Make Code Changes on a New Branch Using Android Studio
In this section we will describe how to use Git branches in Android Studio for contributing code changes. Code from these branches can then be merged with other branches easily. Branches allows developers to work independently on the same code base without causing disruption.
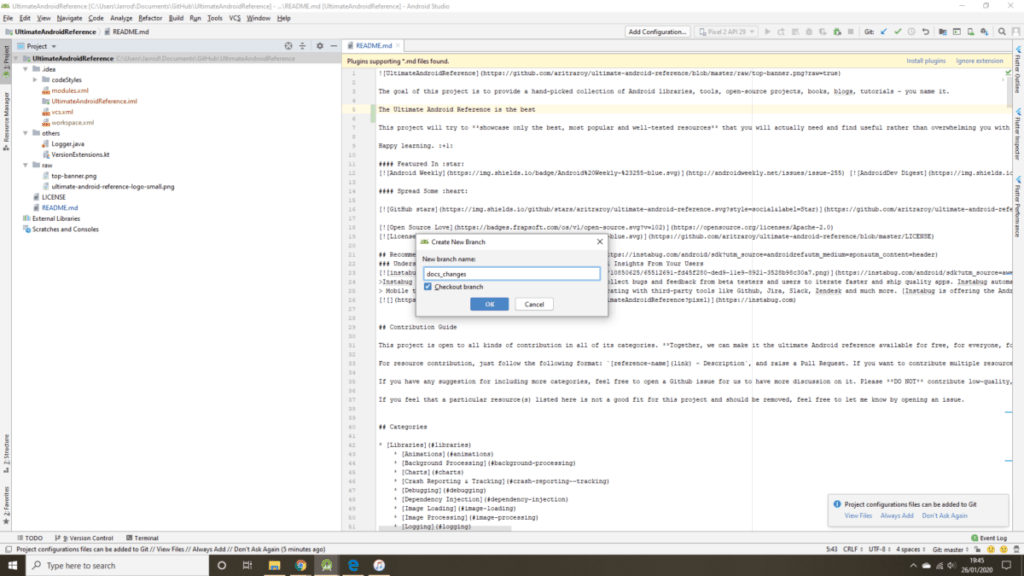
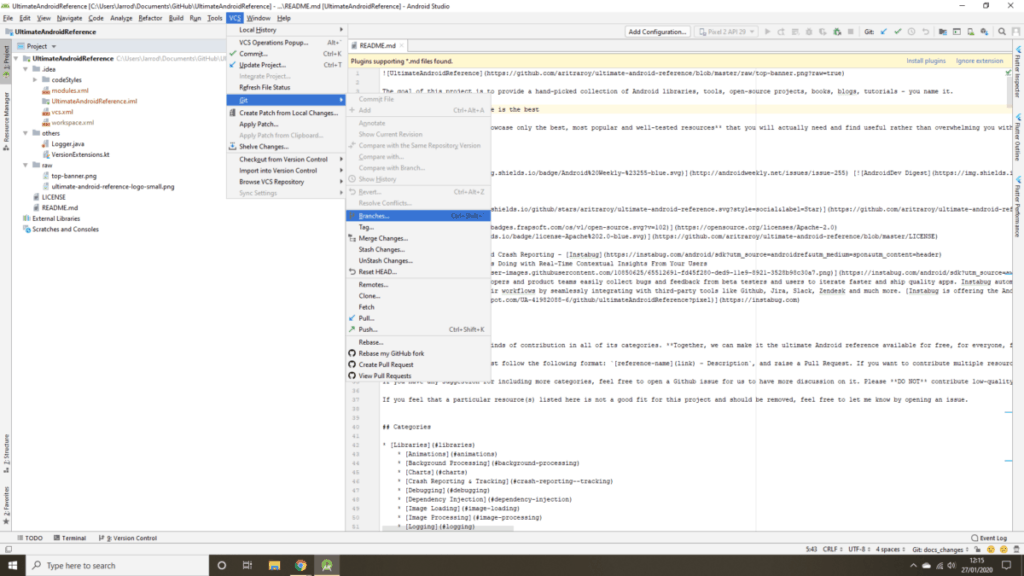
To get started we will create a new branch using Android Studio, select the “VCS” menu, hover over “Git” and select “Branches…”.
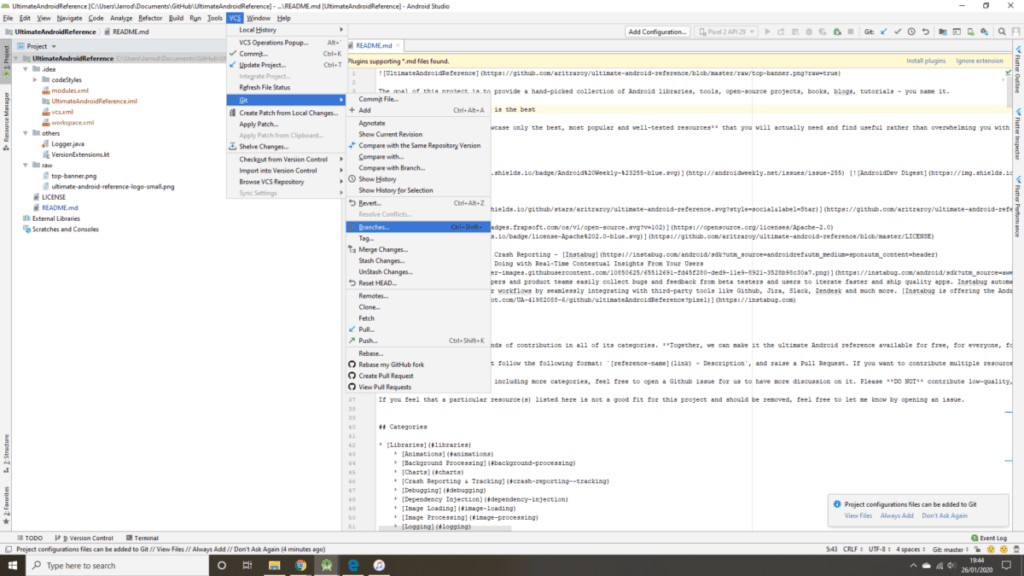
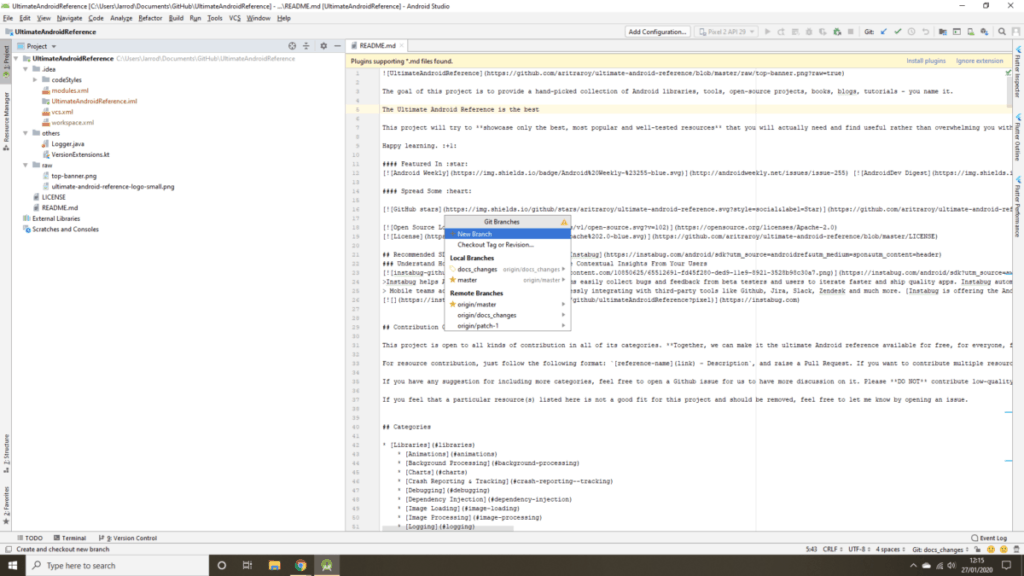
From the pop up list select “New Branch”.

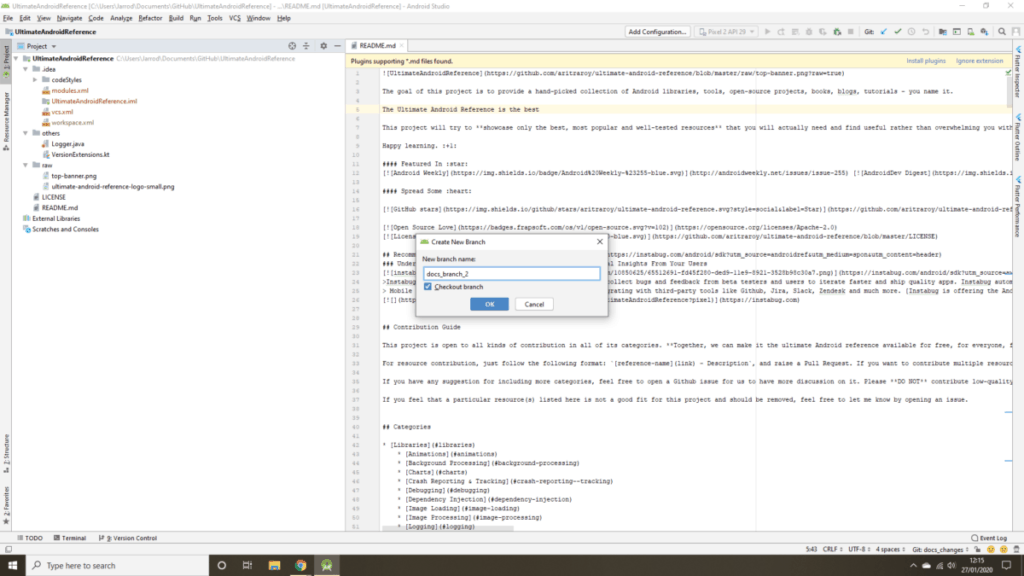
Enter a name for this branch and select the “OK” button.
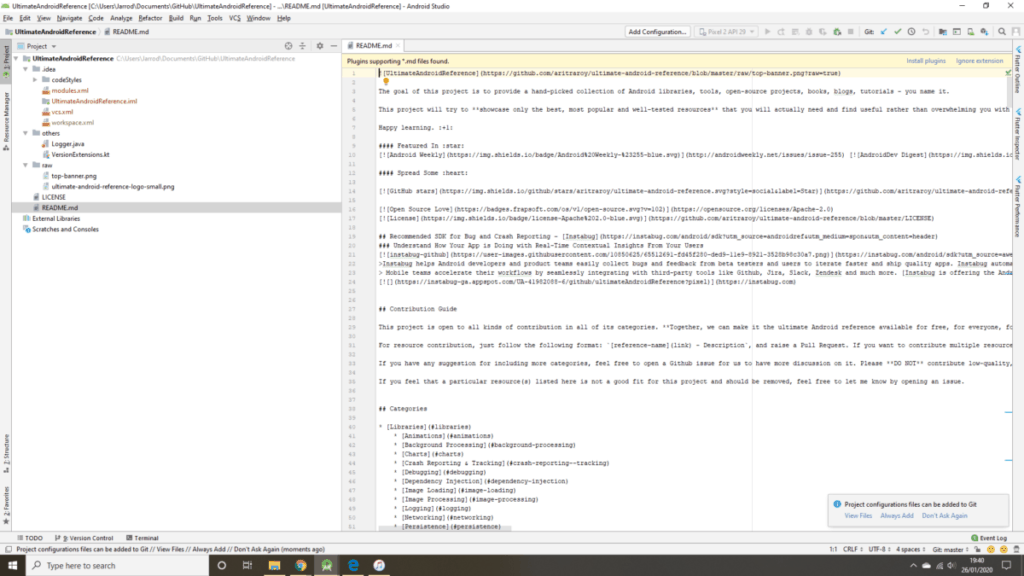
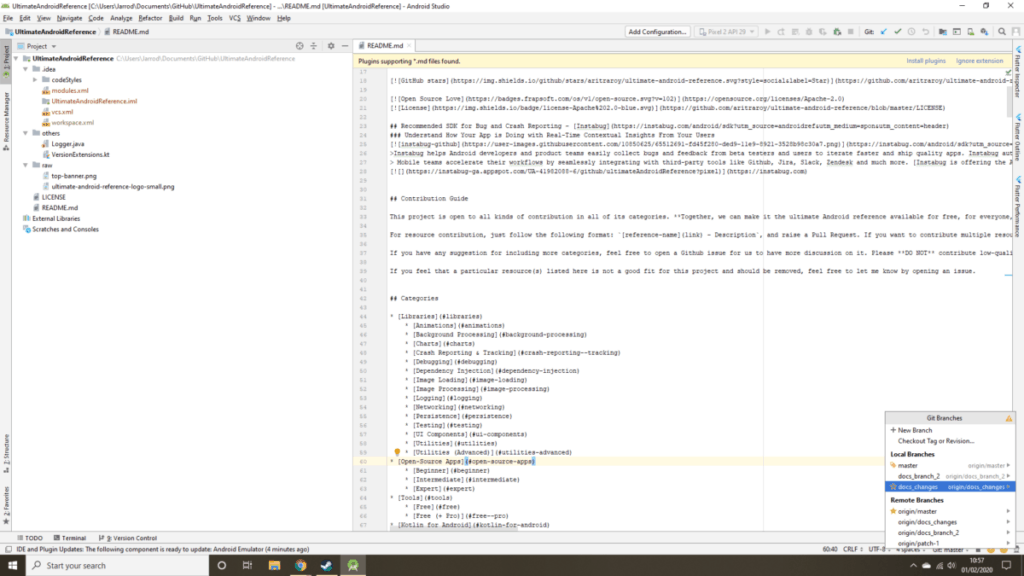
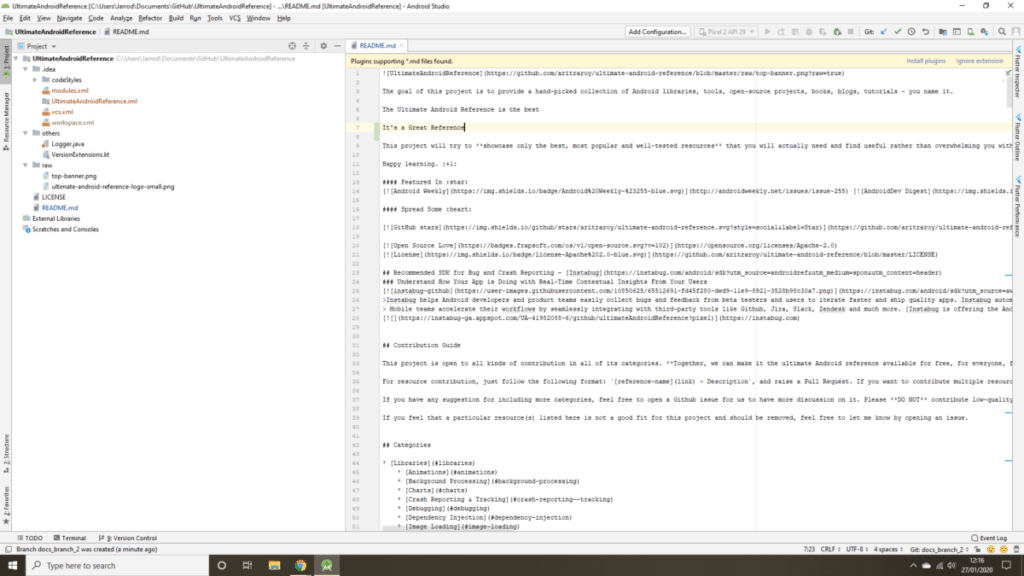
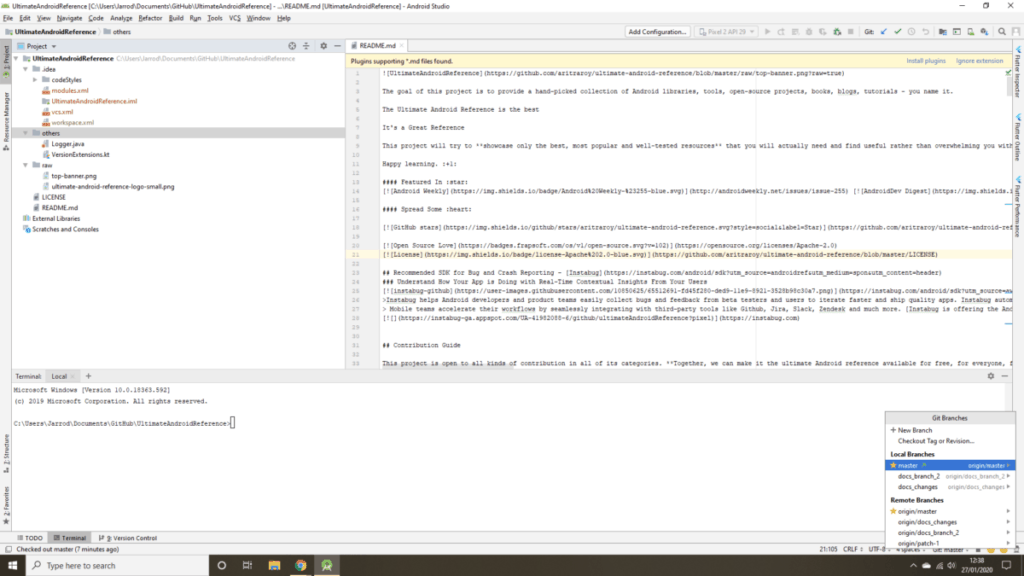
Next make sure you are on the new branch you have just created by checking the current branch name which is shown in bottom right section of the screen the right of the text “Git:”.
If it is “Git: master” or otherwise not the name of the branch you just created, left click on the current branch name and select your branch that you have created from the pop up screen.
Now that you are on the correct branch make a change to your code, what I did has add a line to the README file saying “The Ultimate Android Reference is the best”.
We will commit this change to the current branch in Android Studio by right clicking on the project name, hovering over “Git” then selecting “Commit Directory…”.
Add a commit message then select the “Commit” button.

Step 4: Push Code Changes to GitHub Repository Android Studio
Next we will push the code changes on this new branch to the GitHub repository using Android Studio.
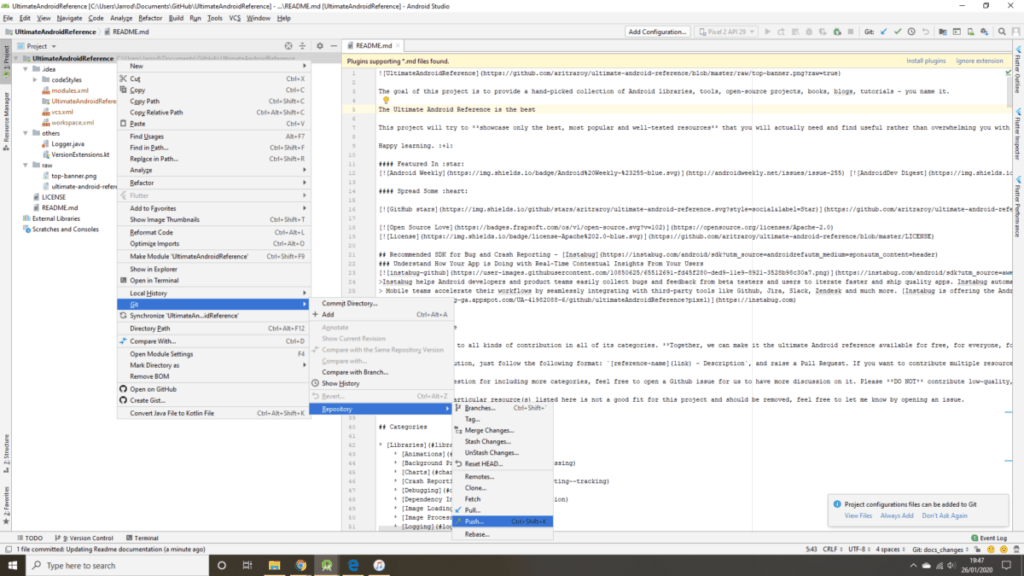
We will push these changes to the GitHub repository using Android Studio by right clicking on the project name, hovering over “Git”, hovering over “Repository” then selecting “Push”.
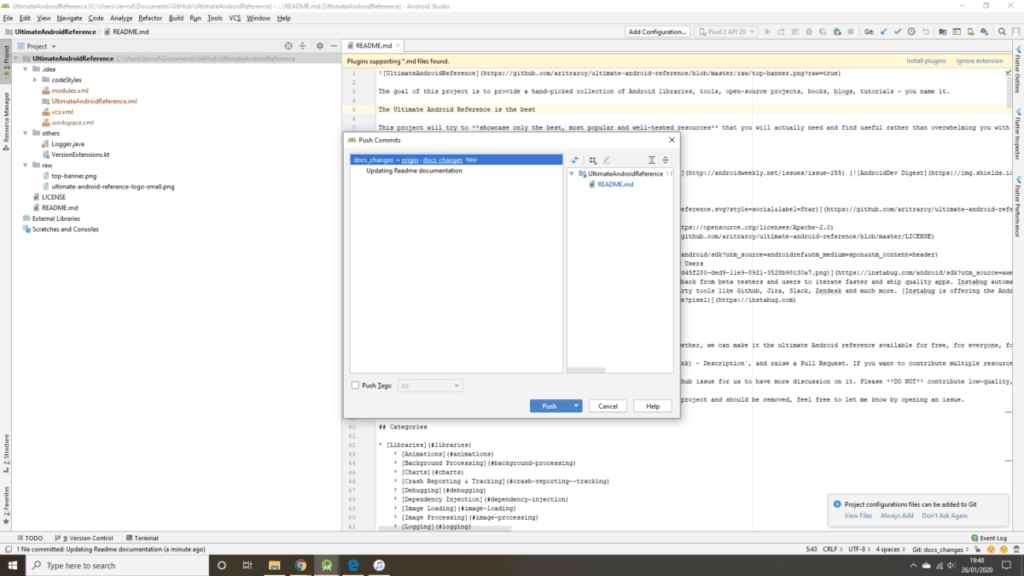
In the “Push Commits” pop up we will select the “Push” button.
Step 5: Using a Pull Request in GitHub to Perform the Code Merge
At this stage the changes on the new branch we are created are not merged in the master (also known as the main line) branch.
We will be using a pull request in GitHub to trigger the code merge from the new branch into the master branch. Pull requests are used widely in GitHub for the purposes of code reviews so that other developers can run their eyes over the changes before they get merged into the shared branches.
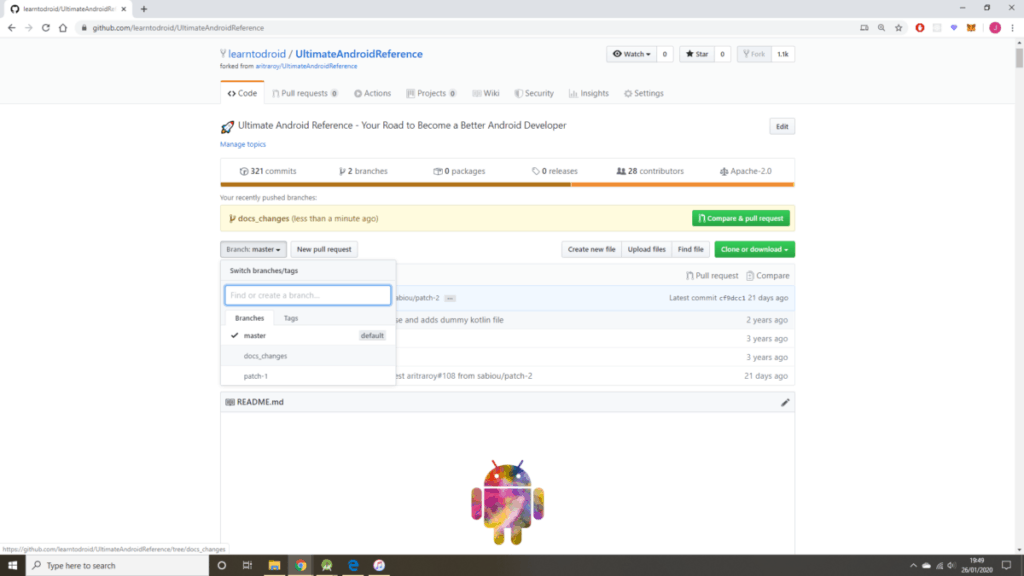
To raise a pull request in GitHub you first need to navigate to your GitHub repository in the web browser. You will need to be on your new branch in GitHub before in order to raise the pull request properly, you can do this by clicking the “Branch: master” button then selecting your new branch from the list of branches on your GitHub repository.
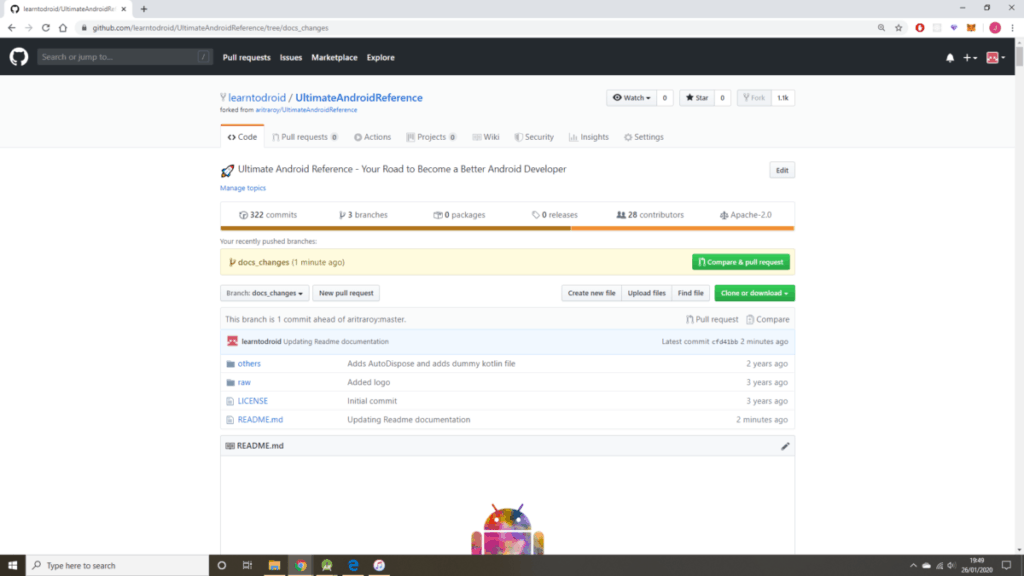
Once you are on your new branch, select the “New pull request” button.
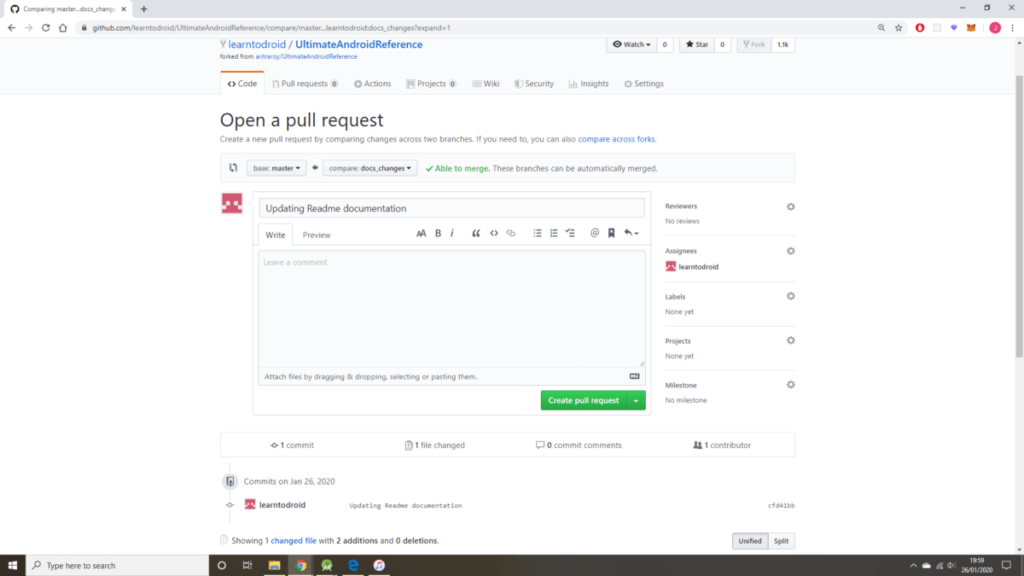
This will show the open pull request as per the screen shot below. If you have forked a repository, it will show the source repository as the base repository. Make sure the base repository is set to your repository and not the source repository.
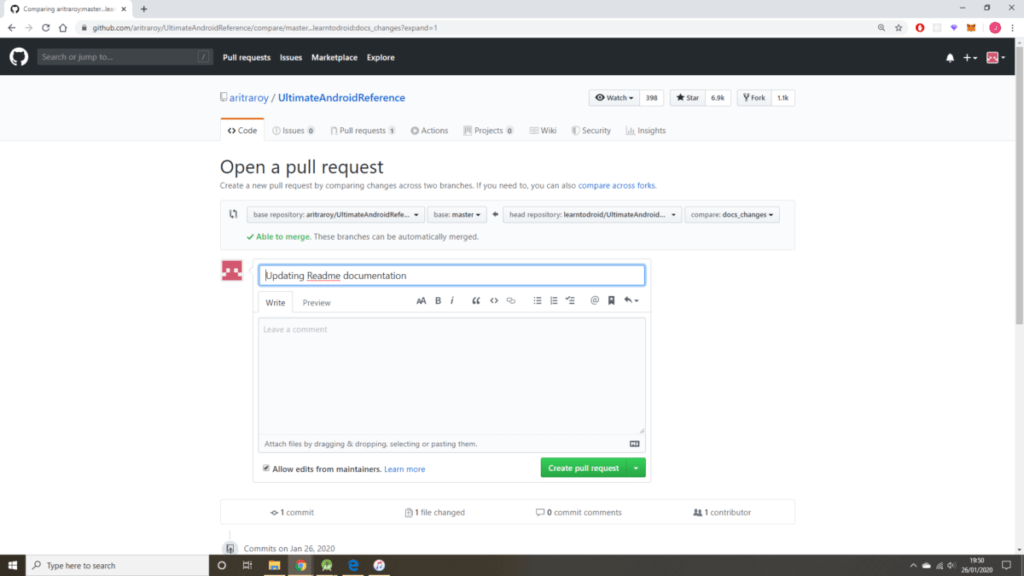
In the Assignee section, assign the pull request to yourself. Make sure the base branch is set to master and the compare branch is set to your new branch. Once this is done select the “Create pull request” button.
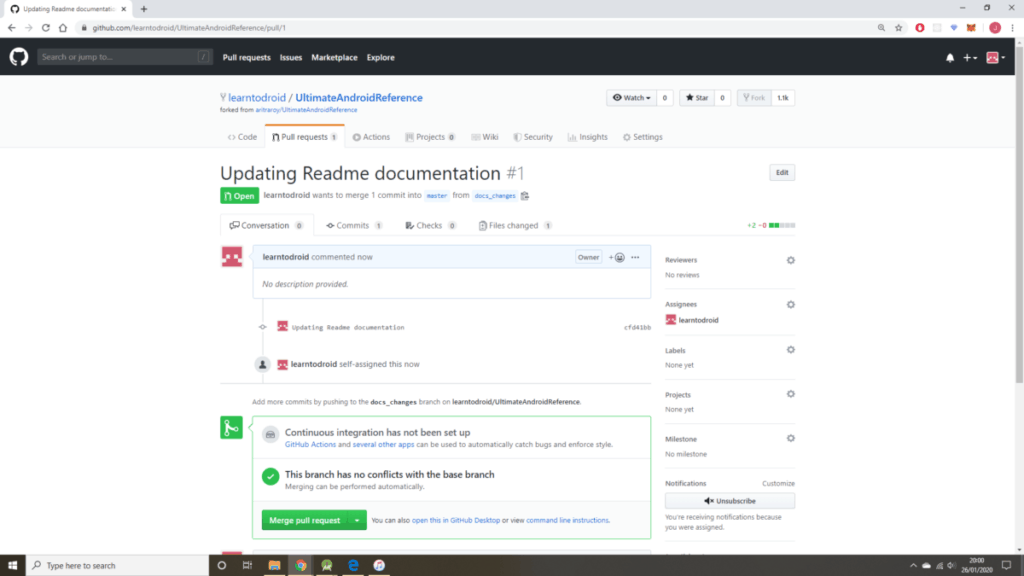
This will create the pull request and you will have the option to merge the pull request. Select the “Merge pull request” button.
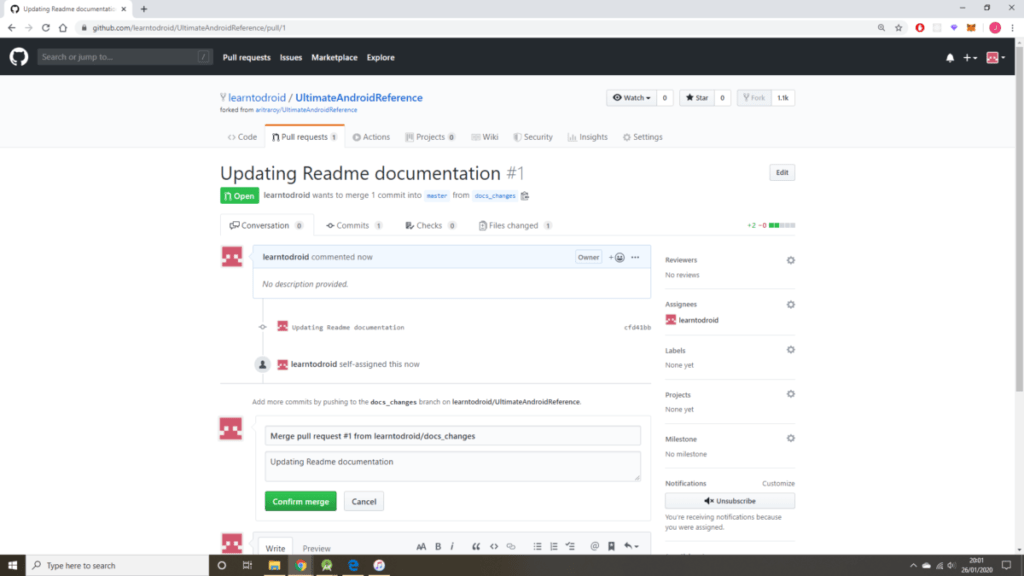
Select the “Confirm merge” button.
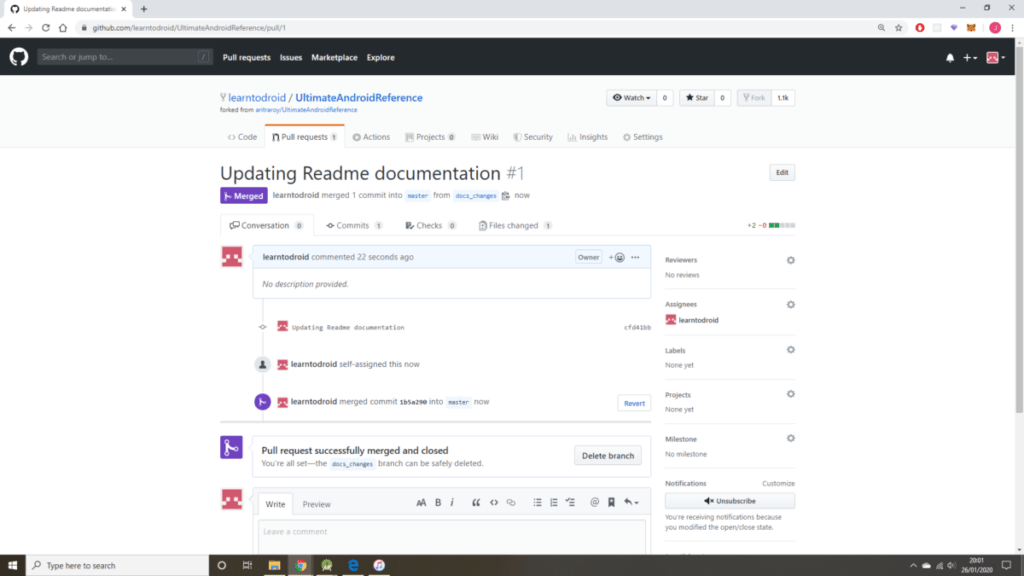
Then this will update the pull request as merged. You also have the option to delete the branch you previously created if you won’t be using it more by selecting the “Delete branch” button.
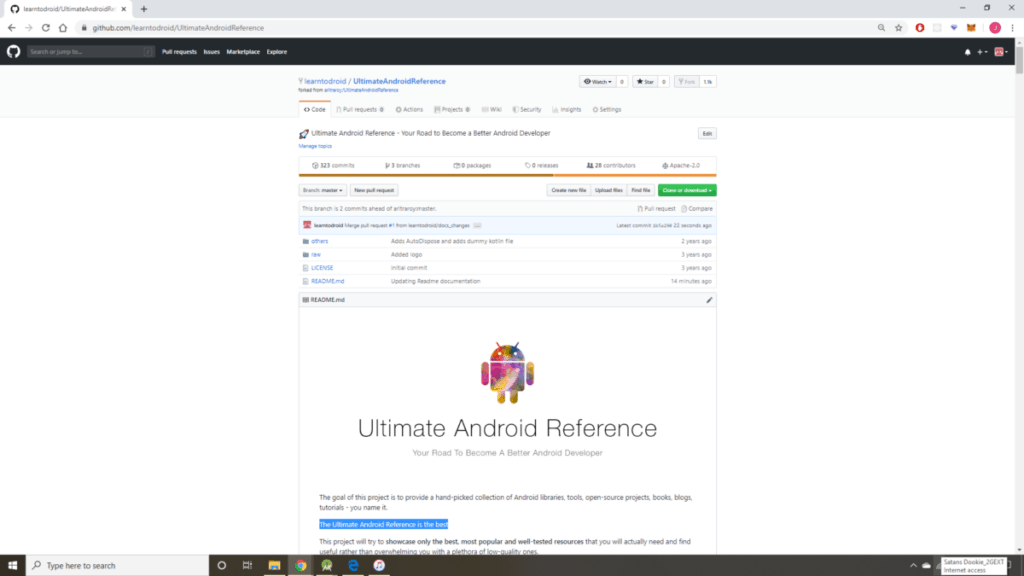
To verify the merge has occurred successfully, navigate to your repository in GitHub and make sure the master branch is selected and you can confirm that the changes have been made.
How to Merge a Branch in Android Studio
In the previous section we showed using the pull request feature of GitHub to perform the code merge, however it is also possible to merge branches with Android Studio directly by performing the steps this section.
Step 1: Create a Branch in Android Studio
First we will create a new branch in Android Studio, by selecting “VCS”, “Git”, “Branches…”.
Select “New Branch” from the pop up list.
Enter a new branch name then select the “OK” button.
Step 2: Make Code Changes on the New Branch in Android Studio
Next we will make a code change on the newly created branch.
First make sure your current branch in the bottom right section of the screen is set to your new branch.
Then make your change, in this case I am adding another line to the README file.
Commit these changes to the new branch in Android Studio by right clicking on the project name, hovering over “Git” then selecting “Commit Directory…”.
Enter a commit message then select the “Commit” button.
Step 3: Merge Changes from New Branch into Master Branch Using Android Studio
Next we will merge the changes made in the new branch to the master branch using Android Studio.
In the bottom right section of the screen, select the master branch.
Before we do the code merge, if you have been following the section above in this tutorial, you will have code changes that are on the master branch in the remote repository in GitHub that aren’t known in the local master branch. To retrieve these changes select “VCS”, “Git” then “Fetch” to retrieve these changes into your local repository.
Next we will merge the changes from the new branch to the master branch by selecting “VCS”, “Git” then “Merge Changes…”.
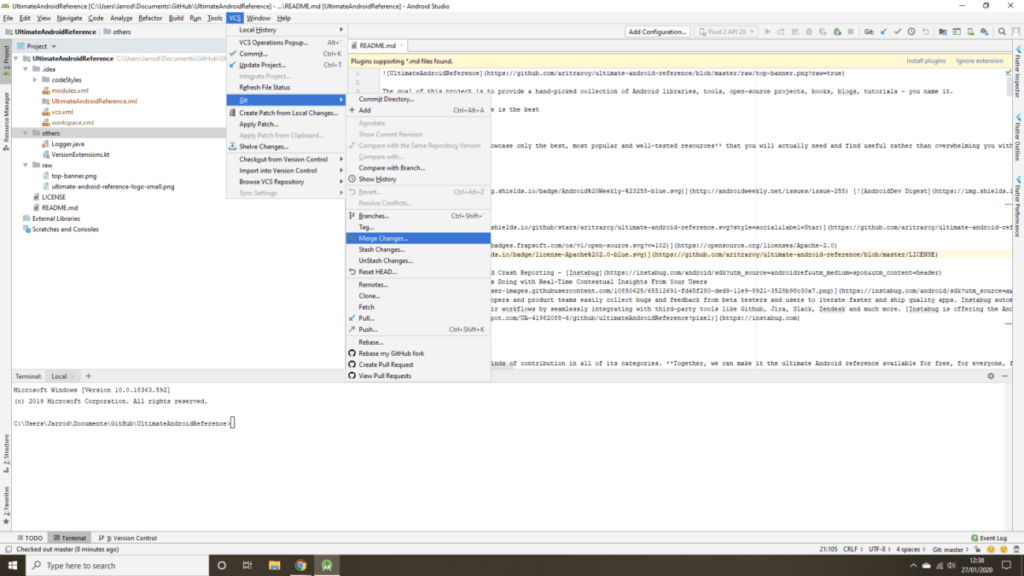
You will see a popup screen showing the current branch as master branch. Make sure you select the new branch as the branch to merge by checking the checkbox. Also add a commit message then select “Merge” button.
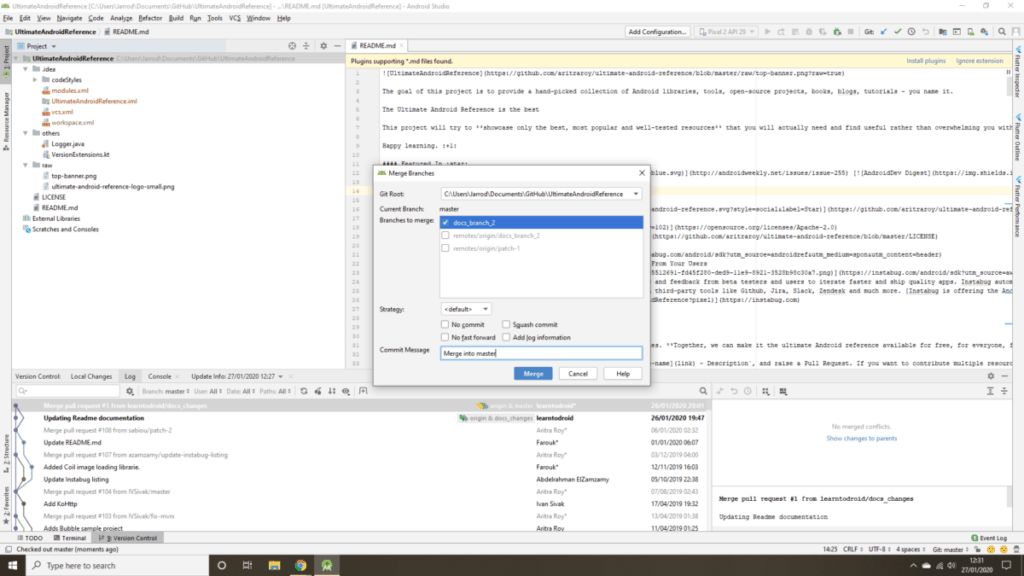
This will merge the changes from the new branch into the master branch with your local Git repository.
Step 4: Push Merged Changes into GitHub Repository Using Android Studio
In this step we will push the merged changes from the previous step to the remote GitHub repository using Android Studio.
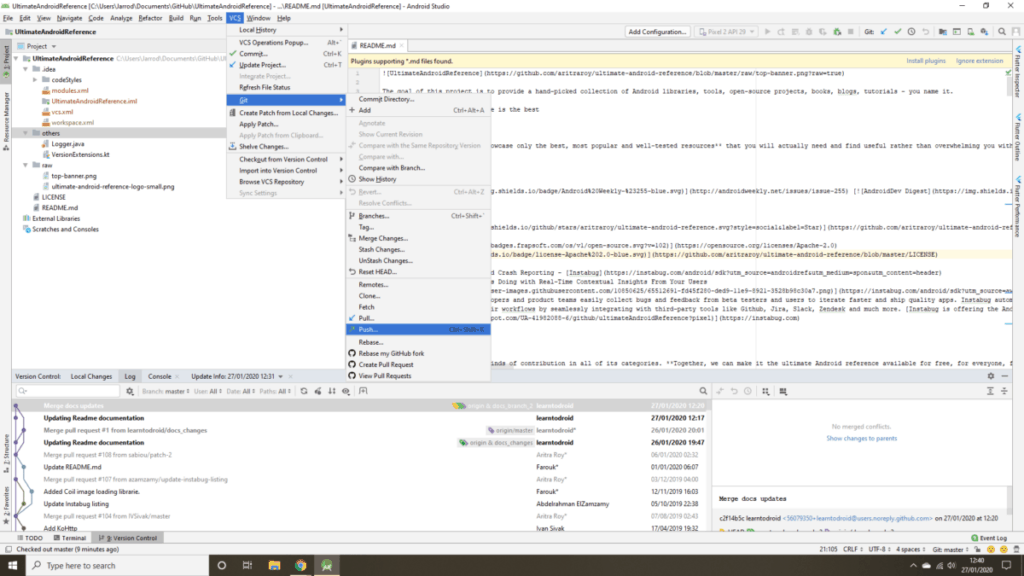
To push these changes into the remote repository using Android Studio, select “VCS”, “Git” then “Push…”.
Make sure the master branch is selected that has commits underneath it and select the “Push” button.
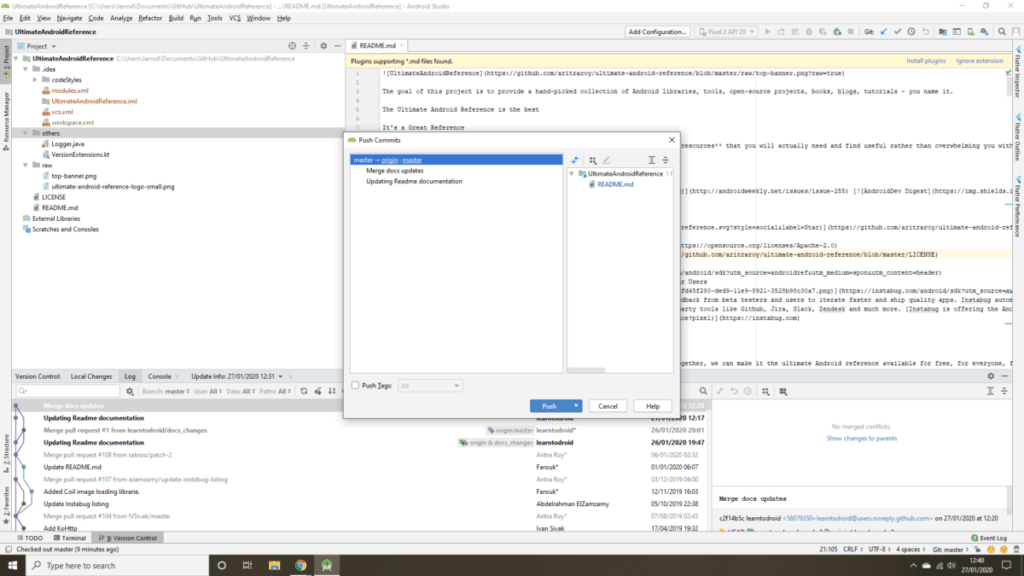
From there you can verify the changes where successfully made to your GitHub repository on the master branch by reviewing the README file for changes and looking at the commits.