
There are a number of different speech to text APIs that exist today. I experiment with IBM’s Watson Speech to Text service to see how easy it is to integrate with an Android app and the accuracy of the transcription results.
I have done some research and created a sample Android app that demonstrates how to integrate with IBM’s Watson Speech to Text service in Android. I have put together a step by step guide on how to accomplish this.
To use IBM Watson’s Speech to Text service in an Android app you will need to:
- Create an IBM Cloud Account
- Enable the Speech to Text service and obtain your API Key
- Add the IBM Watson SDK to your Android project with Gradle
- Request INTERNET and RECORD_AUDIO permissions in the Manifest file
- Make a runtime request in the Activity class for access to the RECORD_AUDIO permission
- Use the MediaRecorder API to make an audio recording of your speech
- Convert audio recording to MP3 format using the FFMPEG library
- Provide the audio recording in an MP3 format to the Speech to Text API
- Retrieve the response containing the converted text and display the text in a RecyclerView
In this tutorial, I will walk you through each of these steps in detail and provide code samples embedded in this blog post that are also available for free on GitHub.
I have also created a video of this tutorial that is available on YouTube which I have embedded below.
Android Watson Speech to Text Tutorial
Creating an IBM Cloud Account
In order to use IBM’s Watson Text to Speech service, you will need to create an IBM Cloud account.
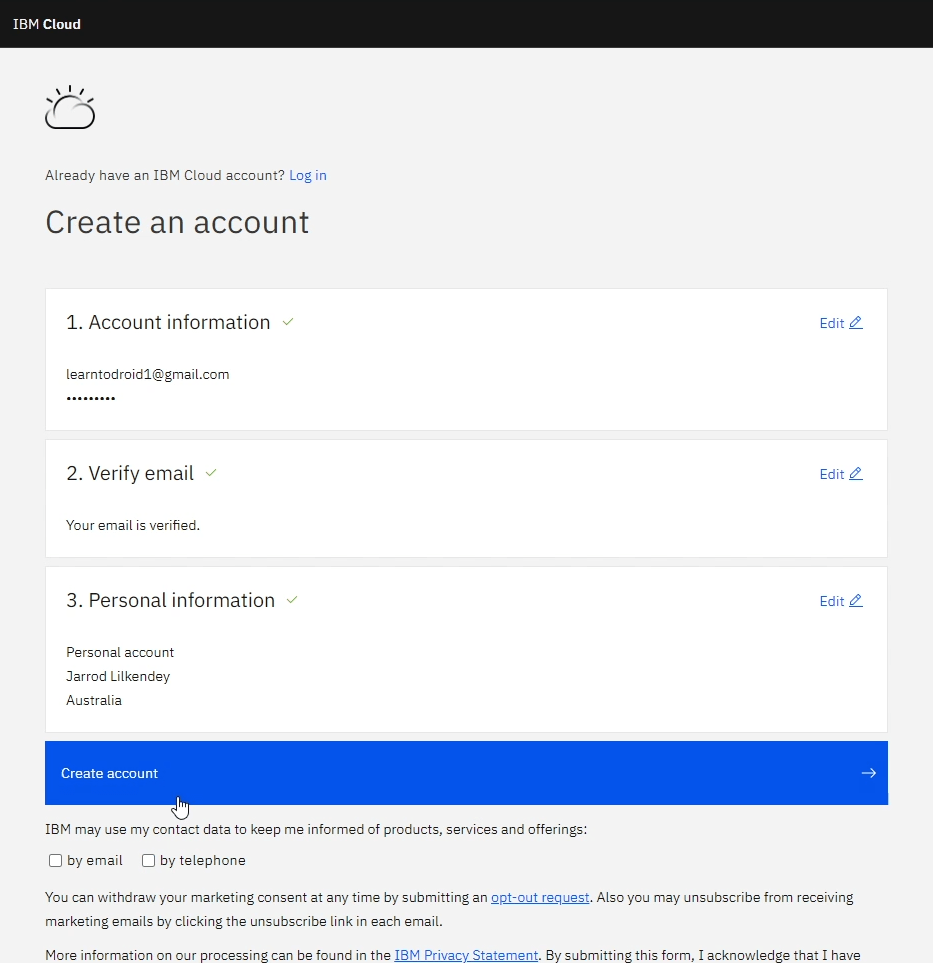
Navigate to the IBM Cloud account registration form in a web browser and fill out account information with an email address and password.
Then you will need to verify your email address using a code sent via email.
After that you will need to enter some personal information for your account, then you can select the “Create account” button.
Enabling Speech to Text and Obtaining API Key
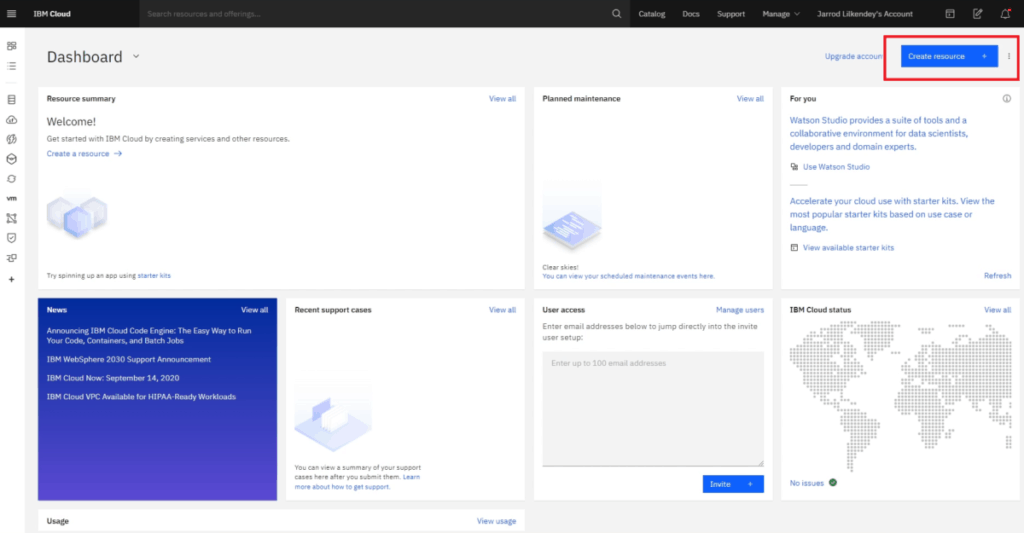
Now that you have created an IBM Cloud account, what you will need to do next is create a Speech to Text resource you can use against your account.
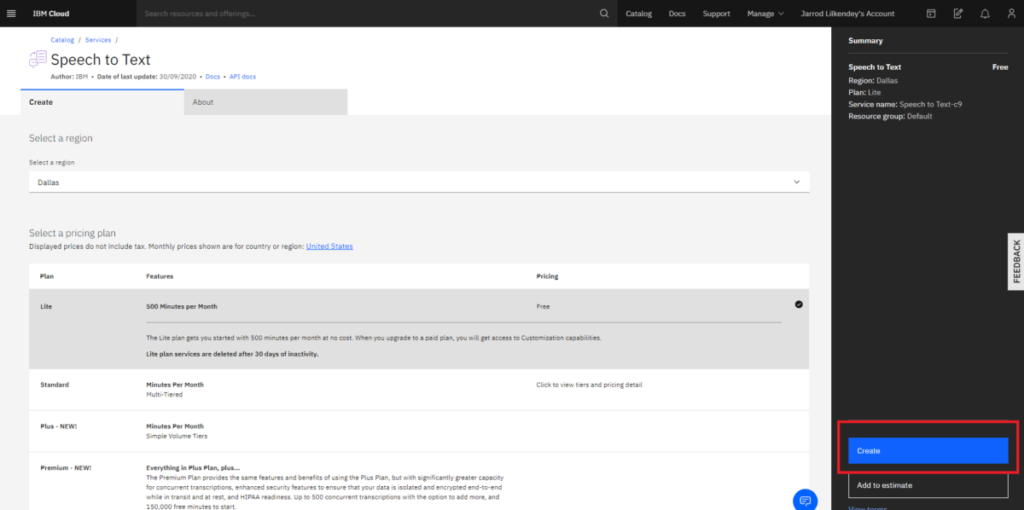
In the IBM Cloud home screen, select the “Create resource” button in the top right section of the screen.
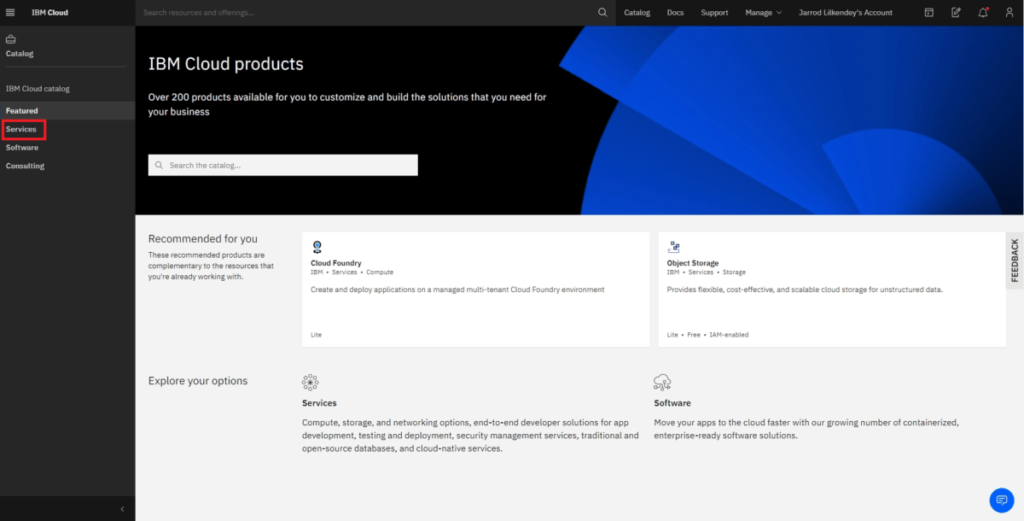
After that, go into the “Services” section.
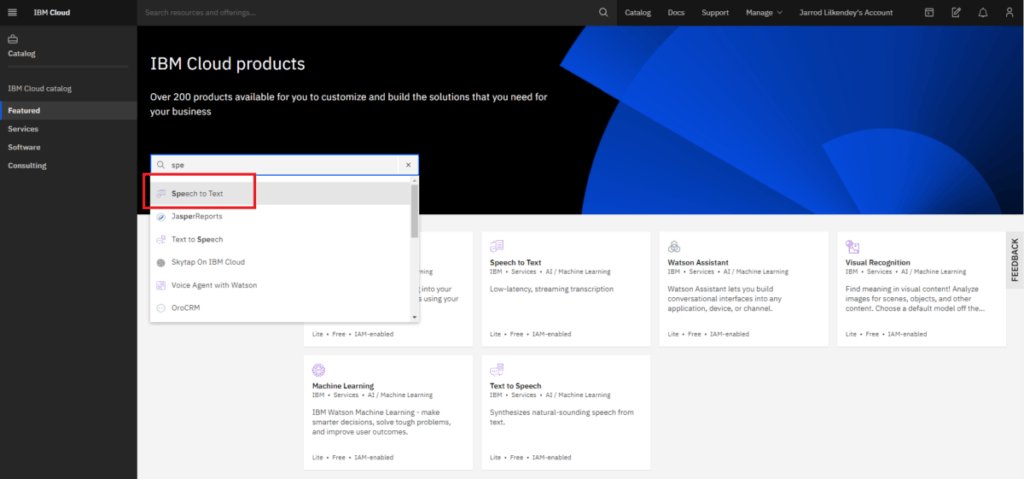
Then, search for “Speech to Text” in the service catalogue and select the “Speech to Text” result.
Then, you can pick the region your service will be based in. We will want to use the Lite Plan for our Speech to Text service, which currently allows you to perform 500 minutes a month of speech to text for free.
When you are ready to create the service, select the “Create” button.
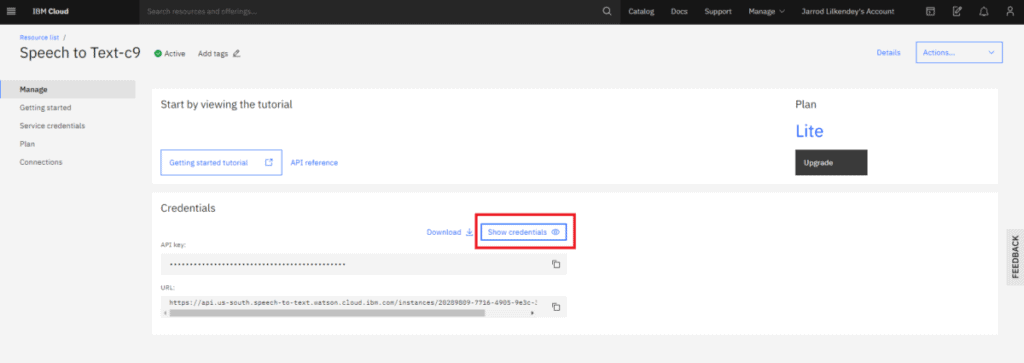
Once the service has been created, go into the Manage section and note the API key and the base URL of the URL shown in this screen which we will copy over to our Android app in a subsequent step.
Retrieve Gradle Dependencies
In this section of the tutorial, we will create a new Android project in Android Studio, then we will retrieve the dependencies required to use IBM’s Watson Speech to Text service in our Android app using Gradle.
Once you have created a new Android project, open the app level build.gradle file where we make some changes.
In the dependencies section of the app level build.gradle file, we will add two dependencies. The first for the IBM Watson SDK and the second for the mobile FFMPEG library.
The IBM Watson SDK will be used to interact with the Watson Speech to Text service. The mobile FFMPEG library is required to convert the audio recording we will make of our speech into an MP3 format that can be consumed by the Watson speech to text service.
In addition to this, we will a line in the defaultConfig section to enable multi dex.
Also in order to use the mobile FFMPEG library in your Android app, you will also need to set the minSdkVersion to at least version 24.
See the sample app level build.gradle file below.
Request Permissions in the Manifest
In this section of the tutorial, we will request access to two permissions in the Android app’s manifest file.
In the app’s manifest file we will need to add the INTERNET permission as we will invoke the Speech to Text service over the Internet.
We will also need to add the RECORD_AUDIO permission as we will be using the device’s microphone to record and audio clip which we will provide to the Speech to Text service to translate it into text.
See the sample app manifest file containing the INTERNET and RECORD_AUDIO permission below.
Request Audio Recording Run Time Permission
In Android, the RECORD_AUDIO permission is considered a dangerous permission, which means you will need to make a run time request inside your Activity class to prompt the user to provide their consent to use the device’s microphone.
See the code sample below for the MainActivity class requesting the RECORD_AUDIO permission at run time.
Record Speech using MediaRecorder API
In this section of the tutorial, we will use Android’s MediaRecorder API to create an audio recording of our speech from the microphone on the device that we will provide to the Speech to Text service to convert.
Before we implement the audio recording functionality into our Android app, we will need to update the Activity layout resource with some additional widgets.
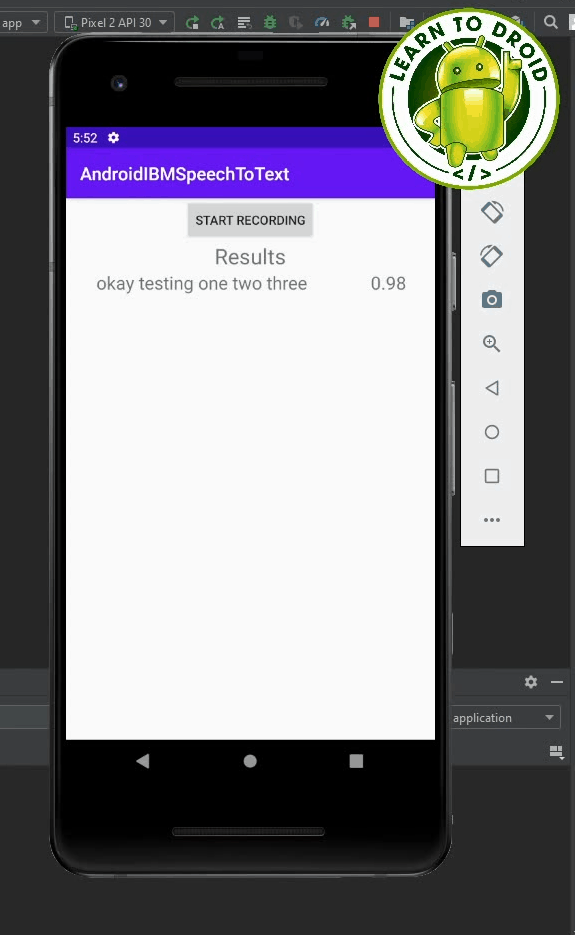
- We will include a Button which will be used to trigger the audio recording
- We will add a RecyclerView to present the text from the converted speech along with a confidence interval
- For this RecyclerView, we will also add a TextView as a label called “Results”
Check out the Activity layout resource file used for the MainActivity below.
Next, we will update the Main Activity class and add a new method which record audio from the device’s microphone when the “START RECORDING” Button is selected.
We will give this method the name “startRecording”. At the start of the method, we will create a file name for the file to be used to record the audio and another file name for the file which will contain the audio converted into MP3 format. We will use a random UUID and provide a path inside internal storage for the recorded and convert files.
Next, we will use the MediaRecorder API to record audio into a file with the 3GPP file format.
We will need to create a new MediaRecorder object then perform the following actions to start recording audio:
- Invoke the setAudioSource method passing the MediaRecorder.AudioSource.MIC parameter to record audio from the device’s microphone
- Invoke the setOutputFormat method passing the MediaRecorder.OutputFormat.THREE_GPP parameter to use the 3GPP file format
- Invoke the setAudioEncoder method passing the MediaRecorder.AudioEncoder.AMR_NB parameter to use the Adaptive Multi-Rate audio codec for audio encoding
- Invoke the setOutputFile method passing the recorded file path
- Invoke the prepare method to up MediaRecorder to record audio
- Invoke the start method to start recording audio
See a code sample of the MainActivity class below, containing the startRecording method for recording audio using the device microphone in the 3GPP file format.
If you would like to learn more about recording audio in Android, check out the following post I wrote on this topic below.
Convert Audio Recording to MP3 using FFMPEG
The Watson Speech to Text API doesn’t support audio files in the 3GPP format. The MediaRecorder API for Android doesn’t support recording audio into an MP3 format. As covered in the previous step, we recorded the audio of the speech into the 3GPP file format which has the extension “.3gp”.
To get around this restriction with the Watson Speech to Text API we will convert the audio recording from the 3GPP file format into MP3 format before sending it using the FFMPEG library.
In our Android project, we will configure the “START RECORDING” Button to toggle to “CONVERT SPEECH” while the audio recording is in progress, then we will toggle back to “START RECORDING” if the audio is not currently recording.
If the Button is selected while the audio recording is in progress a new Thread will be created and started which will be used for converting the audio file into MP3 format.
We will create a new method speech convertSpeech where we will use FFMPEG to convert the audio file into the MP3 format.
First, in the convertSpeech method, we will stop recording the audio and set up the MediaRecorder for reuse later by calling the stop method, the reset method then the release method on the MediaRecorder.
After that, we will execute a FFMPEG command using the libmp3lame MP3 encoder with the file names of the recorded file and the converted file which will convert the audio file into the MP3 format.
We will then check the return code provided to the FFMPEG command above and log if the command was successful, canceled or if there was an error.
In the next section of this tutorial, we will invoke the Watson Speech to Text API if the return code from the FFMPEG command was successful.
Provide the Audio Recording to the Speech to Text API
In this section of the tutorial, we will invoke the Speech to Text API via the Watson SDK passing the audio file in MP3 format that we want to convert into text.
In the MainActivity class, we will create two String constants at the start of the class containing the API key and the URL for interacting with the Speech to Text service.
Inside the convertSpeech method, if the return code from the FFMPEG command to convert the audio file to MP3 format is successful, we will add some additional code the call the Watson Speech to Text API.
Before we can invoke the Speech To Text API, we will need to create an IamAuthenticator object passing the API key as a parameter.
Then we will need to create a SpeechToText object passing the IamAuthenticator as a parameter. On the SpeechToText object we will also need to invoke the setServiceUrl method passing the base URL of the Watson Speech to Text service.
Then, we will need to construct an object containing RecognizeOptions using the builder.
- We will use the audio method on the builder to set the path to the converted audio file
- We will use the contentType method on the builder to use the MP3 format by passing the value HttpMediaType.AUDIO_MP3
- Then we will use the model method on the builder and provide the value of “en-AU_NarrowbandModel”
Then we will invoke the build method on the builder.
To get a JSON string of the results from the Speech to Text API, we will create a SpeechRecognitionResults object and assign it to value retrieved from the API.
To call the API, we will use the SpeechToText object and call the recognize method passing in the Recognize options, then we will call the execute method and finally we will call the getResult method.
Retrieve Speech to Text Response and Display Inside a RecyclerView
In this last section of the tutorial, we will create a RecyclerAdapter and parse the JSON string containing the transcription results from the Speech To Text API to display inside a RecyclerView.
First, we will create a Result model to be used inside the RecyclerView. Each Result will contain a String of the transcription and a double representing the confidence of the transcription.
See the sample class for the Result below.
Next, we will create an item layout to be used for each Result displayed in the RecyclerView. The item layout will be made up of two TextViews inside a horizontally oriented LinearLayout with the transcription on the left side and the confidence value on the right side.
See the sample item layout resource file for the Result below.
After that, we will create a custom RecyclerAdapter and Recycler ViewHolder to be used with the Results from the Speech to Text API.
See the sample RecyclerAdapter below.
Finally, we will update the MainActivity class inside the convertSpeech method to parse the JSON string and provide a List of Result objects to the RecyclerAdapter we created above.
See the sample MainActivity class below.
All of the code shared in this tutorial is available on GitHub at the following link.