Bars containing icons and text that run along the bottom of the screen are common when implementing navigation in an Android app. This kind of navigation can be achieved using the Android material design widget BottomNavigationView.
The Jetpack navigation architecture component simplifies the process of implementing navigation within your Android app and can be used with the BottomNavigationView widget.
To use the Jetpack navigation architecture component with bottom navigation you will need to do the following.
- Retrieve the Jetpack navigation component dependencies using Gradle
- Create the String and Drawable Resources to use as Icons and Labels
- Create the Menu Resource for the BottomNavigationView
- Add the BottomNavigationView to the Activity Layout Resource
- Create the Navigation Graph
- Add the NavHostFragment to the Activity Layout Resource
- Add the Fragments as Destinations to the Navigation Graph
- Setup the NavController with the BottomNavigationView in the Activity class
I have written this tutorial that goes into greater details on these steps on how to setup the Jetpack navigation component with the BottomNavigationView widget to enable bottom navigation within your Android app.
I have also included code samples which are available in a public code repository in GitHub at the link below.
https://github.com/learntodroid/BottomNavigationTutorial
I have created a video tutorial on this blog post which I have uploaded to YouTube which I have embedded below.
Navigation Component Bottom Navigation Tutorial
Retrieving the Navigation Component Dependencies
To use the Jetpack navigation component you will first need to download it’s dependencies using Gradle.
To achieve this, include the following dependencies in your app level build.gradle file that I located from the Getting Started page published for the Jetpack Navigation Component.
Sync Gradle for your Android project inside Android Studio and the dependencies for the Jetpack Navigation Component should be successfully retrieved.
Creating the String and Drawable Resources to use as Icons and Labels
Next we will need to create String resources and Drawable resource to use as the labels and icons in the BottomNavigationView.
Adding String Resources for Labels
To start with add three new Strings for each label to be shown in the BottomNavigationView in the strings.xml resource file located at app/src/main/res/values/strings.xml.
See the sample for the String resource strings.xml file below.
Adding Drawable Resources for Icons
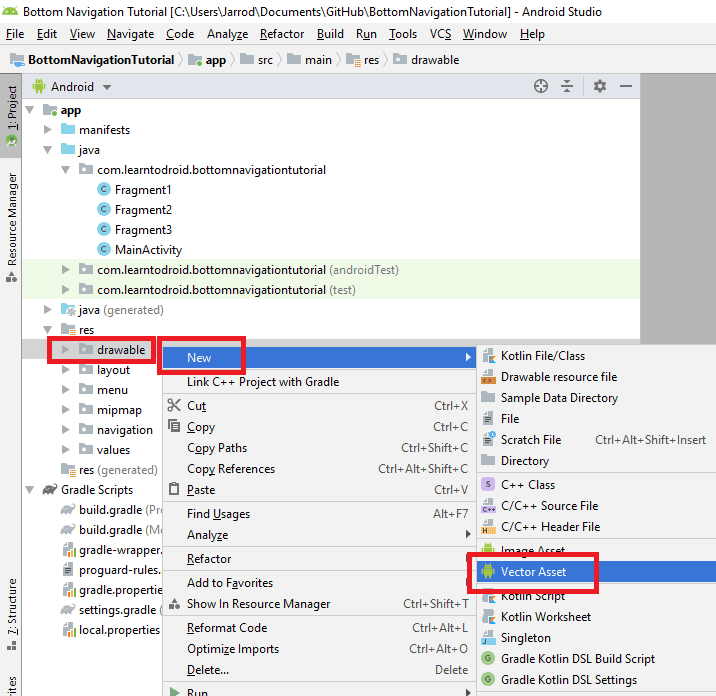
Next we will need to add three Vector Assets to the Drawable Resources to use as icons in the BottomNavigationView.
To add a Vector Asset to your Android project in Android Studio right mouse click on the drawables folder located at app/src/main/res/drawables, select “New”, then select “Vector Asset”.
Select the “Clip Art” button and locate a Vector Asset you like using the search functionality.
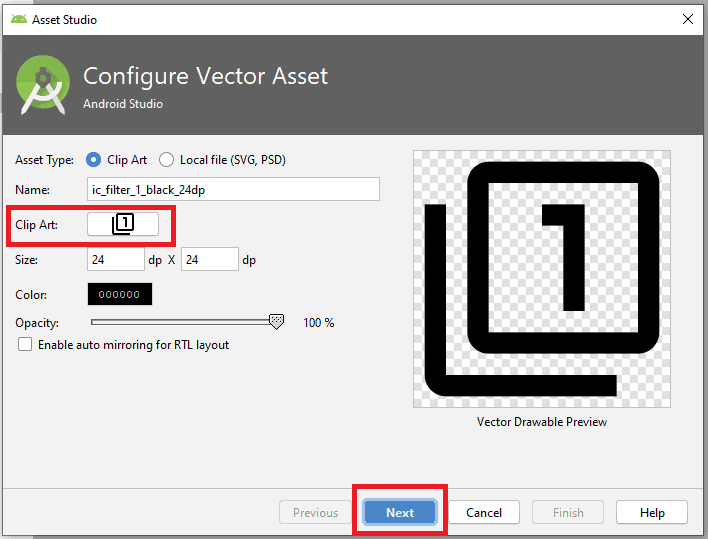
Once you have found a Vector Asset you like, select the “Next” button and select the “Finish” button.
Complete this process a total of three times to create three icons for you to use in the later steps of the tutorial in the BottomNavigationView.
Creating a Menu Resource for Navigation
The next step this tutorial involves creating a menu resource to use in the BottomNavigationView.
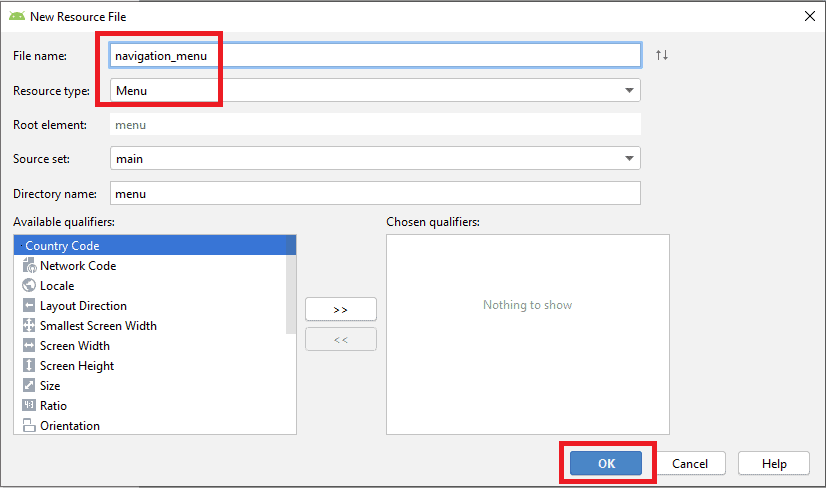
To create a menu resource in your Android project in Android Studio click the right mouse button on the “res” directory and select “New” and click “Android Resource File”.
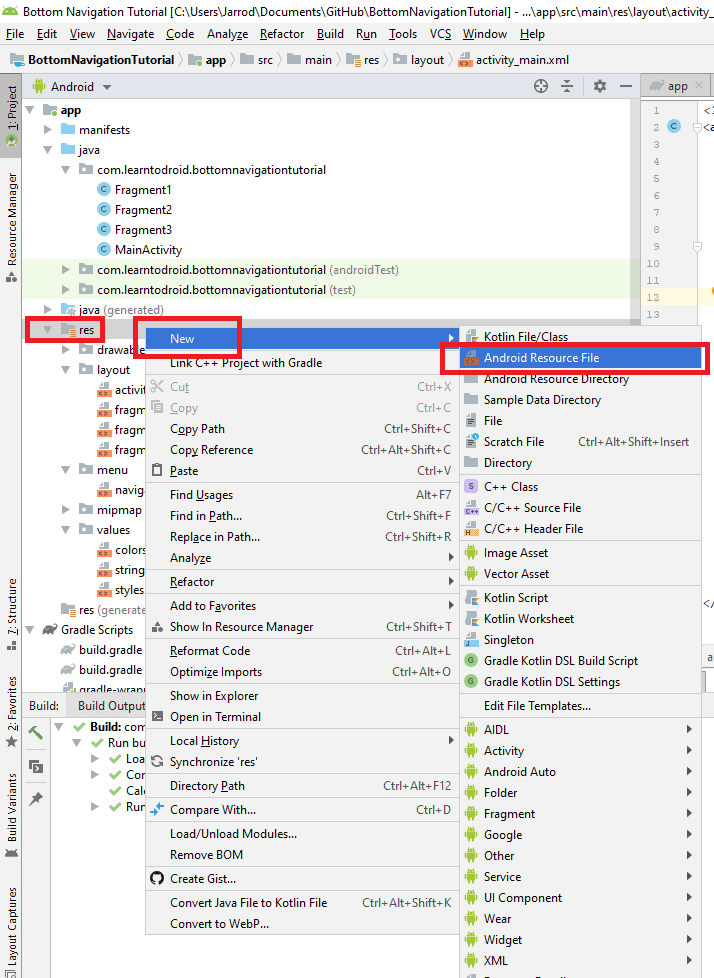
Enter a file name for the menu and set the “Resource type” to “Menu” and click the “OK” button.
In the menu resource you will have a “menu” root element and you will need to add three “item” elements one for each option in the BottomNavigationView. For each “item” element set the label using the “android:title” attribute and set the icon using the “android:icon” attribute.
For the “android:id” attribute you will need to use the same ID that will be defined later for the fragment that will be added to the navigation graph.
See the sample menu resource (navigation_menu.xml) for the navigation menu below.
Adding a BottomNavigationView to the Activity Layout Resource
Next we will be adding a BottomNavigationView widget from the Android material design library into the Activity layout resource.
The BottomNavigationView widget will need to be positioned to the bottom of the screen using your layout resource. You will also need to define the “app:menu” attribute on the BottomNavigationView widget and associate it to the menu resource you created in the previous step.
See the sample Activity layout resource (activity_main.xml) below.
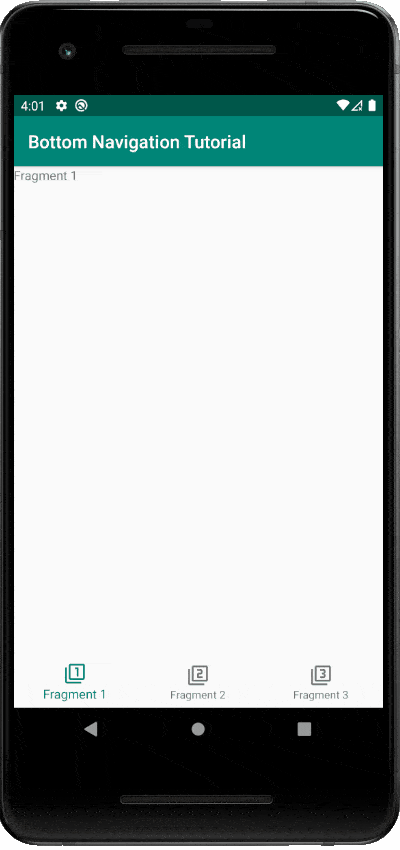
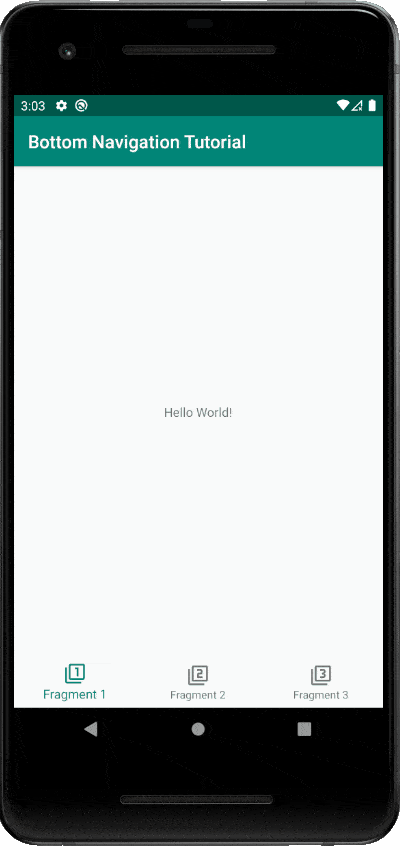
If you make these changes defined above and run your Android app you should see the three options in the BottomNavigationView each with a label and an icon.
Check out the sample screen capture showing a selectable BottomNavigationView with labels and icons.
Creating the Navigation Graph
Next we will start to use the Jetpack navigation component by creating our navigation graph resource.
The navigation graph consists of destinations and actions. The destinations are fragments that the user can navigate between using your Android app and actions represent the pathways the user can take by navigating your app between destinations.
The navigation graph is placed inside a NavHostFragment inside an Activity which we will create in subsequents steps. The navigation graph will have starting destination defined which we will also implement in a later step after we build the three fragments and add them as destinations to the navigation graph.
To create the navigation graph resource in Android Studio, select the right mouse button on the “res” folder and select “New” and click on “Android Resource File” (just like we did earlier with the menu resource).
Next provide a file name for the navigation graph and set the “Resource type” to “Navigation” and select the “OK” button.
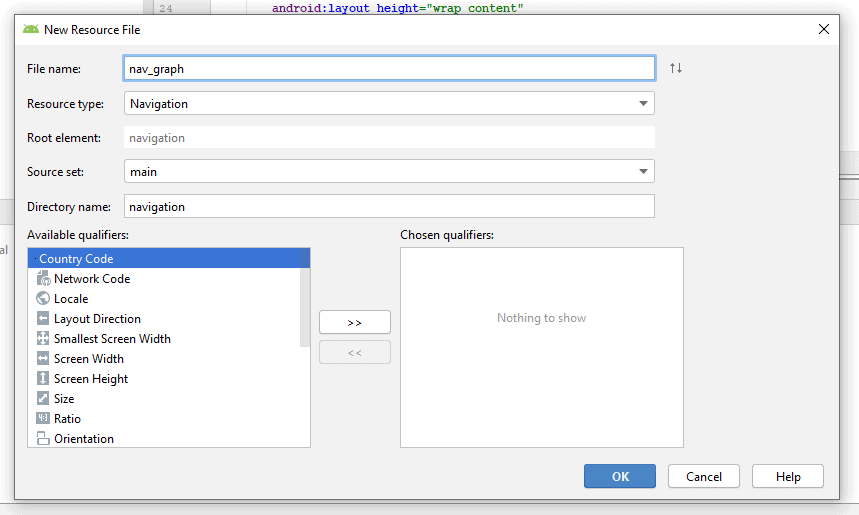
This will create the navigation graph and take you to the Navigation Editor within Android Studio showing a blank navigation graph without any destinations or actions.
Adding the NavHostFragment to the Activity Layout Resource
Next we will set up the navigation graph to show the active destination in the main Activity by adding a NavHostFragment to the Activity layout resource.
To achieve this we will need to add a “fragment” element inside the main Activity layout resource.
This fragment will need to have the following attributes set:
- The “android:name” attribute set to “androidx.navigation.fragment.NavHostFragment” indicating that this fragment is a NavHostFragment
- The “app:defaultNavHost” attribute set to “true” that will allow this NavHostFragment to detect the back button getting pressed
- The “app:navGraph” attribute set to the navigation graph resource created in the previous step to link the navigation graph with the NavHostFragment
See the sample Activity layout resource (activity_main.xml) containing the NavHostFragment below.
Adding Fragments as Destinations to the Navigation Graph
Next we will create the three different fragments and add them as destinations to the navigation graph. This will enable us to navigate to each of these destinations using the bottom navigation once we have made some final changes in the next step.
Creating the Fragments
We will need to create three fragments. These fragments will be very basic just to showcase how the navigation works. The fragments will each contain a single TextView showing the value “Fragment 1”, “Fragment 2” or “Fragment 3”.
I will show you the layout resource and class for Fragment1 and you can repeat this process for creating Fragment2 and Fragment3 or just clone the GitHub repository for this tutorial referenced in the introduction of this post.
See the sample fragment layout resource (fragment_fragment1.xml) for Fragment1 below.
See the code sample fragment class for Fragment1 below.
As mentioned above, repeat this process for creating the next two fragments so that we end up with a total of three fragments each with a layout resource.
Adding Destinations to the Navigation Graph
Now that we have created the three fragments we can now add them as destinations to the navigation graph.
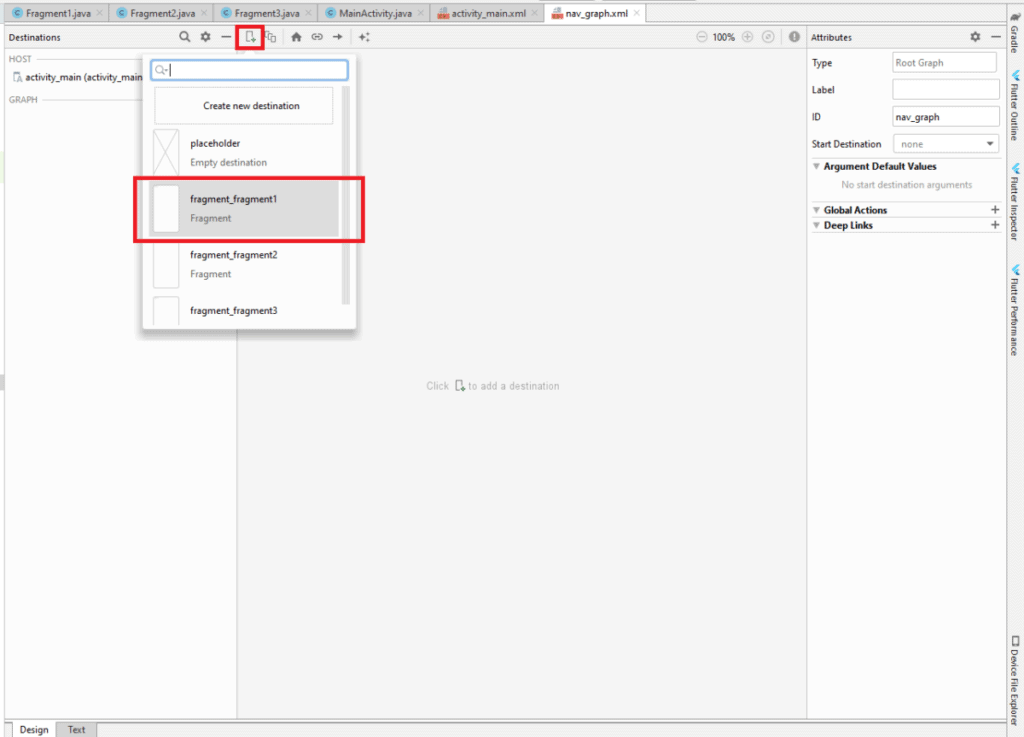
To add the destinations to the navigation graph, open the navigation graph in the Navigation Editor in Android Studio. Then select the icon with a screen and a green plus sign to add a destination. This will display a search bar and a drop down list containing possible destinations to add to the navigation graph.
Locate the Fragment1 from the search results and select it to add it to the navigation graph. Then repeat the process for Fragment2 and Fragment3.
You should end up with the Navigation Editor looking like the screenshot below with three destinations added with fragment1 configured as the start destination which means it will show initially when the Android app is run.
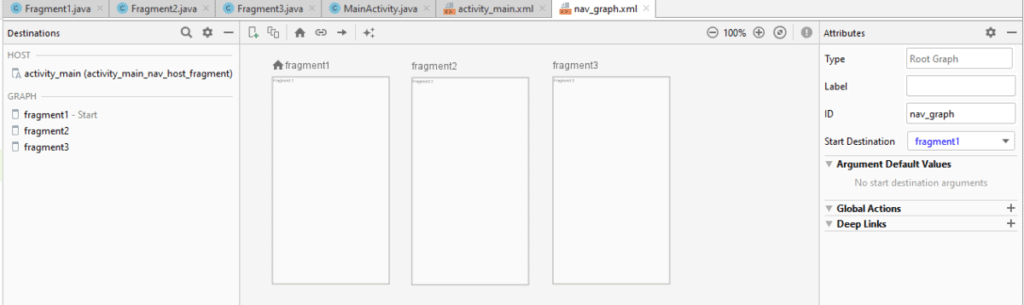
Another important thing to note that I also mentioned in the section for creating the menu resource, is the ID for each of the destinations in the navigation graph must match with the ID of the menu item in the menu resource.
To check the ID of the destination, select a destination from the navigation graph in the left sidebar and on the right you should see an attribute containing the destination ID.

Setup the NavController with the BottomNavigationView in the Activity class
This is the final step in the process for setting up bottom navigation with the Jetpack navigation component. This step involves locating the NavController in the Activity class and associating it to the BottomNavigationView widget.
The NavController is part of the Jetpack navigation component and is used for navigating between destinations inside the navigation graph.
In the onCreate(…) method of the Activity class we will need to locate the NavController using the Navigation.findNavController(…) method.
Then we will obtain the BottomNavigationView and then integrate it with the Jetpack navigation component using the NavigationUI.setupWithNavController(…) method.
See the code sample for the MainActivity class below.
If you make all of the changes above and run your Android app you should see something like the screen capture below showing navigation to the correct fragment based on the button in the BottomNavigationView selected.