
Glide is an open source library for Android that is best known for making loading images from the internet into an ImageView a breeze. It also offers a cache for loading images to improve the performance and reduce network bandwidth of your Android app.
In this post I have created a tutorial covering how to set up and use the Glide image loading and caching library.
I will share code samples throughout this post written in Java also available in the GitHub repository I have created at the link below.
https://github.com/learntodroid/GlideTutorial
How to Download the Dependencies for Glide using Gradle
Using Gradle to download the latest dependencies for Glide in your Android project is a simple task.
Inside the app level build.gradle include the following inside the dependencies section of the file.
These dependencies are the latest as at the time of writing this post but if you need to check for the latest version numbers of the dependencies they can be located on the official Glide GitHub repository in the README. In the README it also advises how to retrieve the dependencies for Glide using Maven if you prefer to use Maven over Gradle.
Now you can sync Gradle and once complete you are now ready to start using Glide for image loading.
How to use Glide to Load an Image into an ImageView
In this section of this tutorial on Glide I will show you how to load an image from a URI into an ImageView.
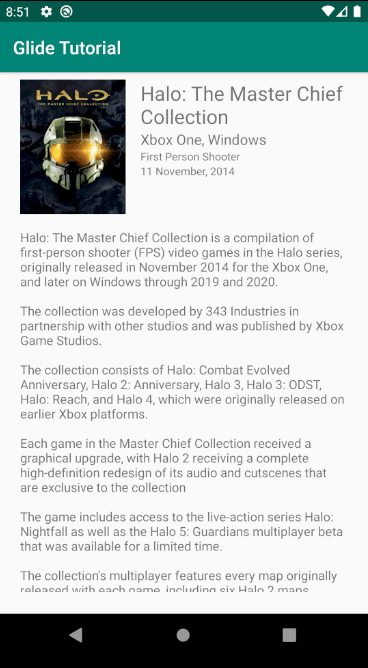
To demonstrate how to use Glide I will create a simple Android app that will display information about a video game such as the title, platforms supported, genre, initial release date, description and box art. We will be using Glide to load the box art image for the video game into an ImageView.
See the screenshot below for what we are looking to implement in this section.
Game Description Source: https://en.wikipedia.org/wiki/Halo:_The_Master_Chief_Collection
Step 1: Modelling a Game Class
For the app we will be creating we will first create a class for modelling a Game that we will be showing the app. The Game class will contain six String variables for capturing the following details relating to a video game.
- Title of the game
- Genre of the game
- Initial release date of the game
- Platforms supported by the game
- URI to the box art image for the game
- Description of the game
See the code sample for the Game class below.
Step 2: Creating the Layout Resource for the Fragment
Assuming you have already downloaded the dependencies for using Glide covered in an earlier section of the post, the next step is to create a layout resource for a game details fragment shown in the screenshot above.
The game details fragment will contain the following:
- An ImageView for displaying the box art
- TextViews positioned to the right of the box art for the game title, platforms supported, game genre and the initial release date
- Underneath the box art and the TextViews will contain a vertically scrollable ScrollView containing a single TextView showing a long description of the video game (in the example I have used in the screenshot and code samples the description originates from the Halo: The Master Chief Collection Wikipedia page)
See the sample layout resource file for the game details fragment below.
Step 3: Create the Fragment Class and Load Image into ImageView Using Glide
In this section of the tutorial we will be creating the GameDetailFragment class.
In this onCreate(Bundle) method of the GameDetailFragment class we will create a hardcoded Game object we will use for displaying in the user interface.
In the onCreateView(…) method we will inflate the fragment resource file we implemented in the previous step and set the text for each of the TextViews using the set text method and retrieving the relevant String variable from the Game object using the getter methods.
Also in the onCreateView(…) method we will use Glide to load the image into the ImageView.
To do this we will use the with(…) method from Glide and pass the fragment as the parameter. The with(Fragment) method for Glide will tie the load transaction that will come next to the lifecycle of the provided Fragment. The with(…) method from Glide also supports taking a View, Context, Activity or FragmentActivity as a parameter instead of a Fragment.
Next we will chain the load(…) method onto the with(…) method call and provide the String of the URI to the box art image as a parameter. The load(…) method originates from the RequestManager class from Glide. The load(String) method is used for loading the image using a String as the Uri into the Glide cache. The load(…) method from Glide also supports loading an image from a bitmap, a drawable, a Uri object, a File object and a resource id.
After that we will chain the into(…) method onto the load(…) method call and provide the ImageView for the box art as the parameter. The into(…) method originates from the RequestBuilder class from Glide. The into(ImageView) method will provides the ImageView resource that the image will be loaded into. It also cancels any existing loads into the ImageView and frees up any resources Glide has previously loaded into the view for performance reasons. The into(…) method also support a Target being passed as a parameter.
See the code sample below for the GameDetailFragment class.
Step 4: Adding the Fragment to the Activity Using the Navigation Component
I will go through this step briefly as it is not the focus of this tutorial, however if you like to learn more about the navigation architecture component released under Jetpack and how to use it to move between fragments check out the post I wrote linked below.
To set up the navigation component in our Android project first we need to download the navigation component dependencies via Gradle.
See the sample app level build.gradle file containing the dependencies for the navigation component.
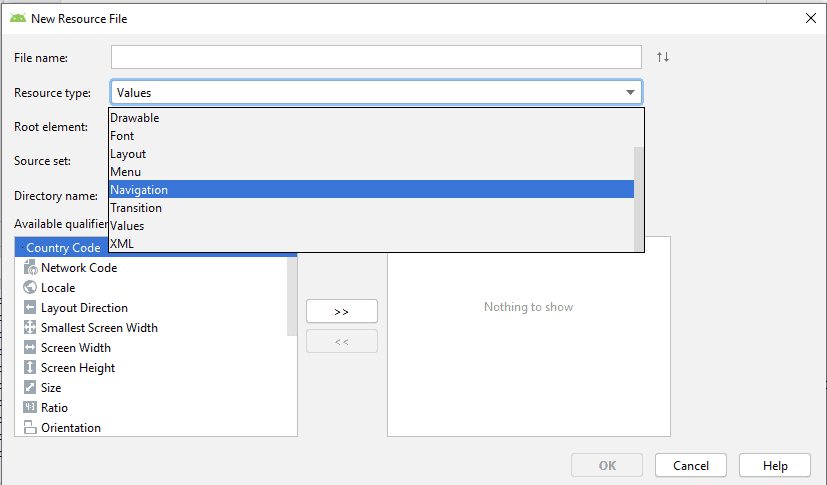
Next we will need to create a navigation graph. To do this in Android Studio right click on the “res” directory and create a new Android resource file with the resource type of “Navigation”.
Next we will need to add a NavHostFragment to the layout resource for the MainActivity class.
See the layout resource for the MainActivity class below containing a NavHostFragment.
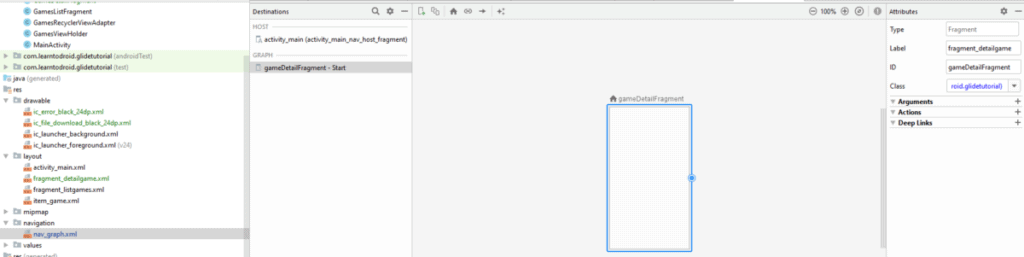
Next we will go into the Navigation Editor in Android Studio by clicking on the navigation graph resource file and selecting the “Design” tab. In the Navigation Editor we will add the GameDetailFragment as a new destination to the navigation graph. The GameDetailFragment will be the start destination for the navigation graph.
Step 5: Add Internet Permission to the Manifest
As we will be using Glide to load the image from the internet to be shown in the ImageView we will require permission in our Android app to access the internet.
See the sample manifest file below requesting permission to access the internet using the use-permission tag for the “android.permission.INTERNET” permission.
Now if you build and run your Android app you should see the GameDetailFragment load with the TextViews showing immediately, then you should notice a short pause where your ImageView will be blank (which is Glide downloading the image for the internet) then the box art should be displayed.
How to Display a Placeholder Image While Loading an Image using Glide
Glide has support for showing a placeholder image inside an ImageView while it is loading the image to show in the ImageView. For an example of how this works take a look at the animated GIF I created below.
To show a placeholder image in Glide while the other image is being loaded you must first create a drawable to use as the placeholder image.
In the example shown in the screen capture above I created a drawable that uses the download clipart icon by right clicking the “res” directory and selecting the “New”, “Vector asset” option. From there I located the download clipart icon and created the drawable.
Once you have created the drawable you can set the drawable as the placeholder image using Glide by chaining the placeholder(…) method onto the load(…) method call and provide the drawable as the parameter.
See the code sample below that shows how to use Glide to display a placeholder image into a ImageView while loading an image.
How to Display an Image if there is an Error Loading an Image using Glide
Glide also has the ability to display an image representing an error inside an ImageView if there is an error when loading an image. For an example of this check out the animated GIF I created below.
In the screen capture above, first aeroplane mode is enabled to turn off the internet connection on the device causing the error image to appear. After that, the aeroplane mode is disabled restoring the internet connection and the app is relaunched and the image loads with a placeholder then the box art image is shown.
The image shown in the case of an error needs to be added to the Android project as a drawable just like the placeholder image covered in the previous section.
Once you have created the drawable to use for the error image, you can set the drawable as the error image using Glide by chaining the error(…) method onto the load(…) method call or placeholder(…) method call and provide the drawable as the parameter.
See the code sample below that shows how to use Glide to display an error image into a ImageView while loading an image.
How to Use Glide for Image Loading in a RecyclerView
Glide can also be used to load images as items into a RecyclerView.
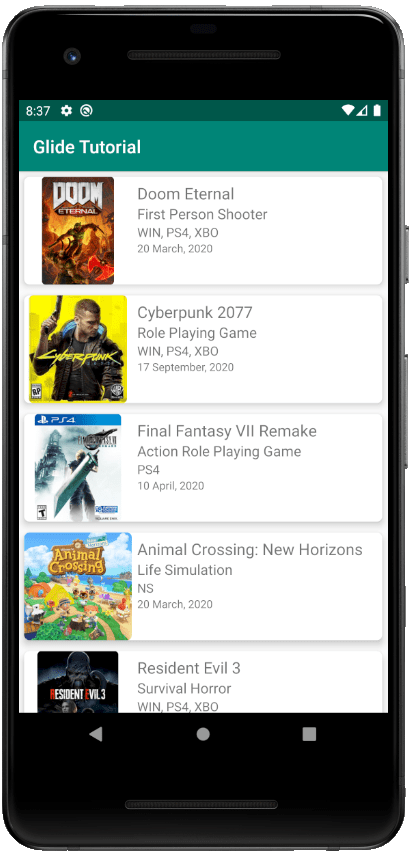
The screenshot below shows a RecyclerView containing a list of video games each inside a CardView showing the box art image on the left, loaded using Glide and information about the video game on the right.

Next I will take you through how to create this RecyclerView with the help of Glide for image loading. We will reuse the Game model class created in the previous section as well as the navigation component and Glide dependencies previously set up in the app’s build.gradle file.
We will follow the steps below for this section of the tutorial for creating the RecyclerView containing images loaded using Glide.
- Create the Layout Resource for each game shown in the RecyclerView
- Create the RecyclerViewHolder for the game using Glide to load the image
- Create the RecyclerViewAdapter for the games
- Create the GamesListFragment and initialise the RecyclerViewAdapter and set up the RecyclerView
Creating the Layout Resource for the Game Item in the RecyclerView
The first step of this section of the tutorial involves creating the layout resource file for each Game to be displayed in the RecyclerView.
The layout resource we will be creating will contain a CardView which will contain the following:
- An ImageView for the box art
- TextViews of varying sized fonts for the game title, genre, platforms and initial release date
See the sample layout resource file to be used for each Game in the RecyclerView.
Create the RecyclerViewHolder for the Game using Glide to Load the Image
The second step of this section of the tutorial to create a RecyclerViewHolder for the Game item.
This is where we will bind the data from the Game object into the TextViews and load the box art into the ImageView using Glide.
See the code sample for the GamesViewHolder.
Create the RecyclerViewAdapter for the Games
For the third step of this section of the tutorial we will create the RecyclerViewAdapter class for the RecyclerView to be used for displaying Games.
See the code sample below for the GamesRecyclerViewAdapter.
Create the GamesListFragment and Initialize the RecyclerViewAdapter and Setup the RecyclerView
This is the final step in this section of the tutorial for creating a RecyclerView that utilizes Glide to load Images. This step involves creating the GamesListFragment and it’s layout resource then adding it to the navigation graph to display in your navigation graph.
For the layout resource for the GamesListFragment it will consistent of a simple LinearLayout containing a RecyclerView. See the sample layout resource file for the GamesListFragment below.
Next we will define the GamesListFragment class.
In the onCreate(Bundle) method we will initialize a List of Games by creating an ArrayList and adding five games to it. Then we will instantiate the GamesRecyclerViewAdapter passing the List of Games as a parameter.
In the onCreateView(…) method we will set up the RecyclerView by setting the layout manager as a LinearLayoutManager and setting the GamesRecyclerViewAdapter as the adapter for the RecyclerView.
See the code sample for the GamesListFragment class below.
Finally we will add the GamesListFragment to the navigation graph and set it to the start destination for the navigation graph.
Now if you build and run your Android app you should see the RecyclerView for the games containing the images of the box art for each game loaded using Glide.
How to Create a Round Circular Image using Glide
Glide has a feature called transformations which allows it to modify an image resource it has loaded. Transformations can be used with Glide to crop or apply filters to bitmaps.
Glide has some out of the box transformations it supports, these include:
- CenterCrop
- FitCenter
- CircleCrop
The CenterCrop transformation can be used to scale an image to fit particular dimensions without maintaining the aspect radio then crop the image from the center point.
The FitCenter transformation can be used to scale an image to fit particular dimensions while maintaining the aspect ratio.
The CircleCrop transformation can be used to create a round circular image using Glide.
See the screenshot below showing the CircleCrop transformation being applied to box art images for the games loaded into the RecyclerView using Glide.
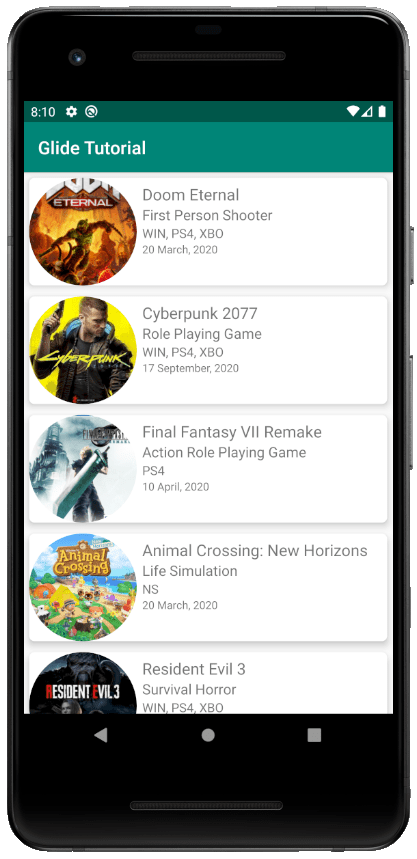
See the modified code sample of the GamesViewHolder class created in the section for the RecyclerView tutorial that chains the circleCrop(…) method to the load(…) method call to achieve this effect.
How to Apply Rounded Corners to an Image using Glide
Glide can also be used to apply a transformation to an image to create rounded corners.
For an example of applying rounded corners to an image loaded using Glide look at the screenshot of the app below.
See the modified code sample of the GamesViewHolder class created in the section for the RecyclerView tutorial that uses the apply(…) method to apply a bitmap transform for rounded corners.
How to Load GIF and WEBP Images into an ImageView using Glide
It is possible to load and display animated images in GIF and WEBP formats using Glide.
GIF files for animations are supported out of the box by Glide. It is recommended when you load an GIF image using Glide you should chain the asGif() method to the with(…) method call so that you can get an error if the image is not in the correct format.
See the example screen capture loading and displaying the following GIF into an ImageView using Glide.
WEBP is a popular image file format also used for animations. If you look at the popular website for finding image animations giphy.com the image files are in WEBP format.
To load and display WEBP formatted images from the internet you will need to use the GlideWebpDecoder library. To obtain the GlideWebpDecoder you will need to add the following to your app level build.gradle file.
See the example screen capture loading and displaying the following WEBP into an ImageView using Glide.
Check out the code sample below that covers loading an animated GIF file and an animated WEBP file from the internet into an ImageView using Glide.
Useful Links
- Glide API Documentation – https://bumptech.github.io/glide/javadocs/4110/index.html
- Official website for Glide – https://bumptech.github.io/glide/
- GitHub repository for Glide – https://github.com/bumptech/glide