
I am starting a series on learntodroid.com that will show how to build different types of apps in Android. These tutorials will be suitable for beginner Android app developers and will give you exposure to different components and concepts used in Android app development.
For my first app in this series I have put together a tutorial covering how to build a simple alarm clock app for Android.
To create a simple alarm clock app in Android you will need to follow these steps.
- Capture the alarm time using a TimePicker
- Schedule an alarm using Alarm Manager and a Pending Intent
- Start the Alarm Service using a Broadcast Receiver
- Use a Notification, Media Player and Vibrator to activate the alarm
- Managing Dismissal and Snoozing of an Alarm
- Cancelling an Alarm using the Alarm Manager and a Pending Intent
- Handle Rescheduling Alarm Service
- Handle Enabling and Disabling of Alarms
Along with the content in this post you can also clone the entire project code base written in Java available from GitHub. https://github.com/learntodroid/SimpleAlarmClock
This project will touch on the following Android components and concepts.
- Time Picker
- Alarm Manager
- Media Player
- Broadcast Receivers
- Services
- Notifications
- Vibrator
- Manifest and Permissions
- Calendar
- Intent, Pending Intent and Intent Extras
- MVVM Design Pattern
- LiveData, Observer and Repository
- Room Persistence Library from Jetpack
- RecyclerView
- Activities and Fragments
- Navigation Jetpack Architecture Component
Scope of the Simple Alarm Clock Android App
Features of the Simple Alarm Clock Android App
The simple alarm clock Android app we will be building in this tutorial will have the following features.
- Ability to set a once off alarm
- Ability to set a recurring alarm on set days of the week
- Ability to disable and re-enable an alarm
- Ability to play a looped audio track for the alarm that is active
- Ability to play a vibration effect for the alarm that is active
- Ability to show a notification for the alarm this is active
- Ability to dismiss an alarm
- Ability to snooze an alarm
Design of the Simple Alarm Clock Android App
The user experience for this app will contain two fragments and two activities.
The first activity which will be used as the main screen for the Android app. It will contain two fragments, the first fragment will be used for listing all alarms in the app and the second fragment will be used to create a new alarm.
The second activity will only be shown when the user selects the push notification shown when an alarm is active. When the notification is selected it will take the user to an activity where the user can select to either dismiss or snooze the alarm.
Structure of the Simple Alarm Clock Android App
In addition to fragments and activities the simple alarm clock Android app we will be building will contain a BroadcastReceiver and Service.
The BroadcastReceiver will be used to trigger the alarm to start after the alarm manager generates a broadcast once the system time hits the scheduled alarm time.
The BroadcastReceiver will start a Service that will be used for the alarm. This Service will display a notification and will play an audio track for the alarm sound on loop and produce a vibration effect until the alarm is dismissed or snoozed.
The app will be structured using the Model View ViewModel (MVVM) software design pattern. This helps for creating a separation of concerns for components within your app to simplify the maintenance of your code base over time.
If you would like to learn more about the MVVM design pattern and how it can be used in apps that require integration with an API, check out the following post that I wrote.
In this tutorial we will also make use of Android architecture components offered under Jetpack. This gives us access to really useful components that we can leverage in our app with tasks such as without needing to code it from scratch.
Some of the Jetpack architecture components we will be using in this tutorial include LiveData for enabling the MVVM design pattern, the Navigation architecture component to transition between screens in our app and the Room persistence library for storing user data.
If you would like to learn more about Android Jetpack and how it can help you make better Android apps consider checking out this other post I wrote.
Tutorial for Creating a Simple Alarm Clock App in Android
Step 1: Capturing the Alarm Time using a TimePicker
In the first section of the tutorial I will show you how we will be capturing the time for the alarm to go off using a TimePicker widget.
We will be creating a fragment called “CreateAlarmFragment” which will be used for capturing all the details needed for the alarm such as:
- The time of day of the alarm
- A title for the alarm which will be shown in the notification when the alarm is playing
- Whether it is a recurring alarm or a once off alarm, and if it is a recurring alarm which days of the week the alarm will be active
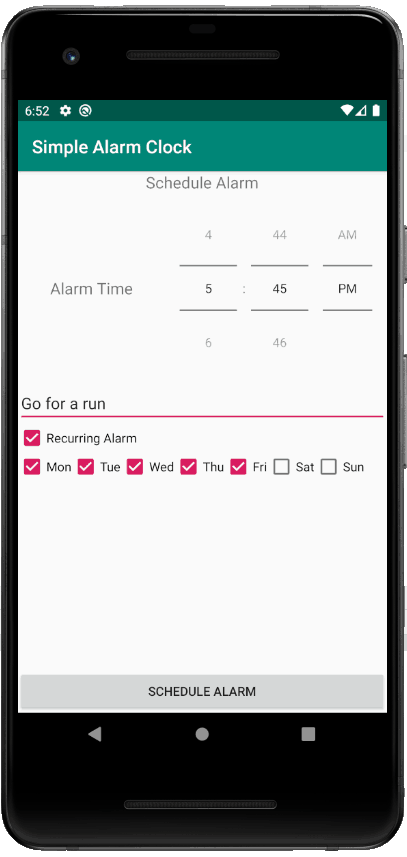
First we will create a layout resource for the fragment. Check out the sample fragment layout I have created below.
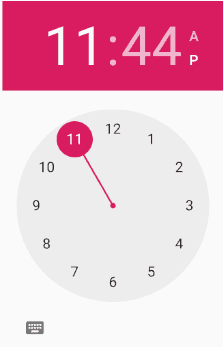
The fragment layout contains a TimePicker widget. The TimePicker widget supports two different modes a spinner mode and clock mode, I have selected a spinner mode. The TimePicker mode is set using the “android:timePickerMode” attribute on the TimePicker which can be set to either “spinner” or “clock”.
By default the spinner mode shows the hour, the minute and whether it is an AM or PM time. The user can change each of these values by selecting the attribute in the user interface and scrolling up or down to increment or decrement the value.
See a screenshot of a TimePicker in spinner mode below.
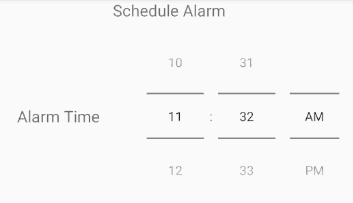
If you want to use clock mode on the TimePicker, by default it will show a clock face for capturing the time where you can move the clock hands to select the hour and minute.
See the following screenshots of a TimePicker in clock mode below.

The layout for creating the alarm also contains an EditText for capturing a title for the alarm. In addition to this there is a checkbox for setting a recurring alarm, where if checked will show a series of checkboxes for the days of the week for the alarm should be run. Also the layout contains a button to trigger the alarm to be scheduled.
See the layout resource for the create alarm fragment below.
In order to get the hour and minute selected on the TimePicker to set the alarm I created a TimePicker utility to handle some of the complexities when dealing with different versions of the Android API.
Prior to Android API level 23 (Android 6.0, Marshmallow) to get the hour and minute from the TimePicker widget you needed to use the getCurrentHour() and getCurrentMinute() methods. Since then those methods have been deprecated and now you need to use the getHour() and getMinute() methods.
See the TimePicker utility class below.
To see how I use the TimePicker utility from the fragment class, see the code for the fragment for creating the alarm and look at lines 58 – 59 to see how the hour and minute values are obtained from the TimePicker.
This is a rather complex class which I will go into more detail in the next sections of this tutorial.
Step 2: Scheduling an Alarm Using Alarm Manager & Pending Intent
In this section of the tutorial for building a simple alarm clock app we will be using the AlarmManager with a PendingIntent to trigger a BroadcastReceiver we will be creating in the subsequent step in this tutorial which is used to generate the Alarm.
The AlarmManager uses the alarming system from the Android operating system to trigger a broadcast to be sent once an alarm is active. The AlarmManager allows you to schedule both once off alarms and repeating alarms. When an alarm is no longer required the AlarmManager can also be used to cancel an alarm.
We use a PendingIntent with the AlarmManager to send an action to perform when the alarm goes off which will be handled by our BroadcastReceiver.
In our simple alarm clock app we will send details about our alarm inside the PendingIntent using Intent extras such as if the alarm is recurring or not and if so what days of the week the alarm should sound. This information will be used in the BroadcastReceiver to only create the alarm service for recurring alarms if the current day of the week falls on one of the days permitted by the alarm.
See the excerpt below for the class that has been created to model an alarm below.
The Alarm has variables defining it’s id, a title of the alarm to be shown in the notification, which hour and minute of the day it will go off, whether it currently scheduled or not, if it is recurring or not and if it is recurring what days of the week it will be active for.
The Alarm also contains a schedule method that takes a context as a parameter. This schedule method is to be called just after the details for the alarm are submitted to be created in the CreateAlarmFragment class covered in step 1.
The schedule method creates an Intent for our AlarmBroadcastReceiver that is covered in the next section of the tutorial and provides data about the Alarm as Intent Extras. It creates the PendingIntent using the Intent previously created.
Then the time in milliseconds to fire the alarm broadcast is calculated using a Calendar set to the system time then adjusted by setting the hour and minute then adjusting the alarm one day forward if the alarm time has already passed for today.
The AlarmManager is then used to schedule the alarm. If the alarm is not recurring, the alarm is scheduled using the setExact(…) method on the AlarmManager including the parameters AlarmManager.RTC_WAKEUP alarm type (meaning it will wake up the device to fire the alarm if the screen is off), the time of the alarm in milliseconds and the pending intent previously created.
If the alarm is recurring, the alarm is scheduled using the setRepeating(…) method on the AlarmManager including the parameters AlarmManager.RTC_WAKEUP alarm type, the time of the alarm in milliseconds, the repeat interval in milliseconds (set to 1 day) and the pending intent created above.
Step 3: Starting the Alarm Service using a Broadcast Receiver
In this section of the tutorial we will using a BroadcastReceiver to capture the Broadcast created by the AlarmManager when the scheduled alarm goes off. Once this broadcast is received we will use it to start an alarm Service that will create a notification, vibrate the device and play a looped sound for the alarm.
Broadcast receivers are an Android app component that allow us to listen to different events or broadcasts such as those generated by the Android operating system or Android apps.
Some examples of broadcasts that are generated by the Android operating system include:
- When the device boots up
- When an SMS is received
- When the device starts charging
- When the Wi-Fi connectivity changes
During step 2 of this tutorial we used the AlarmManager to schedule an alarm which creates a broadcast once the alarm is ready to go off. In this section we will intercept this broadcast generated by the AlarmManager inside our own broadcast receiver then will start an alarm service.
See the code below for the AlarmBroadcastReceiver that has been created to handle the broadcast from the AlarmManager.
In the onReceive method of our broadcast receiver we check that the broadcast received is not the broadcast that is sent when the device is booted. If that is not the case then the broadcast relates to an alarm and we then retrieve extras from the Intent to check is the alarm is recurring on not.
If the alarm is not a recurring alarm, we start the alarm service by using the startService(…) method on the context then passing an Intent containing the title of the alarm.
If the alarm is a recurring alarm, we perform additional checks in the Intent extras on the broadcast to check if the current day of the week is permitted for the recurring alarm. Only if that is the case, will we start the alarm service.
If your device shut downs your alarms scheduled by the AlarmManager will be lost. To set them up again you will need to schedule them when your app boots. To achieve this in the AlarmBroadcastReceiver onReceive(…) we will check for the Intent action of ACTION_BOOT_COMPLETED which is sent in a broadcast when the device boots. If this action is detected, we will then create a service that will retrieve all the alarms stored in the Room database and reschedule them using the AlarmManager.
The AlarmBroadcastReceiver, the AlarmService and the RescheduleAlarmsService will need to be registered as receivers and services inside your manifest file. Broadcast receivers defined in a manifest file are known as static receivers.
In addition to that you will need to request that permission to use the FOREGROUND_SERVICE permission to run services in the foreground. We will also need the RECEIVE_BOOT_COMPLETED permission and an intent filter with the BOOT_COMPLETED action inside our receiver in the manifest so that we can send a broadcast to the AlarmBroadcastReceiver when the device is booted to reschedule any active alarms.
See the manifest file I have created below which covers each of these details.
Step 4: Use a Notification, Media Player and Vibrator to Activate the Alarm
In this section of the tutorial for creating a simple alarm clock Android app we will creating the Service we will be using for activating the Alarm.
The service will run as a foreground service and will show a notification while playing a loop sound for the alarm as well as a looping vibration pattern. When the user selects the notification it will take them to an activity where they can either dismiss or snooze the alarm.
Please see the java code sample for the AlarmService class I wrote below.
This AlarmService extends the Service class and it overrides the following methods of the Service class.
- onCreate()
- onStartCommand(Intent, int, int)
- onDestroy()
- onBind(Intent)
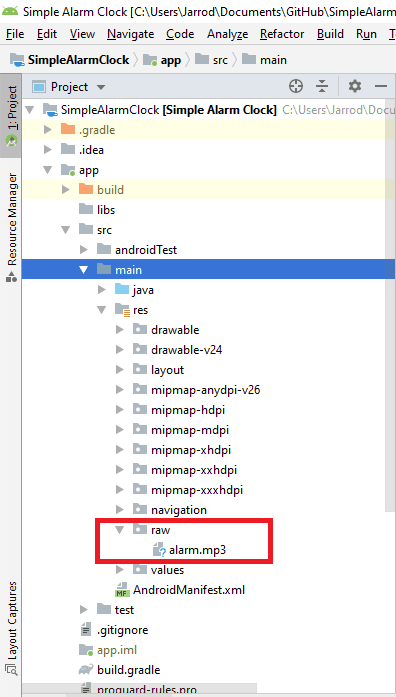
The onCreate() method is called when the Service is created. In the onCreate() method we first set up the media player to load a particular sound file included as an MP3 file. To load an MP3 file into your Android project within Android Studio, place the MP3 inside a directory in the “res” folder.
We also configure the media player to loop the sound file when it starts to play. Also in the onCreate() method we get a reference to the vibrator service on the Android operating system for use later when we will play the alarm.
We don’t have any need to bind this service so we return null in the onBind(Intent) method.
The onStartCommand(Intent, int, int) is called after the onCreate() method when the startService() or startForegroundService() method is called. In the onStartCommand(…) method we do the following.
- Create an Intent and PendingIntent to be provided to the notification to allow for navigation to the activity to dismiss or snooze the alarm when the notification is selected
- Retrieve the title for the alarm passed inside an Intent Extra for use in the title of the notification
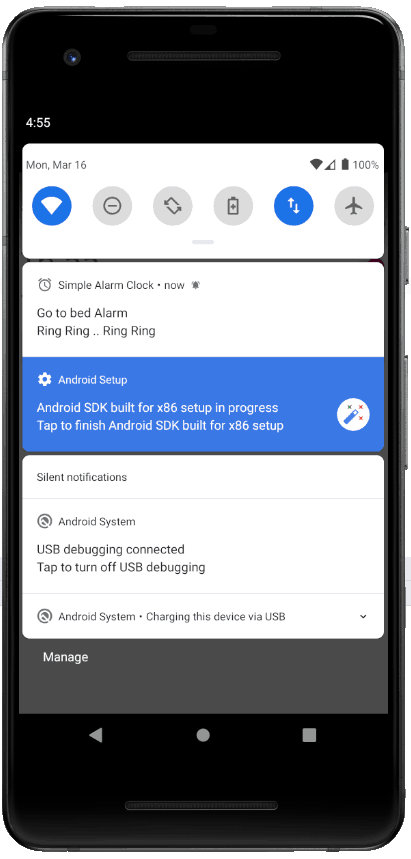
- Create and send the notification containing the title of the alarm inside with a clock icon for the notification and on selection it navigates the user to the activity to dismiss or snooze the alarm (see the notification in the screenshot below)
- Start the media player to play the sound previously loaded in the onCreate() method on a loop
- Start the vibrator on the device to vibrate for 100 milliseconds then pauses the vibration for 1000 milliseconds then repeats it until cancelled
The onDestroy() method gets called when the service is no longer used an is destroyed. In this method we perform clean up tasks such as stopping the media player and cancelling the vibrator service.
When creating a notification as of Android Oreo (Android 8.0) we need to create a notification channel first. This is best implemented inside an Application class.
See the java code below for creating a notification channel inside an Application class.
We will also need to make some changes to the manifest in this step in the tutorial. These changes are already reflected in the manifest shown in step 3 of the tutorial above. These changes include the following.
- Request access to the “android.permission.VIBRATE” permission to gain access to the device vibration functionality (See line 7 in the manifest shown in Step 3)
- Set the “android:name” attribute on the application in your manifest to the application class you built for creating a notification channel (See line 10 in the manifest shown in Step 3)
- Add the AlarmService as a service within your manifest (See line 35 in the manifest shown in Step 3)
Step 5: Implementing Dismissal and Snoozing of the Alarm
In the fifth section of this tutorial for implementing a simple alarm clock app in Android I will cover how to implement the functionality to dismiss (stopping the alarm) and snooze (stopping the alarm and rescheduling it to run in 10 minutes) the alarm.
In the previous section we implemented the AlarmService that has a notification which when selected will start an activity that has buttons to snooze or dismiss the alarm.
See the java code sample for the RingActivity class below.
On selection of the dismiss button, the AlarmService will be stopped by creating an Intent of the AlarmService class then calling the stopService(Intent) method on the application context. In addition to stopping the service it will end the activity by calling the finish() method.
When the snooze button is selected by the user, prior to stopping the AlarmService and closing the activity in the same way as the dismiss button, first it will schedule a new alarm to run 10 minutes in the future. The new alarm time is calculated using setting a Calendar to the current time then using the add method the Calendar instance to add 10 minutes.
Step 6: Cancelling an Alarm using the Alarm Manager and a Pending Intent
In this section of the tutorial for creating a simple alarm clock app we will implement functionality to cancel an alarm that was previously scheduled using the AlarmManager.
See the code excerpt model from the Alarm class which has a method used for a cancelling an alarm using an AlarmManager.
The process for cancelling an alarm using an AlarmManager is very similar to the process for scheduling an alarm using an AlarmManager.
In the cancelAlarm(Context) method we first get a reference to the AlarmManager by calling getSystemService(Context.ALARM_SERVICE).
After that we create an Intent that uses the AlarmBroadcastReceiver and use the Intent to create a PendingIntent that has a reference to the alarm id that we when scheduling the alarm.
From there we call the cancel(PendingIntent) method on the AlarmManager passing the PendingIntent we created as a parameter and this will cancel the alarm.
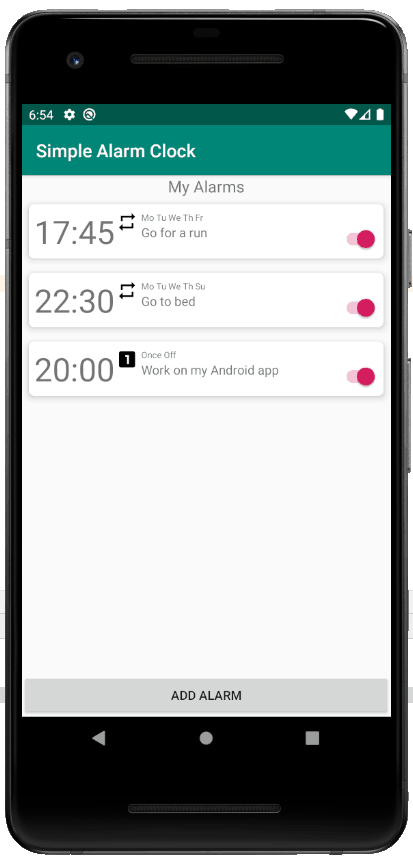
See the code for the AlarmsListFragment class below.
The AlarmsListFragment displays all of the Alarms in a RecyclerView which includes details about the Alarm times, the alarm title, whether it is recurring or not, if it is recurring which days of the week the alarm will sound and it also has a Switch that shows the whether the alarm is active or not. The Switch has a listener that when selected will either schedule or cancel the alarm dependending on the state of the alarm.
The AlarmsListFragment retrieves the Alarm records to show in the RecyclerView using a AlarmsListViewModel that uses the AlarmRepository and a Room database to locate the alarms. An observer when retrieving the Alarms data so that the RecyclerView will automatically get refreshed if there are any changes to the Alarms data in the Room database.
The AlarmsListFragment also navigates the user to the CreateAlarmFragment if the user selects the button to add an alarm.
See the code for the AlarmRecyclerViewAdapter class below.
See the code for the AlarmViewHolder class below.
See the code for the OnToggleAlarmListener interface below.
See the code for the AlarmsListViewModel class below.
See the code for the AlarmRepository class below.
See the code for the AlarmDatabase class below.
See the code for the AlarmDao interface below.
Step 7: Handling Rescheduling of Alarms On Device Boot
The final part of this tutorial to create a simple alarm clock Android app covers how to reschedule alarms when the device boots.
It is important to note that all alarms scheduled using the AlarmManager will be lost when the device is booted. This means that so the user doesn’t lose the alarms they configured we will need a way to reschedule these each of the alarms using the AlarmManager when the device boots.
We will achieve this using the Room persistence library, our existing BroadcastReceiver and a new foreground Service.
Earlier in the tutorial in Step 1, I showed a code sample of the CreateAlarmFragment class. The CreateAlarmFragment class follows the MVVM design pattern to insert instances of the Alarm model into the Room Database via a ViewModel and a Repository when a user captures submits a new alarm.
The CreateAlarmFragment uses the insert method on the CreateAlarmViewModel passing an Alarm as a parameter. See the CreateAlarmViewModel class below.
When the insert method is called, the CreateAlarmViewModel calls the insert method on the AlarmRepository and passes the Alarm. The code for the AlarmRepository is available in Step 6 but ultimately this new Alarm record gets added to the Room database.
We will be using the AlarmRepository to retrieve the Alarm records from the Room database when we are ready to reschedule any alarms that were cancelled when the device was booted.
In the AlarmBroadcastReceiver shown in step 3 of the tutorial, line 14 checks for a broadcast with the Intent Action of Intent.ACTION_BOOT_COMPLETED which is sent when the device is booted. Once it receives this broadcast it calls a method to start a foreground Service using the RescheduleAlarmsService class.
See code for the RescheduleAlarmsService below.
As you can see in the onStartCommand(Intent, int, int) method, the Service uses the AlarmRepository to retrieve all of the Alarm records stored in the Room database. It checks the Alarm’s started state, which gets set to true when the alarm is scheduled and gets set to false when the alarm is cancelled by the user. If the Alarm is started, then it will then reschedule the Alarm using it’s schedule method.
Note: As mentioned in a GitHub issue raised, if the Android app is force closed by the user, it is standard AlarmManager behavior to cancel alarms scheduled by the AlarmManager. In the SimpleAlarmClock app, any enabled alarms that get canceled in this manner will still show as enabled in the app when it gets restarted even though they are actually canceled.