
Design patterns are important to help us create cleaner more extensible code with a clear separation of concerns. Understanding how all the Android Jetpack architecture components fit together in the Model View ViewModel (MVVM) design pattern is not a simple task and adding integrating with an API to the mix can increase the learning curve. After doing some research on how to use Retrofit2 to consume an API while following the MVVM pattern, I have put together this tutorial to share what I have learnt.
To consume a REST API using Retrofit2 using the MVVM pattern in Android the you will need to complete the following steps.
- Allow permission to use the internet in the app manifest
- Obtain developer dependencies for Retrofit2 and the various Jetpack libraries enabling MVVM in Android using Gradle
- Create the model to handle the API response
- Use Retrofit2 to create an interface of the API
- Create a repository and consume the API within the repository using Retrofit2
- Create the ViewModel and connect it to the repository
- Create the View and connect it to the ViewModel to make the API call via the repository
In the article I will take you through a tutorial of consuming the REST API offered by Google for Google Books using Retrofit2 inside an Android app architected using the Model View ViewModel design pattern in Java.
All of the code samples that will be shown in this article in the tutorial section are available publicly on GitHub in the Learn To Droid MVVM REST API repository.
Before we jump into the tutorial I will also cover the following.
- What is Retrofit?
- What is MVVM?
- How can the MVVM pattern be applied in Android app development
What is Retrofit?
Retrofit is a HTTP client for Android and Java by Square, Inc that simplifies the implementation of integrating with a REST API both for generating requests and handling responses.
Retrofit is easy to use for developers as it automates a lot of the work required to integrate with an API by transforming an Java interface that you write containing annotations and method declarations of the operations on the API that you consume.
Later in the post in the tutorial section I will show an example of how you can use Retrofit2 in our repository to integration with an API.
What is MVVM?
MVVM stands for Model View ViewModel and it is a design pattern which enables you to create a separation of concerns from the different components within your app in addition to allowing you to drive the user interface from your model.
In MVVM, the Model is made up of the data models, business logic and application data.
In MVVM, the View is the structure, layout and appearance of what a user will see in your app.
In MVVM, the ViewModel is used by the View to transform data in the model to display in the View.
How can the MVVM pattern be applied in Android app development
Under the banner of Android Jetpack various Architecture Components have been released by the Android development team in part to enable the use of Model View ViewModel design pattern in Android.
Examples of Jetpack Architecture Components used in the MVVM design pattern include:
LiveData is an observable data holder that is lifecycle aware. Inside your View you can add an observer to the LiveData so that when the LiveData is updated, your View (for example a Activity or Fragment) is notified so that you can update your user interface with the new data. The ViewModel is generally used to update the LiveData, however LiveData can also be modified in the repository on certain events such as handling an API response.
To learn more about LiveData and the benefits for using it, check out the video below from the Android Developers YouTube channel.
View models are objects that provide data for user interface components that survive configuration changes such as device rotations that cause an Activity to be recreated potentially resulting loss of data. View models reduce the complexity of your Activity and Fragment classes by shifting responsibility of code relating to the data to shown in the user interface of out of the Activity and Fragment and into the ViewModel.
To learn more about ViewModel and the benefits for using it, check out the video below from the Android Developers YouTube channel.
The Room architecture component is a persistence library that provides an abstraction layer over SQLite. Room allows you to keep a cache of your app data allowing it to be accessible even in cases on network connectivity issues.
Room can be used to cache data retrieved from an API using Retrofit2 in the MVVM pattern, however this not been included in this tutorial at this stage. If this is something you are interested in learning more about please leave a comment and I will look at getting it included.
To learn more about Room and the benefits for using it, check out the video below from the Android Developers YouTube channel.
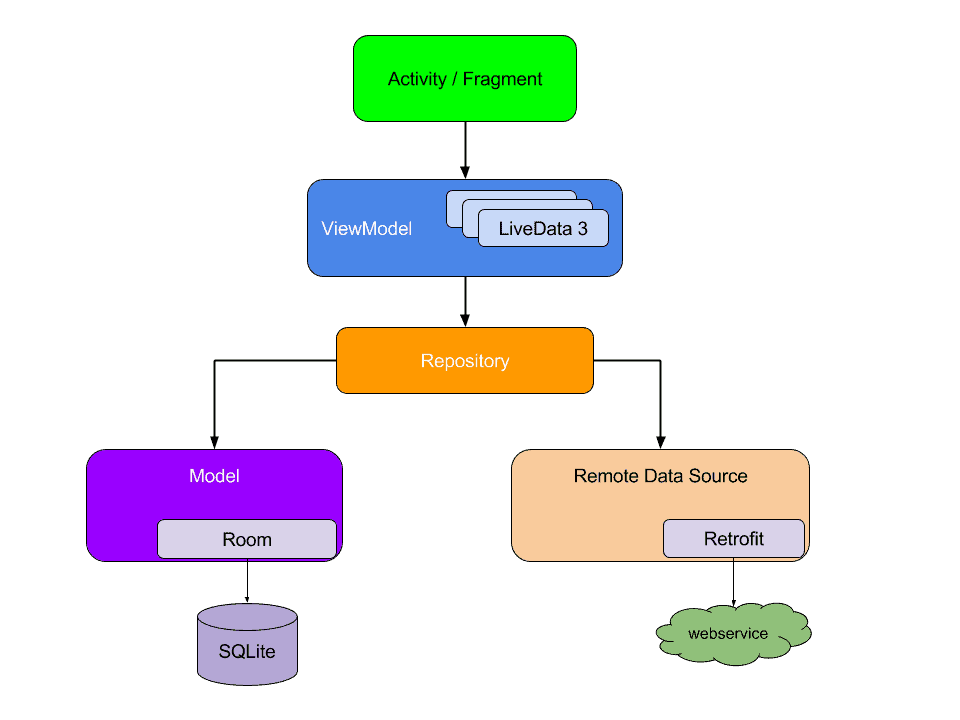
To get an idea of how it all fits together, see the architecture diagram available in the Android Jetpack documentation below, which we will be loosely following in the tutorial, with exception of the Room component.
MVVM Android Tutorial with Retrofit2 in Java
Scope of this Tutorial
In this tutorial I will show how the MVVM design pattern can be applied along with the Retrofit2 library through the creation of an Android app in Java that utilises Google’s Books API.
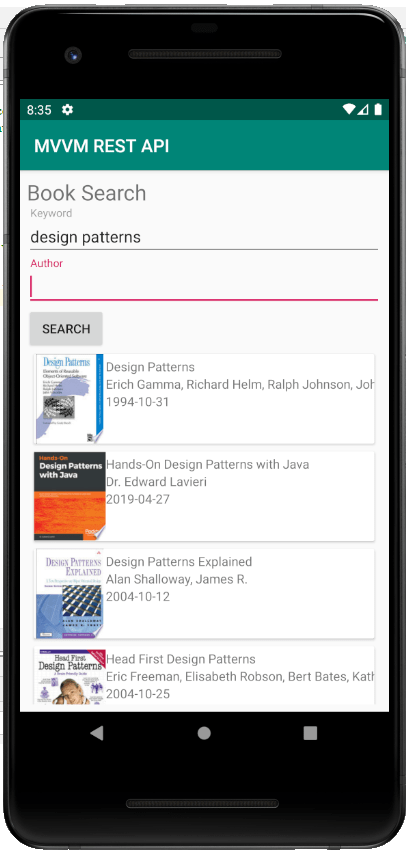
The app we create will allow you to search for books using keywords and an author and display the results in a RecyclerView.
I will be make use of the following libraries to create this example app.
All of the code used to create this app is available publicly on GitHub in the Learn To Droid MVVM REST API repository.
How we will use the Google Books API
We will be consuming the the Google Books API using Retrofit2 for this project. To understand more about how the API functions and the data model of the API check out the online documentation.
In order to search for books using a keyword and author we will need to use a GET request passing in the keyword and author as query parameters.
See the example below searching for “harry” with the author “rowling”.
GET https://www.googleapis.com/books/v1/volumes?q=harry&inauthor=rowling
When you are performing a search across publicly available books using the Google Books API, an API key is not mandatory. An API key is only required if you want to utilise private data inside that particular user’s book library.
If you want to create an API key, you will need to create a project, generate an API key and enable the Google Books API against the project to allow you to use the key for this API. For more information on how to to create the API key check out the Using the API documentation.
Step 1: Allow Permission to use the Internet in the App Manifest
Given the Google Books API is only accessible through the internet we will require the permission to use the internet in the app’s manifest file.
This is simple but easy to forget, so we may as well get this out of the way first. Add the following to the manifest file to enable the permission for the app to use the internet.
<uses-permission android:name="android.permission.INTERNET" />
Step 2: Getting the Dependencies using Gradle
We will be making use of multiple different libraries for making this project. These libraries will need to be added as dependencies using Gradle inside the build.gradle file in our Android project’s app directory.
We will be using ViewModel and LiveData libraries as a part of implementing the MVVM design pattern in Android. See the dependencies for the ViewModel and LiveData in Java below.
// viewmodel and livedata /app/build.gradle dependencies
implementation 'androidx.lifecycle:lifecycle-extensions:2.1.0'
We will be using Retrofit2 for communicating with the Google Books REST API. See the dependencies for Retrofit2 in Java below.
// retrofit2 /app/build.gradle dependencies
implementation 'com.squareup.retrofit2:retrofit:2.7.0'
implementation 'com.squareup.retrofit2:converter-gson:2.7.0'
We will be using Glide for showing displaying thumbnail images of book covers inside the ImageViews. See the dependencies for Glide in Java below.
// glide /app/build.gradle dependencies
implementation 'com.github.bumptech.glide:glide:4.10.0'
annotationProcessor 'com.github.bumptech.glide:compiler:4.10.0'
Step 3: Creating the Model to Handle the API Response
Next we will by creating a package called models then create a series of different model classes that will be used to handle the response from the Google Books API when we perform a search.
When we will use Retrofit2 to handle the API call, we will be using Gson to handle the conversion of the JSON string into a Java object (i.e. Deserialization). As we create these model around the API response we will use the @SerializedName and @Expose annotations offered by Gson for this purpose.
The response format for making a book search query is available in the Google Books API documentation, this is what we will use to create the various model classes as seen in the code samples below.
VolumesResponse.java
Volume.java
VolumeInfo.java
VolumeImageLinks.java
When creating these models we do not have to specify every field in the response, we only need to include those fields that are required for our app.
Step 4: Use Retrofit2 to Create an Interface of the API
Now we will be creating a package called api then create an interface inside this package using annotations which Retrofit2 will use when communicating with the real HTTP API.
As mentioned earlier, we are interested in just a single operation using a GET request for which we will be passing various query parameters including a keyword for search, an author and an API key (optional)
See the code sample for the BookSearchService interface below.
In this tutorial, I will only be adding a GET request to this API using Retrofit2, if you are interesting in learning how to make a POST request using Retrofit2 take a look at this other post I wrote below.
Step 5: Create a Repository and Consume the API with Retrofit2
Next we will be creating a repository which will interact with the remote data source (Google Books API) using Retrofit2.
Create a package called “repositories”, inside that package we will create a new class called BookRepository. See the code sample below for BookRepository.java
This repository will be utilised by the ViewModel to interact with the Google Books API which will be triggered when the user clicks the button in the View to search for a book after entering a keyword and author.
In the constructor method of the BookRepository, Retrofit2 is used to build the client used to interact with the Google Books API using the interface defined previously. I have included a HttpLoggingInterceptor on the client to log the body of the interactions with the API to allow for improved debugging as this is not shown by default.
This BookRepository also includes a method searchVolumes(String, String, String). This method uses the client created by Retrofit2 to make an API request and handle the API response in the case of success or failure.
In the future steps of this tutorial, the ViewModel will contain a reference to the LiveData stored in the repository and the View (i.e. the Fragment) will observe for any changes to the LiveData via the ViewModel. This allows the ability for the user interface in the View to be updated in the real-time once the API response has been received and updated into the LiveData using postValue(…) which will notify the observer to update the View with the latest search results.
Step 6: Create the ViewModel
The next part of this tutorial will be to create the ViewModel which will be used by the View to interact with the API via the repository to search for books.
The View will also use the ViewModel to observe for any changes to the list of search results, which gets updated when the search triggered by the API is complete, which allows the View to retrieve the results immediately to display in the user interface.
Create a package called “viewmodels”, inside that package we will create a new class called BookViewModel. See the code sample below for BookViewModel.java
Step 7: Create a RecyclerView Adapter for the Book Search Results
In this section of the tutorial we will be creating the RecyclerView adapter for the RecyclerView that will be placed in the View showing the search results for the book.
In the layout for each book in the search result we will include the following.
- A thumbnail of the book cover inside an ImageView
- The title of the book inside a TextView
- The author(s) of the book inside a TextView
- The published date of the book inside a TextView
See the layout resource below for book_item.xml
In the adapter we will create a list of Volume records and will initialise it as an empty list. In Step 8 inside the fragment class, we will observe changes to the LiveData which is updated in the repository when we perform a search and receive a response from the API. The data from this will be updated in real-time for use in this RecyclerView adapter.
I have included an inner class for the ViewHolder for each BookSearchResult which will set the contents of each TextView in the search result as well use the Glide library to retrieve the book cover image from the URL and show it inside the ImageView.
See the code sample below for BookSearchResultsAdapter.java
Step 8: Create the Fragment and Connect it to the ViewModel
In this section of the tutorial we will be creating the fragment for the book search user interface and connect it to the ViewModel to allow us to interact with the repository to perform a search and observe the changes to the LiveData to keep the user interface up to date.
In the layout for BookSearchFragment we will include the following.
- A TextInputEditText to capture keyword search term
- A TextInputEditText to capture the author to use in search
- A Button to trigger the search
- A RecyclerView to show the search results
See the layout resource below for fragment_booksearch.xml
Inside the BookSearchFragment we are doing the following.
- Creating the BookSearchResultsAdapter which will start with no data
- Wiring up the BookSearchFragment with the BookSearchViewModel with the Fragment and initialising it (which creates the repository from the ViewModel)
- Observing the LiveData used for handling the Google Book API search results from the BookSearchFragment to automatically trigger an update to the data inside the BookSearchResultsAdapter when the LiveData is updated as the search is completed
- Setting up the RecyclerView for showing the search results
- Setting up the TextInputEditTexts to capture the keyword search term and author for performing a search
- Setting up the search Button to trigger the search using a method exposed by the ViewModel which uses the repository to trigger an API request using Retrofit2 then updates the response into the LiveData
See the code sample below for BookSearchFragment.java
Step 9: Place the Fragment inside an Activity
This section of the tutorial is mainly for future proofing in case of needing to expand the app with more functionality and additional fragments in the future. I have created the MainActivity and placed a NavHostFragment inside it from the navigation component library. The MainActivity will only show a single fragment which is the BookSearchFragment.
See the layout resource below for activity_main.xml
See the code sample below for MainActivity.java
The NavHostFragment requires the creation a navigation graph resource to know which fragment to display in the Activity.
See the navigation graph resource below for mynavgraph.xml
To learn more about how to use the Navigation Component from Android Jetpack check out the article below.