
Retrofit2 is a powerful HTTP client library developed by Square used in Android and Java development. I have put together a tutorial with code samples in Java covering how to send JSON data in a HTTP POST request within an Android app using Retrofit2.
To send JSON data in a POST request in Android using Retrofit2 you need to complete the following steps.
- Obtain the dependencies for Retrofit2 using Gradle
- Create the model for the API request and response
- Create a Java interface representing the service and including Retrofit2 annotations
- Set up the HTTP client using a singleton pattern within your app
- Invoke the HTTP client generating the request and handling the response and errors
- Configure the app manifest to give permission to access the internet
Continue reading this post to deep dive into what Retrofit2 is and how it can be used to generate a POST request containing JSON data with code samples available in this article in Java.
I have also added some information to the tutorial around an alternative approach for sending data in a POST request with Retrofit2 by using URL parameters instead of a JSON body inside the request.
Android HTTP JSON Body Post Request in Java Using Retrofit2 Example
We will be creating a very basic Android app for this tutorial to demonstrate how to make a HTTP POST request containing a JSON body using Retrofit2.
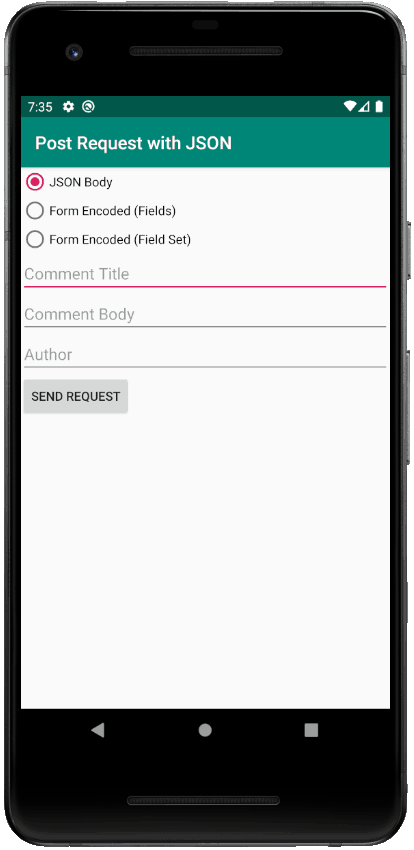
Please see a screenshot of the Android app will be creating. The app contains a basic form that is used to capture a comment which is like something that you might see on a social media app or a news app with articles the public can comment on.
As you can see it contains the following:
- Three fields for capturing a Comment including a title, a body and an author
- A radio button group containing three different options for creating the HTTP POST request using Retrofit2
- And a button to send the HTTP POST request containing the data about the Comment
I have uploaded the code for the Android app being created in this tutorial in GitHub – https://github.com/learntodroid/PostRequestwithJSON
For the purposes of this tutorial I have written code for a very basic API using Python and the library Flask which is configured to respond with the same Comment sent to the API in POST request from the Android app.
If you are interested in the code for the API written in Python using the Flask library it is also available on GitHub – https://github.com/learntodroid/PostRequestFlaskApi
If you want to run this API make sure you have Python and PyPi installed on your local machine where you are running the Android emulator and follow the brief instructions in the Readme to retrieve the dependencies for Flask and run the API.
Step 1: Obtaining the Retrofit2 Dependencies
In this tutorial we will be making use of various 3rd party libraries to simplify the effort required to integrate our Android app with an API to make a POST request.
The 3rd party libraries we will use include Retrofit2, OkHttp3 and GSON. Each of the libraries will be retrieved into our Android project using Gradle.
Retrofit2
Retrofit2 is a HTTP client for Android and Java developed by Square which allows you to use a Java interface to simplify the process of integrating with a HTTP API.
- Official docs – https://square.github.io/retrofit/
- Retrofit2 on GitHub – https://github.com/square/retrofit
To retrieve the Retrofit2 library using Gradle include the following implementation dependency inside your app’s build.gradle file (see a complete build.gradle file at the end of this section which covers all required dependencies).
implementation 'com.squareup.retrofit2:retrofit:2.7.1'
Retrofit2 requires Java 8, to include Java 8 in an Android project, update your app’s build.gradle file to include compile options.
android {
  compileOptions {
    sourceCompatibility JavaVersion.VERSION_1_8
    targetCompatibility JavaVersion.VERSION_1_8
  }
}
OkHttp3
OkHttp3 is a HTTP client for Java and Kotlin developed by Square.
- Official docs – https://square.github.io/okhttp/
- OkHttp3 on GitHub – https://github.com/square/okhttp
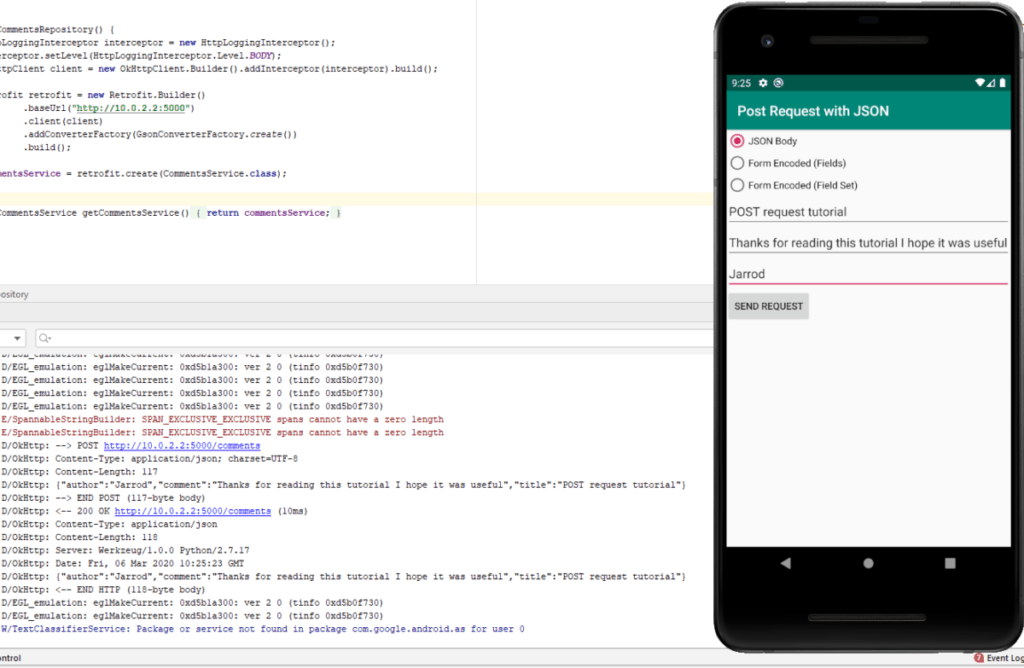
For the purposes of this tutorial we will be using the logging interceptor included in the OkHttp3 library to give us visibility of the HTTP request and response logs for our Android app within Logcat.
To get an idea of what we will be able to see in Logcat using the OkHttp3 logging interceptor, have a look at the screenshot below

To retrieve the logging interceptor from the OkHttp3 library using Gradle include the following implementation dependency inside your app’s build.gradle file.
dependencies {
    implementation 'com.squareup.okhttp3:logging-interceptor:4.4.0'
}
GSON
Gson is a Java library by Google that supports converting objects in Java into JSON format and back otherwise known as serialization and deserialization.
- GSON on GitHub – https://github.com/google/gson
Retrofit2 has added support for different converters including GSON to support serialization and deserialization when handling an API’s request and response.
To retrieve the GSON converter from the Retrofit2 library using Gradle include the following implementation dependency inside your app’s build.gradle file.
dependencies {
    implementation 'com.squareup.retrofit2:converter-gson:2.7.1'
}
The list of converters supported by Retrofit2 are:
- Gson
- Jackson
- Moshi
- Protobuf
- Wire
- SimpleXML
- Scalars
Example ‘build.gradle’ Containing Retrofit2, OkHttp3 & GSON Dependencies
Please see the example build.gradle file covering all the dependencies highlighted in the section above.
Step 2: Creating the Model for the API Request and Response
The comments we will capture in our Android app with contain three attributes entered by the user. These three attributes will all be strings and will contain the comment author, a title for the comment and a body for the comment.
When we will be make a POST request to the API, we will use the GSON library to transform a Comment object into a JSON string (serialization) to send inside the body of the request.
If the request was correctly formatted the API will request with the same JSON file we can then use GSON to transform that JSON string and transform it into a Comment object (deserialization).
When building the model class, use the @SerializedName(string) annotation against each field to set the name of the attribute as it will appear in the JSON file. By default GSON will use the variable name in Java if there is no @SerializedName(string) annotation provided.
Please see the example class below containing the model for a comment.
Step 3: Creating a Java Interface for the API with Retrofit2
In this section of the tutorial we will be creating a Java interface and use the Retrofit2 library to add annotations to methods in the interface that will represent the operations exposed on the API.
Please see the example Java interface using Retrofit2 annotations to describe the API will we be using to submit Comments.
In this section we will focus the createComment(Comment) method defined on line 14.
Line 13, contains both the request method and path that will be called on the API when the createComment(Comment) method is invoked. In this case we are using a POST request so we use the “@POST” Retrofit2 annotation. We will be sending the POST request to the “/comments” end point on the API so inside we pass the path as a parameter to the “@POST” annotation.
The full list of request methods supported by Retrofit2 are:
- GET
- POST
- PUT
- PATCH
- DELETE
- HEAD
On line 14, we are defining the method for creating a comment and we are passing a @Body annotation with a Comment object as a parameter. Providing an @Body annotation with a Comment as a parameter indicates that we will be providing a request body when we invoke this API which in our case will be a JSON payload containing the details of the comment.
The finally, the createComment(Comment) method returns a Call<Comment> object. This means that when we invoke the API to create the comment we expect to see a request body containing a JSON body that we will deserialize into a Comment object (in our case using Gson).
Step 4: Setting Up the HTTP Client
In this part of the tutorial we will setting up access to the HTTP client using Retrofit2 inside a repository class that follows the singleton pattern. This will enable us in the next step of tutorial to retrieve the instance of the repository then invoke the API to create a comment.
Please see the code below containing the CommentsRepository class which initialises the HTTP client using Retrofit2 inside the constructor.
Inside the constructor prior to setting up the API using Retrofit2 first we create an interceptor using the OkHttp3 library that we will use to allow us to log the HTTP request and responses inside Logcat. We create also use the OkHttp3 library for it’s HTTP client when interacting with the API.
Using the Retrofit2 API builder we provide it with the base url of the API, we set the client to the OkHttp3 client and specify we will be using the Gson library for converting API request and response payloads.
With regards to the base url, I have set it to use the host of “http://10.0.2.2” and the port number 5000. This is because I will use flask to run on it’s default port which is port 5000, and run it on the same host as where I am running the Android emulator.
You cannot use “localhost” as the host for the Android emulator because as I learned in this helpful Stackoverflow answer localhost on the Android emulator will point to the emulator’s own loopback service and you need to use “10.0.2.2” instead to access your local machine.
And finally we create a reference to the web service using the interface of the API we defined in step 3.
Step 5: Invoking the API using Retrofit2
In this section of the tutorial for sending a JSON payload inside a POST request using Retrofit2 we will be creating our Activity that will invoke the API using Retrofit2.
Please see the code below containing the CommentsActivity class which invokes the HTTP client with a POST request using Retrofit2 when the button is clicked.
Inside the onCreate(Bundle) method we will get access to the single instance of the CommentsRepository which we will use in the OnClickListener assigned to the Button to generate a HTTP request to the Comments API.
Inside the OnClickListener we first create the Comment object using the comment title, comment author and comment body captured by the use.
Then using a switch statement check for which radio button was selected, in this section I will only cover the option sending the JSON payload which is defined in lines 55 – 66.
To invoke the API we access the CommentService on the CommentRepository and call the createComment(Comment) method passing the Comment object we created based on the user input.
We call the createComment(Comment) method using enqueue which allows use to define a callback method in case of either a response (defined in an onResponse method) or failure (defined in a onFailure method).
In the onResponse method we expect to see a Comment object in the response and we use a toast to show the comment text which is present inside the HTTP response JSON body that gets deserialized into a Comment object using Gson.
In the onFailure method we simply display the error encountered using a toast, this may occur if the API is down, if there are connectivity issues, or there is a coding error on the server side API.
I have also included the layout resource below which I used for the CommentActivity class.
Step 6: Configure the Manifest to Access the Internet
One final thing you will need to do to ensure you have connectivity to the API is to enable the permission to access the internet (android.permission.INTERNET) inside your Android Manifest for your app.
In addition to this, if you are going to use the Flask API I wrote and don’t want to configure a HTTPS certificate for the API, you will need to add an attribute in the application tag (by setting “android:usesCleartextTraffic” to “true”) inside the Android Manifest to specify that you want to send clear text traffic in your Android app. Warning: Sending clear text traffic should not be done in production for security reasons.
See the sample AndroidManifest.xml file below the shows how to configure the use of clear text traffic and setting the permission to access the internet.
Demonstration
Now if you run your Android app with the API running, and include the comment details and click the button, you should see something like the following in Logcat.
Sending Data in URL Parameters using a POST Request with Retrofit2
Retrofit2 also has support for sending data in a POST request using parameters within the URL.
To achieve this using Retrofit2 inside the interface class you need to add @FormUrlEncoded annotation above the method name. For an example of this check out lines 16 and 20 in the interface code shared in Step 3 of this tutorial you will see the use of the @FormUrlEncoded annotation.
To see the difference in the logs when using the @FormUrlEncoded annotation compare the Logcat results from the Demo section above to the results using the @FormUrlEncoded annotation below.
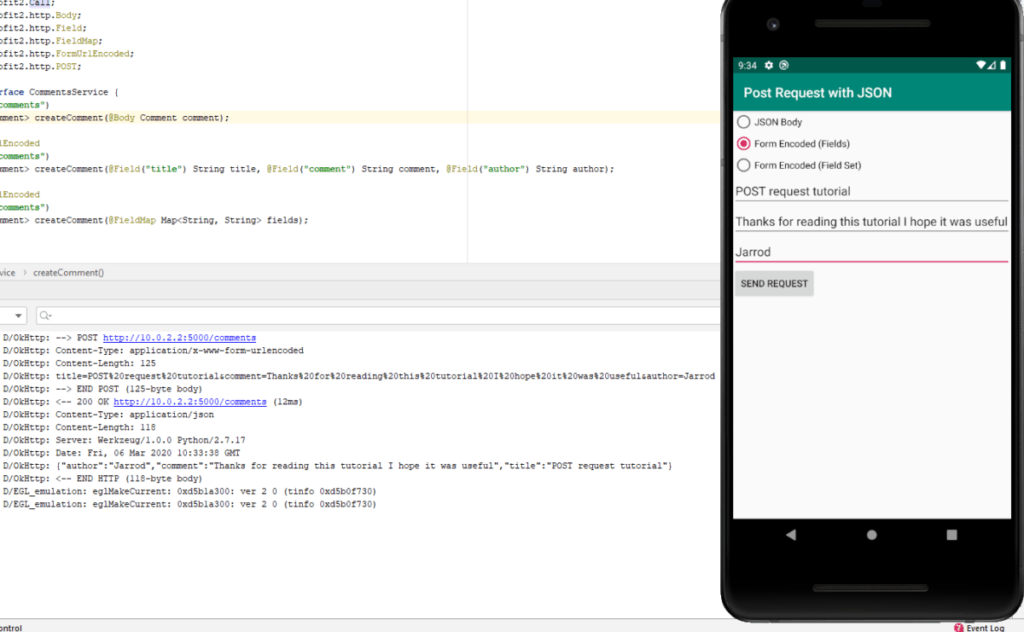
As you can see one difference is that the Content-Type in the header of the request is to set “application/x-www-form-urlencoded”. Another difference is that instead of a request body the the title, comment and author appear in an encoded format in the URL.
How to Use @Field and @FieldMap in Retrofit2
When making a request to an API defined in Retrofit2 you opt to pass the attributes to be sent in the request as a set of fields or as a set of key value pairs.
Using @Field Annotation in Retrofit2
If you check out line 18 in the interface code shared in Step 3 of this tutorial you will see the use of the @Field annotation. Each of the field names and their data types are defined in the method parameters inside the interface.

If you have a look at line 69 in the activity code shared in Step 5 of this tutorial you will see that instead of passing the Comment object as a parameter to the createComment method, the title, comment and author are passed as individual strings instead.

Using @FieldSet Annotation in Retrofit2
If you check out line 22 in the interface code shared in Step 3 of this tutorial you will see the use of the @FieldMap annotation. A Map contain keys that are Strings and values that are Strings are defined as a parameter for that method inside the interface.

If you have a look at lines 83 to 87 in the activity code shared in Step 5 of this tutorial you will see that instead of passing the Comment object as a parameter to the createComment method, a HashMap is passed as an parameter. This HashMap contains key value pairs of which the field names are defined as the keys and the comment title, comment body and comment author are defined as the values.

Further Reading
If you want to learn using the Model View ViewModel software design pattern with Retrofit2 to integrate your Android app with an API, check out the other post I wrote below that goes into this.