
AutoCompleteTextView in Android development is an editable text field that once a certain number of characters are entered, displays a drop down list showing auto-completion results that the user can select from to save time typing.
I have created a tutorial on how to use the AutoCompleteTextView widget in Android which includes examples with sample code.
In this tutorial on AutoCompleteTextView I will cover:
- AutoCompleteTextView Attributes including example screenshots
- AutoCompleteTextView Methods
- How to Add AutoCompleteTextView to a Layout Resource
- Populating AutoCompleteTextView Suggestions with a String Array
- Populating AutoCompleteTextView Suggestions with a String Array Resource
- How to Change the Presentation of AutoCompleteTextView Suggestions with a Custom Adapter
- Populating AutoCompleteTextView Suggestions with a Room Database
- Populating AutoCompleteTextView Suggestions with a Web Service / API
- Testing AutoCompleteTextView with Espresso
All of the code samples shared in this tutorial are available in the AutoCompleteTextView GitHub repository I created at the following link.
https://github.com/learntodroid/AutoCompleteTextViewTutorial
AutoCompleteTextView Attributes
The documentation for AutoCompleteTextView widget is a great resource which includes detailed information about the attributes, methods, constructors and along with some sample code for AutoCompleteTextView.
Standard Example of AutoCompleteTextView in Android
The table below contains attributes used in the AutoCompleteTextView widget in Android along with the description of the attribute and in some cases an example image.
| No. | Attribute | Example |
|---|---|---|
| 1 |
android:completionHint Defines the hint displayed in the drop down menu. |
 android:completionHint="Example Completion Hint"
|
| 2 |
android:completionHintView Defines the hint view displayed in the drop down menu. |
|
| 3 |
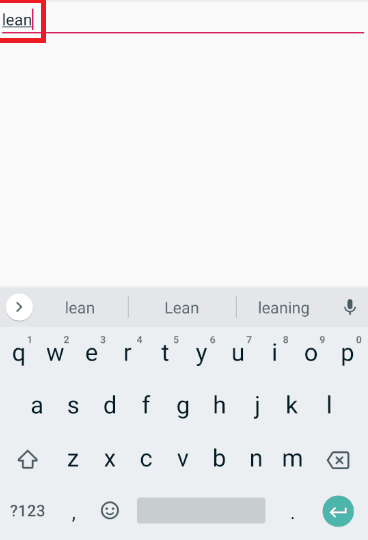
android:completionThreshold Defines the number of characters that the user must type before completion suggestions are displayed in a drop down menu. |
 android:completionThreshold="5"
|
| 4 |
android:dropDownAnchor View to anchor the auto-complete dropdown to. |
|
| 5 |
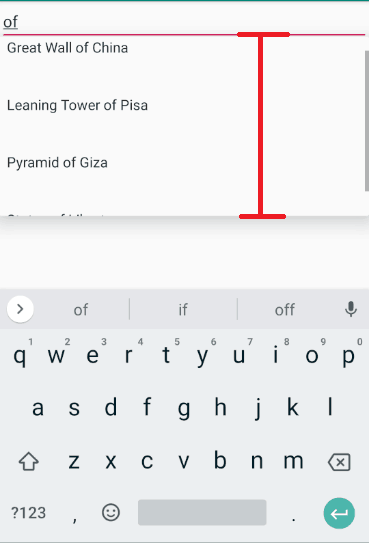
android:dropDownHeight Specifies the basic height of the dropdown. |
 android:dropDownHeight="200dp"
|
| 6 |
android:dropDownHorizontalOffset Amount of pixels by which the drop down should be offset horizontally. |
 android:dropDownHorizontalOffset="100dp"
|
| 7 |
android:dropDownSelector Selector in a drop down list. |
|
| 8 |
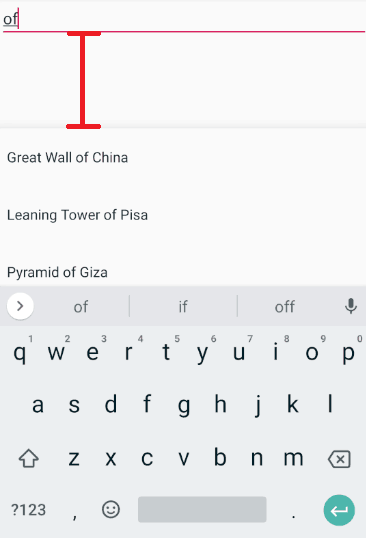
android:dropDownVerticalOffset Amount of pixels by which the drop down should be offset vertically. |
 android:dropDownVerticalOffset="100dp"
|
| 9 |
android:dropDownWidth Specifies the basic width of the dropdown. |
 android:dropDownWidth="200dp"
|
| 10 |
android:popupBackground The background to use for the popup window. |
AutoCompleteTextView Methods
The table below contains some of the key methods of the AutoCompleteTextView widget in Android along with a description.
| Method Definition | Method Description |
|---|---|
| public void setAdapter (T adapter) | Changes the list of data used for auto completion. The provided list must be a filterable list adapter. |
| public ListAdapter getAdapter () | Returns a filterable list adapter used for auto completion. |
| public void setThreshold (int threshold) | Specifies the minimum number of characters the user has to type in the edit box before the drop down list is shown. |
| public int getThreshold () | Returns the number of characters the user must type before the drop down list is shown. |
| public void setOnItemClickListener (AdapterView.OnItemClickListener l) | Sets the listener that will be notified when the user clicks an item in the drop down list. |
For additional information about the methods supported by the AutoCompleteTextView widget have a look at the official documentation for AutoCompleteTextView widget.
How to Add AutoCompleteTextView to a Layout Resource
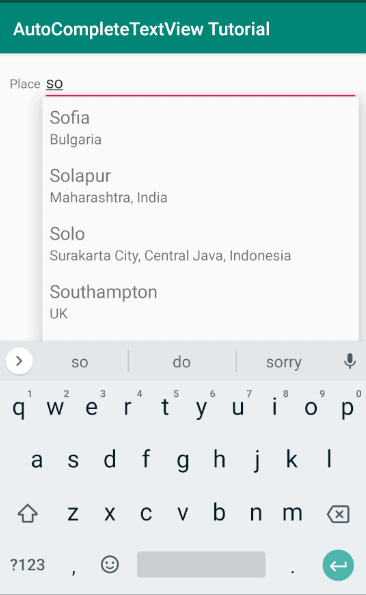
In this tutorial for AutoCompleteTextView we will create a simple app in Android that will autocomplete a place entered by the user.
First we will start by creating a layout resource for to be used in an Activity where we will display the AutoCompleteTextView.
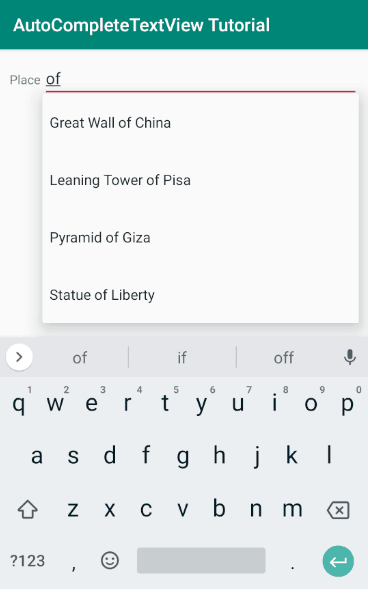
See an example layout resource file below for the MainActivity class containing a AutoCompleteTextView located to the right of a TextView with the label “Place”.
Populating AutoCompleteTextView Suggestions with a String Array
In this section of the tutorial for AutoCompleteTextView I will show you how to populate suggestions into an AutoCompleteTextView using a static array of Strings defined in code.
We will use the layout resource we defined in the previous step inside an Activity where we will create an ArrayAdapter of Strings and set this adapter to the AutoCompleteTextView.
See an example MainActivity class below that contains the code for creating an ArrayAdapter of place names to be loaded as suggestions into an AutoCompleteTextView.
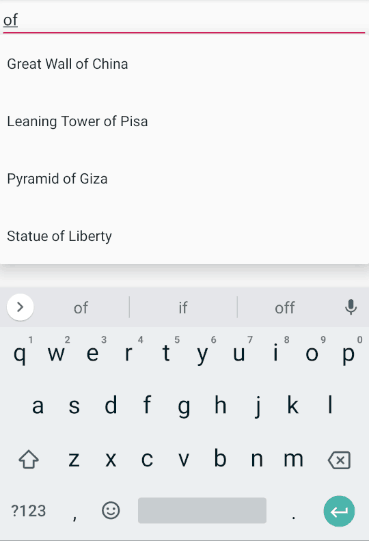
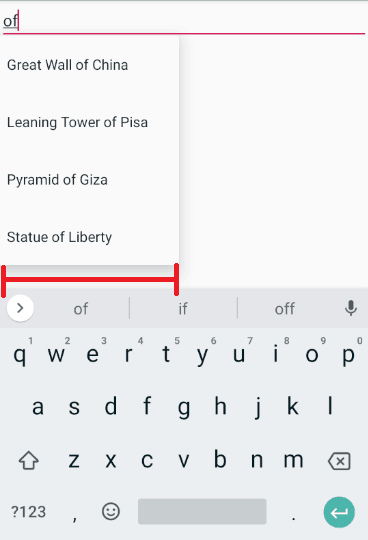
The example code above along with the layout resource defined above, will create an Android app with a user interface that will show suggestions for place numbers once you have entered at least 2 characters in the AutoCompleteTextView.
Populating AutoCompleteTextView Suggestions with a String Array Resource
In this section of the tutorial for AutoCompleteTextView I will show you how to populate suggestions into an AutoCompleteTextView a String Array Resource defined in the strings.xml resource file.
It is best practice in Android app development to use the strings.xml resource file for defining all constant text values you want to display in your Android app for two main resource.
The first reason is that it simplifies the process of maintaining these strings by centralising them in a single file rather than spreading them out across different files with in your app such as classes for activities and fragments.
Secondly it simplifies the process of localization of text inside your Android app allowing you to more easily support different languages and expand the reach of your app to a global audience.
See an example strings.xml resource file that contains an array of Strings for the different place names.
See an example MainActivity class that uses the strings.xml resource file to load the Strings of the place names into ArrayAdapter to be used as suggestions for the AutoCompleteTextView.
How to Change the Presentation of AutoCompleteTextView Suggestions with a Custom Adapter
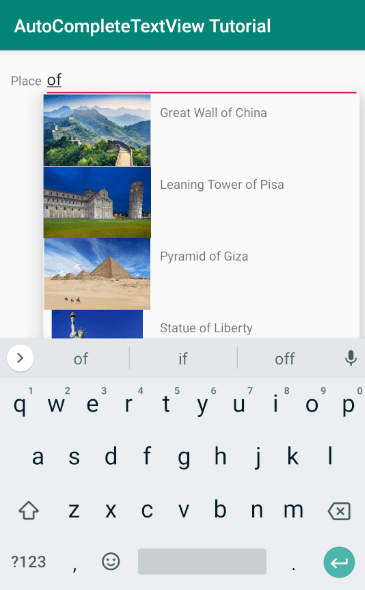
In this section of the tutorial we will be using a custom adapter to allow us to show a photo alongside the name of a place inside the suggestions of the AutoCompleteTextView. See the screenshot below of what we are trying to create.
For displaying images in the suggestions we will using using the Glide image loading library by bumptech, to retrieve the Glide dependency using Gradle include the following code segment in your app level build.gradle file.
For this tutorial we will be using Glide to load images of places from internet, to load images from the internet you will need to add a permission to your Android app’s manifest file to grant access rights to the internet. See an example manifest file containing the INTERNET permission below.
Next we will create a class for Place with two attributes, the name of the place and an URL to the image on the internet. This will be used in the custom adapter we will create to display each Place inside the suggestions in the AutoCompleteTextView. See the code sample of the Place class below.
Then we will create a layout resource to be used for each Place in the suggestions of the AutoCompleteTextView. See the sample layout resource below that contains an LinearLayout layout with a horizontal orientation containing an ImageView for the place image and the name of the place in a TextView to beshown to the right of the ImageView.
The next step will involve creating the custom adapter for the AutoCompleteTextView. This custom adapter will extend the ArrayAdapter class compromised of Places. The custom adapter will contain three variables one List for tracking all of the Places known in the Andorid app and a second List contains a filtered set of Places based on the text entered in the AutoCompleteTextView and a Filter used for filtering the suggestions.
The place filter is implemented using the Filter android widget by overriding three methods publishFiltering(…), publishResults(…) and covertResultToString(…).
In the implementation of the publishFiltering(…) method we receive the constraint as a parameter which in our case in the text entered in the AutoCompleteTextView to look for suggestions. We use the constraint to look through all of the names present in the Places list and add them to the filtered results if the constraint is contained in the Place name. If the constraint is an empty string or null we simply add all Places into the filtered places list.
In the implementation of the publishResults(…) method we clear the results first then add all of the filtered results and notify the data in the filtered list has been updated. In the covertResultToString(…) method we ensure we return the name of the Place name by casting the result to the Place class then use the getter to retrieve the place name.
In the custom adapter class we override getFilter() method and the getView(…) method. The getFilter() method simply returns the filter we have created. The getView(…) will inflate the layout of the Place item in the AutoCompleteTextView suggestions and use the Glide library to load the Place image and set the text of the TextView for the Place name.
See the code sample for the AutoCompletePlaceAdapter class below.
The final step in this section of the tutorial for creating a custom adapter for the suggestions displayed in the AutoCompleteTextView is to set the adapter to the custom adapter inside the MainActivity class. See the sample code below for setting up the AutoCompleteTextView to use the custom adapter we have created above inside the MainActivity class.
Populating AutoCompleteTextView Suggestions with a Room Database
In this section of the tutorial we will cover how to populate suggestions from a Room database into the AutoCompleteTextView. The Room database is a SQLite database available in the Room Persistence Library offered in Jetpack. The Room Persistence Library offers an abstraction layer on top of the database to allow data in your Android app to be persisted even when the user’s connection goes offline.
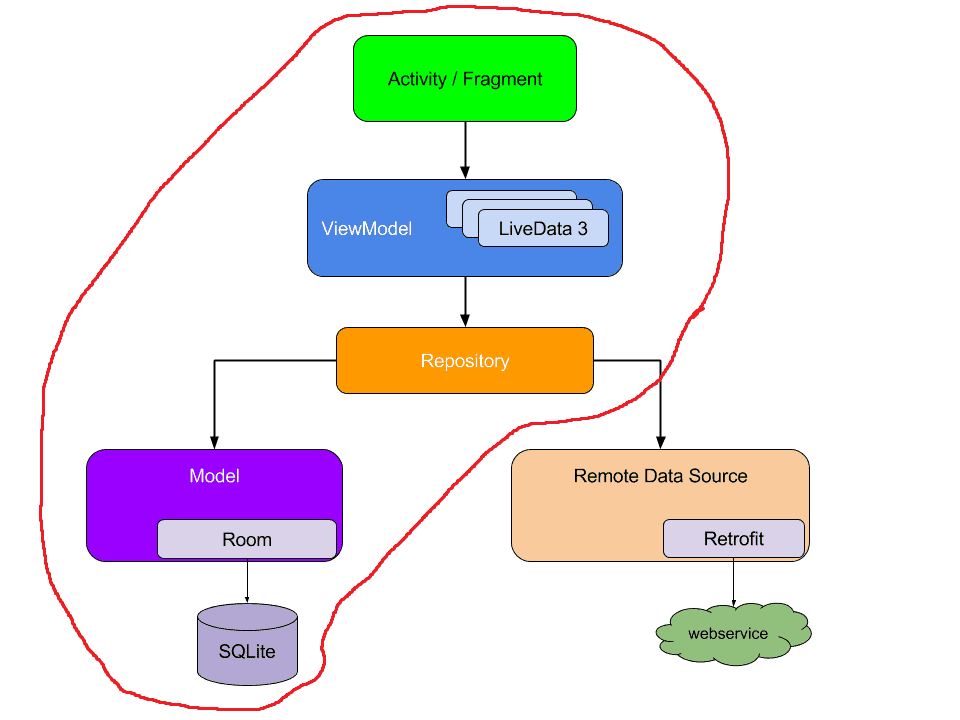
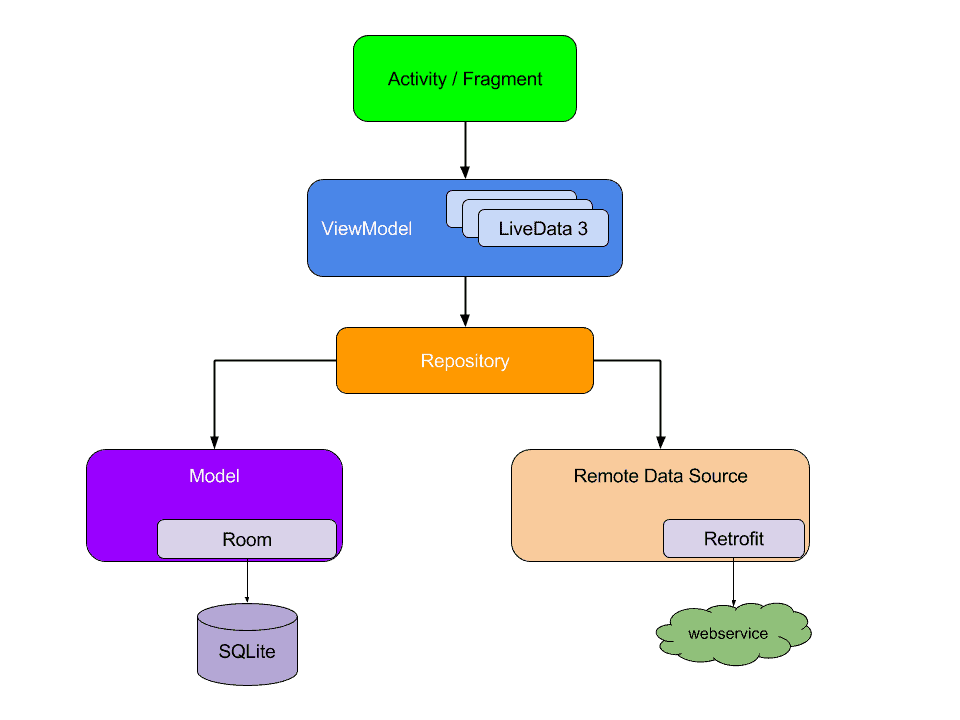
In this example we will be components such as ViewModel, Repository and Room in the architecture pattern shown in the diagram below, known as the MVVM or Model View ViewModel design pattern.
If you would like to learn more about the different libraries and components available under Android Jetpack to make you craft better Android apps check out the post I wrote linked below.
For the sample code in shared in this section we will reuse the custom adapter and the Place class created in the section above.
Retrieving Room Dependencies using Gradle
The first step for this section of the tutorial is to retrieve the dependencies for Room as well as Lifecycle extensions. See the excerpt from the app level build.gradle file below covering both dependencies.
Setting up the Place Entity using Room
The second step for this section of the tutorial for populating suggestions into a AutoCompleteTextView using a Room database is to modify the Place class created in the previous section to become an Entity.
We will be adding annotations from the Room library to the Place class to associate the table with the name “place_table” in the Room database with Place records. These Place records will contain two attributes, the place name and image url, both of these attributes will be stored as text. The place name will be used as primary key which means it will unique for each Place row in the database.
See a code sample for the Place class which is set up as an Entity to be stored in a Room Database below.
Setting up the Place Data Access Object using Room
The third step of this section of the tutorial will involve creating a data access object (DAO) which is an interface consumed by the Room library for creating methods that will interact with the Room database via database queries.
Later in this tutorial where we will need to read or write data into the Room Database we will use methods inside DAO to interact with the database.
See a code sample below for the PlaceDao interface that contains two different queries. One for inserting a list of Place records into the Room Database and the other for retrieving all Place records from the Room Database using a query.
Creating the Place Room Database and Prepopulating with Place Records
The forth step of this section of the tutorial for populating suggestions in into an AutoCompleteTextView from a Room Database involves creating the Room Database and prepropulating the database with Place records.
See a code sample below for the PlaceDatabase class that includes the creation of the Room Database along with a callback that is used to load a List of Place records into the Room Database when it is first created.
Creating a Repository Class to Read Place Records from the Room Database using the Database Access Object
The fifth step of this section of the tutorial is to create a Repository class. The Repository class is used as an entry point to access data from your Room database within your app.
See a code sample of the PlaceRepository class below, inside the constructor for the PlaceRepository, the Room Database will be initialised by either creating a new database or if it does not exist loading an existing Room database.
Also in the constructor, the Place DAO is connected to the Room Database and all of the Place records existing in the Room Database are loaded into a LiveData variable that will be consumed by a ViewModel class in the next step of the tutorial.
Creating and Connecting the Place View Model to the Repository
The sixth step of this section of this tutorial is to set up the ViewModel class to connect to the Repository created in the previous section.
The PlaceViewModel class holds a reference to the PlaceRepository and will retrieve a reference to the LiveData on the PlaceRepository that contains a list of Places retrieved from the Room Database. In the next section of this tutorial the MainActivity will use this LiveData variable on the PlaceViewModel to access Place records from the Room Database.
See the code sample of the PlaceViewModel class below.
Setting up the AutoCompleteTextView to Retrieve Place Suggestions from the View Model
The seventh and final step of this section of the tutorial for populating suggestions into an AutoCompleteTextView from a Room Database covers connecting the ViewModel created in the previous step to the MainActivity to set up the AutoCompleteTextView.
The MainActivity monitors all of the Place records in the Room Database by using the observe method on the LiveData variable via the PlaceViewModel.
On the initial load from the Room Database and on any changes to those Place records in the Room Database the onChanged method will be called containing all of the Place records from the database in a List.
The suggestions are loaded into the AutoCompleteTextView by creating the AutoCompletePlaceAdapter with the list of Places loaded from the database, applying the filter with the text entered into the AutoCompleteTextView and then setting the adapter to the AutoCompleteTextView.
See the code sample of the MainActivity class below.
Populating AutoCompleteTextView Suggestions with a Web Service or API
In this section of the tutorial we will cover how to populate suggestions from a Web Service or API into the AutoCompleteTextView.
In the example we will be working on in this section of the tutorial we will be using the Google Places API to retrieve Places to load as suggestions into an AutoCompleteTextView.
Google Places offers both an API and an Android SDK, we will make use of both for retrieving Places. For the Google Places API we will use the Retrofit2 library to consume the API. We will also still use the Room persistence library covered in the section above to maintain a cache of the data retrieved from the API.
The architecture we will following in our app will be in line with the diagram shown below.
Retrieving the Dependencies for Google Places SDK and Retrofit2 using Gradle
In the first step of this section of the tutorial covering populating suggestions into an AutoCompleteTextView from an API, we will cover using Gradle to download the dependencies required including the following:
- Google Places SDK which is a library that allows you to use the functionality available in the Google Places API by providing a wrapper allowing you to avoid writing code for interacting with a web service directly
- Retrofit2 which is used for consuming the Google Places API
- GSON Converter which is used for deserializing a JSON payload in the body of an API response into a Java object
- OkHttp3 Logging Interceptor which is used for logging HTTP requests and responses made using Retrofit2 to assist with debugging
In addition to downloading these dependencies we will need to make two additional changes to the app level build.gradle file.
- Set the minSdkVersion to 16 which is required by the Google Places SDK
- Enable Java 8 in the compile options
See the code excerpt of the app level build.gradle file below.
Obtaining a Google Places API Key
The second step of this section of the tutorial will cover generating a Google Places API key granting you permission to use the Google Places SDK or Google Places API in your Android app.
To obtain the Google Places API key you will need to log into an existing Google Cloud Account or register a new account at the following link.
https://console.cloud.google.com/
Once you have logged into your Google Cloud Account access the following link to create a new Google Cloud Project.
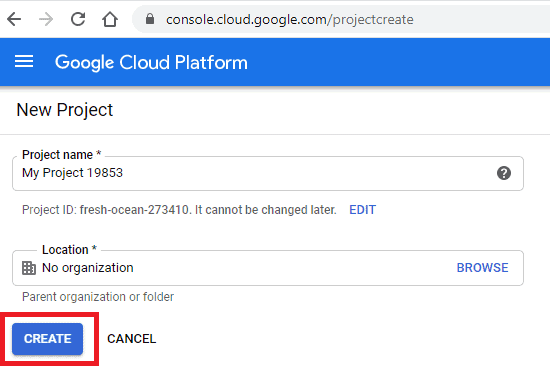
https://console.cloud.google.com/projectcreate
To create the Google Cloud Project enter a project name and select the create button.
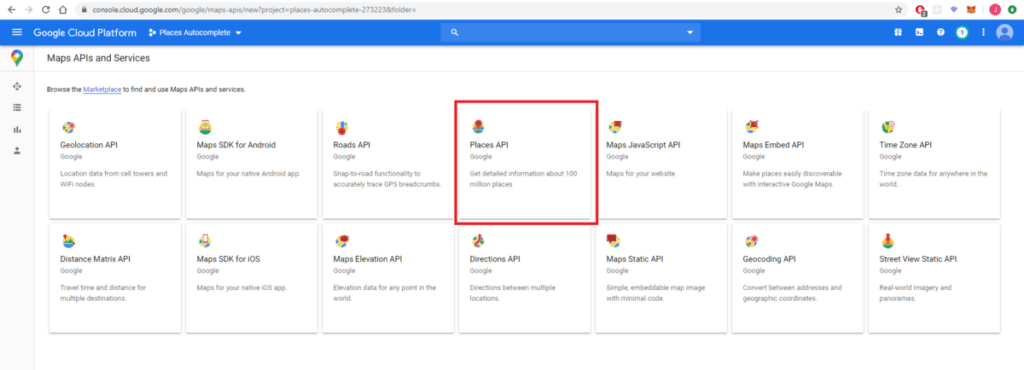
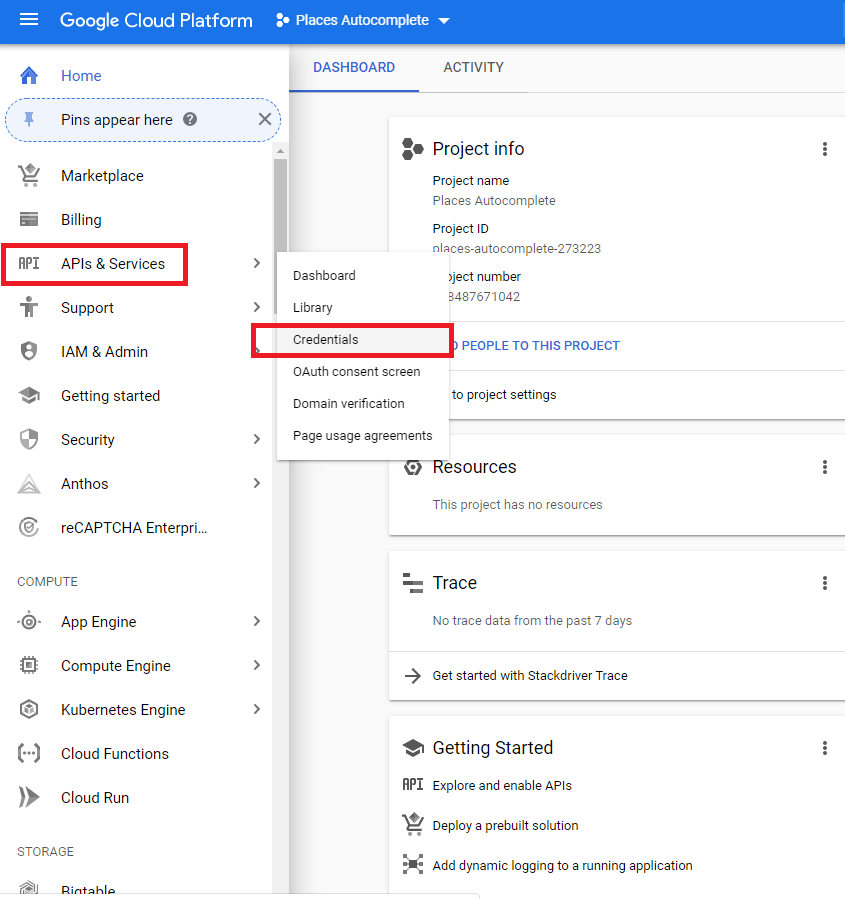
Now that you have created your Google Project the next step is to enable the Google Places API for your project. To achieve this load your new project in the Google Cloud Console then in the left sidebar select “APIs & Services” and select “Library”.

Select the Places API from the list of APIs offered by Google.
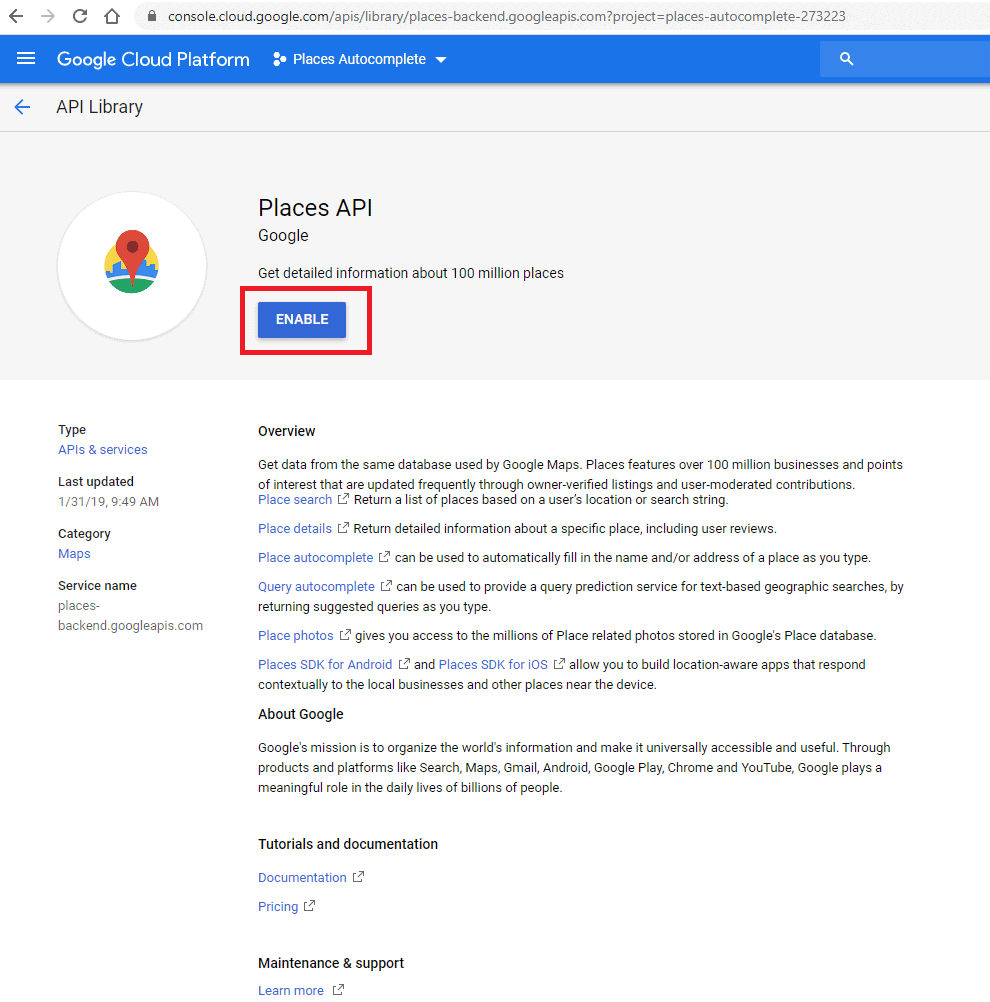
Select the enable button the Places API for your Google Cloud Project
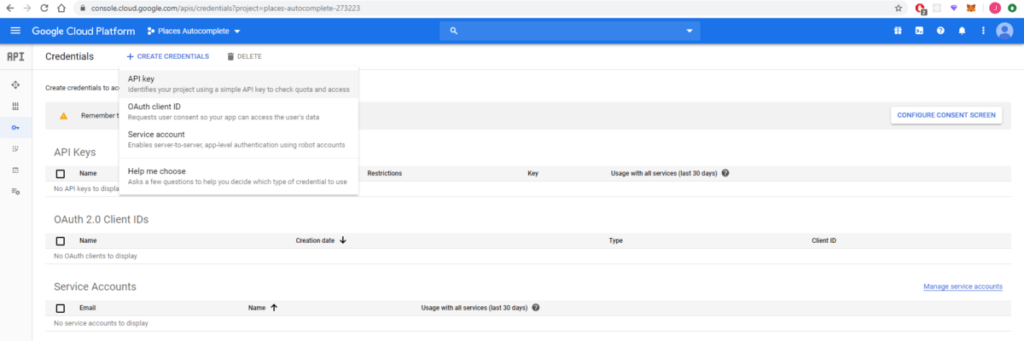
Now that the Google Places API is enabled on your Google Cloud Project the next step is to create an API key. To get started creating the API key navigate to the Credentials screen in your Google Cloud Project by selecting “API & Services” then selecting “Credentials”.
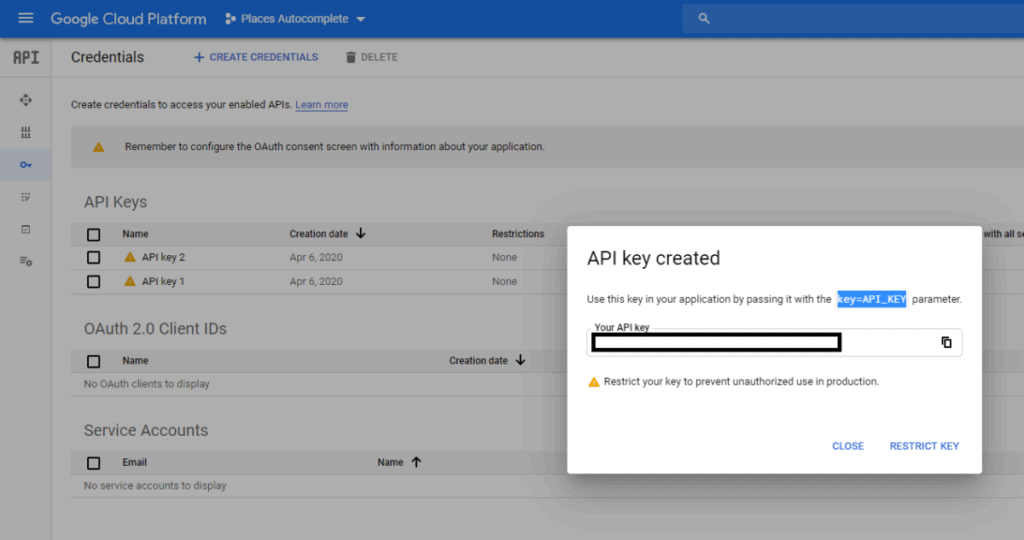
Select “CREATE CREDENTIALS” and select the “API key” option.
This will generate your API key and show it in plain text on screen. It is also recommended you restrict your key to reduce the risk of it being misused this will not be covered in this tutorial but visit the link below if you would like to learn more about how to restrict the key.
https://developers.google.com/places/android-sdk/get-api-key#restrict-key
Updating Model Classes for Storing Google Places and Google Place Predictions
The third step of this section of the tutorial involve updating model classes for storing Google Places and deserializing JSON payloads from the Google Places API response when autocompleting Google Places.
The Google Place API features an API for Autocompleting a Google Place in the HTTP request you can send a search term and in the response you will receive a list of Google Places along with different attributes such as a place id, a primary name and a secondary name for the Place.
We will create a GooglePlace model that we will use storing all places retrieved from the Google Place API. We will define the GooglePlace model as a Room Entity so that it can be stored in the Room Database.
See a code sample of the GooglePlace class below.
We will also define a new model class called PlacePrediction. This will be used with the GSON converter to deserialize the JSON payloads retrieved from the Google Place API request for autocompleting a Place.
Each of the attribute names and data types match up with the attributes on the response payload that we want to have access to in the PlacePrediction object.
See a code sample of the PlacePrediction class below.
Creating a GooglePlace Data Access Object and Update the PlaceDatabase to Store GooglePlace Entities
The forth step of this section of the tutorial covers creating a GooglePlace DAO and updating the PlaceDatabase to support inserting and querying of GooglePlace records in the Room Database.
The GooglePlaceDao will have two methods.
One for inserting a List of GooglePlace records into the Room Database. The insertAll method set the conflict strategy to IGNORE which means that if any of the GooglePlace records in the List to be inserted in the Room Database have the same place id of one of the existing records in the database they will not end up being inserted into the database and instead will be ignored.
The second method is a query that will return a List of all GooglePlace records in the Room Database.
See the code sample for the GooglePlaceDao interface below.
We will also be creating a Room Database called PlaceDatabase that will use the GooglePlace Entity. We will not prepopulate any data into the PlaceDatabase as all of the GooglePlace records will originate from the Google Places API.
See the code sample for the PlaceDatabase below.
Creating the Interface for the Google Place API using Retrofit2
The fifth step of this section of the tutorial covers creating a creating an interface to be used by Retrofit2 for consuming the Google Places API.
In this interface we will add one method definition to be used for autocompleting a Google Place.
Following the documentation provided online for the Google Place Autocomplete API, we will require the following:
- A GET HTTP method for the request
- An API path of “/maps/api/place/autocomplete/json”
- A query parameter input (for the autocomplete search)
- A query parameter key (for the API key)
- A HTTP response that can be deserialized into the GooglePlacePrediction class created above
See the code sample for the GooglePlacesService interface below that incorporates the information above using Retrofit2 annotations.
If you would like to learn more about how to use Retrofit2 check out two the other posts I wrote on this subject below.
Updating the PlaceRepository to Retrieve GooglePlace Records using Retrofit2 and the Google Places SDK
The sixth step of this section of the tutorial covers creating a Repository (PlaceRepository) used to interact with the Google Places API using Retrofit2 and the Google Places SDK along with the Room Database.
In the constructor for the PlaceRepository class we will perform the following tasks:
- Initialise the Room Database by either creating a new Room Database if one does not exist or load an existing Room Database
- Initialise the Google Places SDK for the application by passing the Google Places API key
- Initialise the client for accessing the Google Places API via the Google Places SDK along with a session token to use with the SDK
- Initialise the Google Places Data Access Object and retrieving all of the Google Places records in the Room Database into LiveData
- Initialise the client for accessing the Google Places API using the Retrofit2 builder and the interface we created using Retrofit2 annotations
In addition to a constructor the PlaceRepository class contains two methods for interacting with the Google Places API.
The first method searchGooglePlacesWithSdk(String) will use a String query passed as a parameter to search for Google Places using the Google Places SDK.
The second method searchGooglePlacesWithApi(String) will use a String query passed as a parameter to search for Google Places using the Retrofit2 interface that integrates with the Google Places API.
In both of the methods above if any results are retrieved from the Google Places API it will populate them into a List of GooglePlace records and insert them all into the Room Database using the Google Place DAO.
See the code sample for the PlaceRepository class below.
Connecting the PlaceViewModel to the Repository for Integrating with the Google Places API
The seventh step of this section of the tutorial covers creating a ViewModel (PlaceViewModel) used to interact with the Repository for calling the Google Place Autocomplete API.
The PlaceViewModel will also be used in the next step of the tutorial for the MainActivity class to retreive GooglePlace records from the Room Database and filter them to populate them as suggestions in the AutoCompleteTextView.
See a code sample of the PlaceViewModel class below.
Updating the Main Activity to Populate Suggestions into the AutoCompleteTextView
The eighth and final step of this section of the tutorial is to create the AutoCompleteTextView in the MainActivity and to connect it to the PlaceViewModel to retrieve autocomplete suggestions using the Google Places API into an adapter for the AutoCompleteTextView.
We will need to create a new layout resource for showing the GooglePlace in the AutoCompleteTextView suggestions. See the sample layout resource file below.
Next we will need to create a custom ArrayAdapter for showing GooglePlace records in the AutoCompleteTextView. See the sample code for the AutoCompleteGooglePlaceAdapter below.
Finally we will connect the PlaceViewModel and the AutoCompleteTextView in the MainActivity class.
In order to call the Google Places API when a user enters text into the AutoCompleteTextView we will need to add a TextWatcher by using the addTextChangedListener(…) method on the AutoCompleteTextView. The onTextChanged(…) method inside the TextWatcher will check that sufficient characters have been entered into the AutoCompleteTextView to meet the threshold then it will call the searchGooglePlaces(…) method on the PlaceViewModel with the search text entered by the user.
Also in the MainActivity an observer will be added to the LiveData tracking holding all of the GooglePlace records from the Room Database. This observer will first called when the MainActivity is launched and it will also be run when new GooglePlace records are inserting into the Room Database after the Google Place API is called.
The observer will update the adapter with the List of all GooglePlace records in the Room Database along with a filter to apply based on the text entered into the AutoCompleteTextView. This adapter is then assigned to the AutoCompleteTextView using the setAdapter(…) method.
See the code sample for the MainActivity class below.
How to Implement an OnItemClickListener for an AutoCompleteTextView
In this section of the tutorial we will cover how to implement an OnItemClickListener for an AutoCompleteTextView by showing a photo from the Google Place Details API when the user selects a Google Place from the suggestions provided the Google Place Autocomplete API.
Creating a Model to Handle the Response from the Google Place Details API
The first part of this section of the tutorial for showing a photo of a Google Place on selection of the item from the AutoCompleteTextView involves creating a class for deserializing the JSON payload in the response from the Google Place Details API.
See a code sample of the GooglePlaceDetails class below.
Creating the Interface for the Google Place Details API using Retrofit2
The second part of this section of the tutorial covers adding an additional method definition to the existing GooglePlacesService interface for consuming the Google Place Details API using Retrofit2.
See the code sample for the GooglePlacesService interface below.
Adding a Method to the Place Repository to Interact with the Google Place Details API using Retrofit2
In the third part of this section of the tutorial we will use the additional method definition provided in the previous step in the GooglePlacesService interface by adding a method to the PlaceRepository to invoke the Google Place Details API.
The response from the Google Place Details API will be stored in a LiveData object residing in the PlaceRepository, in later parts of this section of the tutorial we will access this LiveData object from the PlaceViewModel and in the MainActivity.
See the code sample for the PlaceRepository class below.
Connecting the PlaceViewModel to the Repository for Integrating with the Google Place Details API
The forth step of this section of the tutorial covers updating the PlaceViewModel to to interact with the PlaceRepository to call the Google Place Details API and access the LiveData containing the response from the API.
See the code sample for the PlaceViewModel class below.
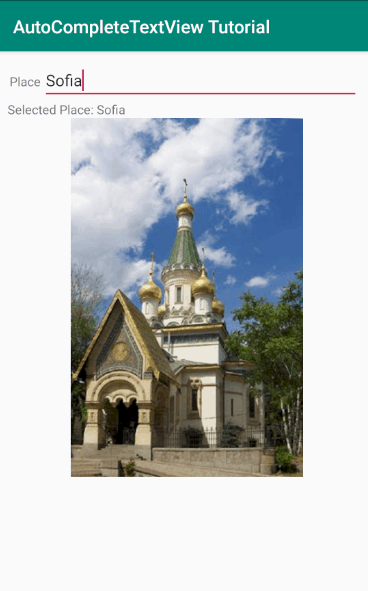
Updating the Main Activity to Show the Google Place Photo when an Item in the AutoCompleteTextView is Clicked
The fifth and final step of this section of the tutorial covers setting up the AutoCompleteTextView in the MainActivity to display the Google Place photo when an item in the AutoCompleteTextView is clicked.
First we will update the layout resource for the MainActivity to include a TextView to display the name of the selected place and an ImageView to show the photo of the selected place. See the sample layout resource file below.
Secondly we will add an OnItemClickListener to the AutoCompleteTextView using the setOnItemClickListener(…) method to make an API call to the Google Place Details API to retrieve photos for the selected Google Place suugestion.
Next we will add an observer to the GooglePlaceDetails LiveData to set the TextView with the place name and load the correct Google Place photo image. The observer will be invoked after the GooglePlaceDetails LiveData gets updated in the PlaceRepository which occurs when an autocomplete suggestion gets selected and the Google Place Details API response is received.
See the code example for the MainActivity class.
Testing AutoCompleteTextView with Espresso
In this section of the tutorial I will cover how to write some basic instrumentation tests for the AutoCompleteTextView using the Espresso user interface testing framework.
To use the Espresso testing framework you will first need to install some dependencies. See a sample app level build.gradle below containing the Espresso dependencies we will be using in this section of the tutorial.
Next we will be creating an instrumented test using Espresso. This will be placed inside the src/androidTest/java directory. See the code sample below containing Espresso tests for the AutoCompleteTextView.