
There is a large selection of different testing tools, libraries and frameworks available for Android. It is hard to understand which tool to use for what type of tests whether that is unit testing, mocking, user interface testing or integration testing.
I have put together an article covering 11 useful testing tools, libraries and frameworks to use for Android which includes the following:
- JUnit 4 (unit testing framework)
- Espresso (user interface testing framework)
- Robolectric (testing framework which supports running testing Android components on JVM)
- AndroidX Test (testing library available under Jetpack)
- Hamcrest (matchers framework)
- Truth (assertions library)
- Mockito (mocking framework)
- Firebase Test Lab (tool running tests on your Android app on a physical or virtual device in the cloud)
- Firebase App Distribution (tool for distributing mobile app builds to testers)
- UI Automator (user interface testing tool for interactions across multiple apps)
- Appium (test automation framework based on WebDriver protocol)
For each tool I will cover some information about where it is best used for testing an Android app, how to get started retrieving any dependencies along with any test class code samples where applicable.
JUnit 4
JUnit 4 is a popular Java based open source framework used for writing and running unit tests.
JUnit 4 has a feature called assertions which allows for testing the result of actual behaviour of an application against expected behaviour.
Some common assertions supported by JUnit 4 are:
- assertEquals and assertNotEquals
- assertTrue and assertFalse
- assertNull and assertNotNull
- assertSame and assertNotSame
- assertArrayEquals
- assertThat
JUnit 4 also features test fixtures which provide support for sequencing tests by using annotations such as @BeforeClass, @AfterClass, @Before and @After. This is useful where you need to need to put the application into a particular state before running unit tests.
JUnit 4 also features test runners which are used for executing unit tests.
For testing Android apps, JUnit 4 is useful for running both local unit tests (tests that run on the JVM) and instrumented unit tests (tests that run on an Android device or emulator).
For an example test class containing local unit tests for Android that uses JUnit 4, see the code sample below.
For an example test class containing instrumented unit tests for Android that uses JUnit 4, that also includes the usage of Espresso (UI testing framework for Android), see the code sample below.
In order to use the JUnit 4 testing framework in your Android app for unit testing you will need to include the JUnit 4 test implementation dependency in your app level build.gradle as per the excerpt below.
Espresso
Espresso is a user interface testing framework for Android apps. Espresso allows you to interact with user interface elements within your app such as EditText fields and Buttons then verify you app is behaviour in the correct manner by observing the user interface.
To create user interface tests using the Espresso framework you will need to define ViewMatchers, ViewActions and ViewAssertions.
- View Matchers are used in Espresso to locate user interface elements on screen
- View Actions are used in Espresso to perform interactions against user elements
- View Assertions are used in Espresso to verify that user interface elements match the correct state after interactions with the user interface has taken place
A great resource to keep handy to help remember the different ViewMatchers, ViewActions and ViewAssertions available in Espresso is the cheat sheet below that has been published to android.developer.com.
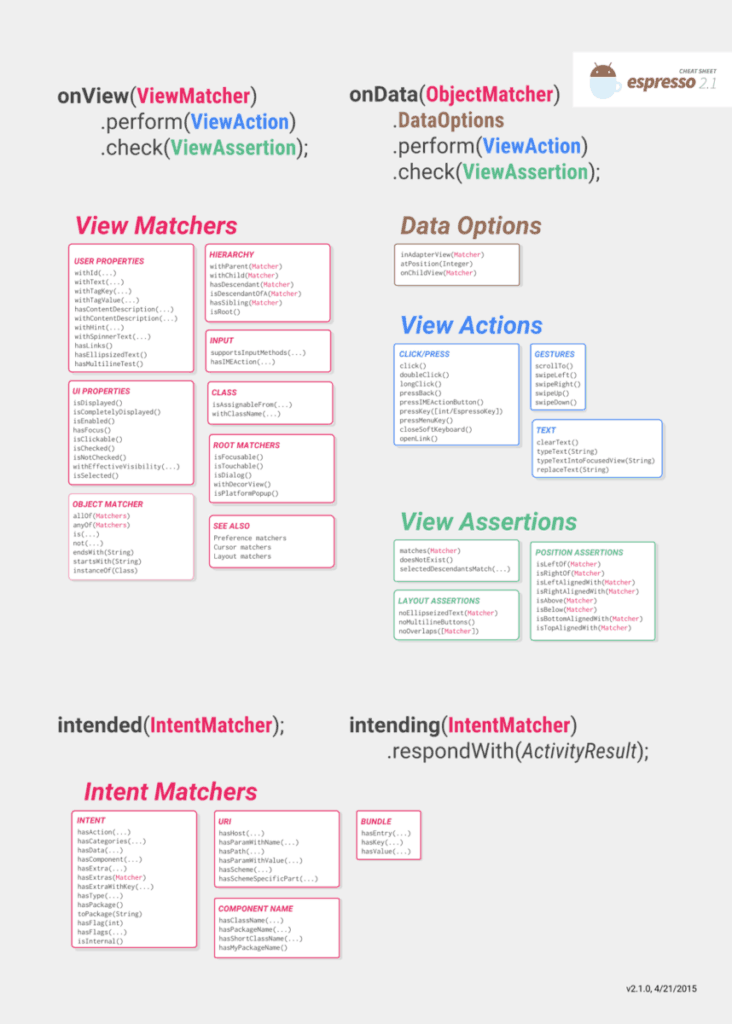
Source: https://developer.android.com/training/testing/espresso/cheat-sheet
For an example test class containing three UI tests written using Espresso, see the code sample below.
In order to use Espresso in your Android app you will need to include some test dependencies and set a instrumentation runner in your app level build.gradle file. See an code excerpt of a sample build.gradle file containing these details below.
If you would like learn more about Espresso have a look at the post I wrote linked below that goes into more detail about how Espresso can be used to test an Android app.
Robolectric
Robolectric is an open source testing framework for Android that allows you to unit test Android components on the Java Virtual Machine (JVM) rather than requiring an emulator or real device.
This improves execution time of tests and allows you to set up these tests to be run on machines where there is no connected mobile hardware or emulator such as a Continuous Integration server.
Robolectric can also handle the inflation of views and resource loading which enables you to test your app as if it was running on a real device.
Because the tests for Robolectric are run on the JVM, your unit tests need to be placed inside the src/test directory rather than the src/androidTest directory.
Robolectric uses test doubles for testing against components in the Android framework. These test double components behave similar to the real components in the Android framework.
For an example test class containing a unit test written using Robolectric, see the code sample below.
To use Robolectric in your Android app you will need to include a test dependency in your app level build.gradle file. See an code excerpt of a sample build.gradle file containing the dependency required for Roboelectric.
AndroidX Test
AndroidX Test is an open source testing library available as a part of Jetpack.
AndroidX Test is comprised of different modules which include:
- JUnit 4 module which includes Runner and Rules
- Core module which includes ApplicationProvider, ActivityScenario and FragmentScenario
- Espresso module which includes ViewMatchers, ViewActions and Intents
- Truth module which includes IntentSubject, BundleSubject and ParceableSubject
- Robolectric module which includes Unified API, AndroidJUnitRunner and binary resource support
To learn of the different dependencies required to use AndroidX Test and how to set up your Android project to retrieve them take a look at the guide published in the link below.
https://developer.android.com/training/testing/set-up-project
To learn more about AndroidX Test I how suggest watching the presentation below.
Source: https://www.youtube.com/watch?v=4m2yYSTdvIg
Hamcrest
Hamcrest is an open source testing matcher framework which offers a set of matchers to use along with an easy way to create your own custom matchers.
Hamcrest matchers can be utilized in unit tests written in JUnit by using the assertThat assertion offered by JUnit.
Hamcrest offers different categories of matchers such as object based matchers, logic matchers, numeric matchers, string matchers and collection matchers.
Hamcrest Logic Matchers:
- allOf
- anyOf
- not
Hamcrest Object Matchers:
- equalTo
- hasToString
- instanceOf
- isCompatibleType
- notNullValue
- nullValue
- sameInstance
Hamcrest Numeric Matchers:
- closeTo
- greaterThan
- greaterThanOrEqualTo
- lessThan
- lessThanOrEqualTo
Hamcrest String matchers:
- equalToIgnoringCase
- equalToIgnoringWhiteSpace
- containsString
- endsWith
- startsWith
Hamcrest Collection Matchers:
- hasEntry
- hasKey
- hasValue
- hasItem
- hasItems
- hasItemInArray
A full list of matchers offered by Hamcrest are available in the Hamcrest API documentation.
For an example test class containing a unit test using Hamcrest matchers, see the code sample below.
Truth
Truth is an open source assertion library for Java and Android that is owned and maintained by the Guava team.
It [Truth] is used in the majority of the tests in Google’s own codebase
Source: https://truth.dev/
Truth can be used to make assertions within your tests quicker to create and easier to read and can improve test failure messages making it easier to debug your code.
Some examples of String based assertions offered by Truth include:
- contains
- containsMatch
- doesNotContain
- endsWith
- hasLength
- isEmpty
Some examples of iterable collection based assertions offered by Truth include:
- contains
- containsExactly
- containsNoDuplicates
- doesNotContain
- containsNoneOf
- containsAnyOf
- isEmpty
- hasSize
A full list of assertions offered by the Truth library is available in the API documentation.
For an example test class containing a unit test using the Truth assertion library, see the code sample below.
To use the Truth assertion library in your Android app you will need to include a test dependency in your app level build.gradle file. See an code excerpt of a sample build.gradle file containing the dependency required to use Truth.
Mockito
Mockito is an open source mocking framework for unit tests in Java and Android.
Mockito allows you to generate and configure a mock object of a Java interface or a class. Mockito will keep a history of all methods called on a mock object along with any parameters sent.
Mockito is useful for testing an Android app that has a component with external dependencies such as an Android dependency and you want to verify that your component interactions with the dependency as expected.
For an example of using Mockito in Android follow the link below to the code sample published by the Android team under their testing samples GitHub repository.
To use Mockito in your Android app you will need to include a test dependency in your app level build.gradle file. See an code excerpt of a sample build.gradle file containing the dependency required to use Mockito.
Firebase Test Lab
Firebase Test Lab is a mobile testing tool, with support for both Android and iOS apps, that allows you to run the tests for your mobile app against physical or virtual devices hosted in the cloud.
Source: https://www.youtube.com/watch?v=4_ZEEX1x17k
Firebase Test Lab also offers an app crawler Robo, that will run automated tests against your app by navigating between screens, interacting with functionality on screen and reporting crashes.
In the Firebase console you can configure which physical or virtual devices you want to run your instrumentation tests against. There is a selection of tablets and smart phones available along with wearables. You can also choose with Android API versions you want the device to have installed.
In addition to this, you can configure Firebare Test Lab to be in a particular locale. You can also choose the screen orientation the device with be in when the tests are run.
Firebase Test Lab is integrated with Firebase Console available in the web browser as well as Android Studio and the gcloud command line interfaces. Firebase Test Lab can also be run from your Continuous Integration pipeline.
If you would like to learn about how you can integrate Firebase Test Lab into your continuous integration pipeline check out the tutorial I wrote covering building, testing and releasing an Android app using Jenkins. It has a section covering the use of Firebase Test Lab to run tests on the devices available in the cloud.
After your tests against your app within Firebase Test Lab it will produce a detailed test report for you accessible in the Firebase console. The test report also includes a video of the tests, screenshots and logs to help you with triaging and fixing any bugs found.
If you would like to learn more about how you can use Firebase in mobile app development take a look at the blog post I wrote below that covers 15 reasons why you should you consider using Firebase within your app.
Firebase App Distribution
Firebase App Distribution is a mobile testing tool that supports both Android and iOS apps that can easily distribute your mobile app to testers working on your app for quality assurance.
Source: https://www.youtube.com/watch?v=SiPOaV-5j9o
To distribute your Android app to testers, either upload your APK via the Firebase Console manually in the browser or use the Firebase command line interface or Gradle on your local machine or your continuous integration server.
Firebase App Distribution allows you to add testers using their email address which you can place into groups to control who has access to your app builds.
Testers when first invited will receive onboarding information via email on how they can access test builds of your Android app using the Firebase App Tester app on their mobile device. When new versions of your test builds are released, your testers will be automatically notified to download the latest test build of your app.
In the Firebase Console you will have visibility of how many testers have been invited to download your app, how many have accepted the invitation and how many have downloaded your app’s test build.
Firebase App Distribution can be integrated with Firebase Crashlytics to give you visibility on app crashes across your test builds.
UI Automator
UI Automator is a user interface testing tool for Android that allows you to test user interactions between your app, the Android System UI and the UI other Android apps installed on your device.
To use UI Automator in a test class you will need to create an instrumentation test inside the src/androidTest directory and use AndroidJUnit4.class with AndroidJUnitRunner as the default test runner.
UI Automator provides a UiDevice class that allows you to retrieve information about your device (such as current device orientation) and perform actions to your device (such as change orientation, select the back button, select the home button or find a UI object on screen).
UI Automator provides a UiObject class representing UI objects found on screen. UI Automator can find UI objects on the device by using a UiSelector which uses a class name and text shown on screen.
UI Automator can interact with a UiObject found on screen using various actions such as clicking, dragging, entering text and swiping.
UI Automator has the ability to send an Intent and launch an Activity by getting a Context.
To learn more about how to test your Android app using UI Automator check out the API documentation.
For an example of using UI Automator follow the link below to the code sample published by the Android team under their testing samples GitHub repository.
To use UI Automator in your Android app you will need to include a test dependency in your app level build.gradle file. See an code excerpt of a sample build.gradle file containing the dependency required to use UI Automator.
Appium
Appium is an open source test automation framework that support native Android and iOS apps, mobile web apps and hybrid apps.
Appium includes a HTTP Server that written with Node.js (Node.js is a dependency). The Appium HTTP Server exposes a REST API which when invoked with initiate a test on the target platform using the test automation scripts written using WebDriver.
When writing automated tests using Appium for Android the WebDriver protocol is used which has support for many different programming languages and in the background Appium uses drivers for UI Automator and Espresso to interact with the Android app.
If you would like to start using Appium I would suggest checking out the following getting started guide for Appium published on GitHub.
https://github.com/appium/appium/blob/master/docs/en/about-appium/getting-started.md