
As you build new features into your app that your users are craving you want to be able to release them to production as quickly as possible while maintaining a strong level of quality to keep your users satisfied.
The process of releasing a new change to to your Android app via the Google Play Console is time consuming, but before you even get to that stage where you want to release a change to your app in production, you want to make sure your app has gone through sufficient testing.
Software development practices such as Continuous Integration and Continuous Delivery will help you reduce cycle times for delivering new changes by introducing automation for building, testing and deploying your Android app.
In this article I have included a tutorial using the well known Continuous Integration and Continuous Delivery software Jenkins, allowing you to automate the following steps to run sequentially, to be triggered manually or by a code change being committed in your code repository.
- Build your Android app
- Run unit tests
- Sign your APK
- Run instrumentation tests on devices hosted in the cloud using Firebase Test Lab
- Distribute your app to testers using Firebase App Distribution
- Then manually trigger a separate automated job responsible from deploying your signed APK into production through the Console Play Console
Before going into the tutorial I will shared some more information on the what Continuous Integration and Continuous Delivery is all about and more on what Jenkins is and the capabilities and benefits it offers.
What is Continuous Integration and Continuous Delivery?
Continuous Integration (CI) and Continuous Delivery (CD) are practices followed in software development to enable the frequent release of smaller incremental changes to software to production while still maintaining quality and reliability through the use of automation.
Continuous Integration encourages the development team to commit and merge code frequently to their shared code repository. Then use a shared build server to take the merged code from the code repository and build the software and run tests written by developers following a test driven development methodology. Then results of the build are available to all developers to review, allowing developers to remediate any failures to ensure quality standards are being met.
Continuous Deployment involves investing in automation tools to take the software built by the Continuous Integration build server and deploy the changes into the appropriate environment whether that be a developer environment, test environment or production environment.
What is Jenkins?
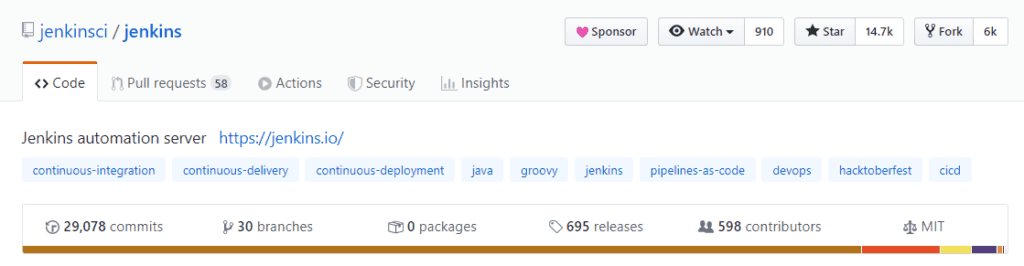
Jenkins is a popular (with 14.7k Stars in GitHub at the time of writing), open source, free to use automation server that enables continuous integration and continuous delivery.
Jenkins allows you to create jobs to automate the building, testing and deploying of your software.
Some other populare features of Jenkins include:
- A Credentials Manager
- A Plugins Manager with a large library of community plugins and available
- Jenkinsfile for specifying an automation pipeline in a structured text format stored in version control
Scope of the Tutorial
In this tutorial, I will be covering the following steps to enable CI CD using Jenkins for an Android app.
- Installation and Configuration of Jenkins
- Setting up Credentials inside Jenkins
- Creation of a Jenkins project that performs the following
- Retrieval of source code for your Android app from GitHub
- Building your app using Gradle
- Signing you APK for distribution
- Running unit tests
- Running instrumentation tests using emulator or physical device connected to your local machine
- Running of instrumentation tests on devices in the cloud using Firebase Test Lab
- Distribution of your app for manual testing using Firebase App Distribution
- Creation of a Jenkins project that performs the following
- Retrieves your signed APK from the most recent successful build from the project above
- Deploys the app to the Google Play Console via API access
Before You Get Started
Pre-requisites
Before we get started with this tutorial I will assume you have the following installed already on your machine. If not please get them installed prior to starting the tutorial.
- Jave JDK
- Android SDK
- Gradle
- Git
Firebase
We will be making use of Firebase for this tutorial so you will need an account with Google to allow you to create a project in Firebase. Firebase is needed so that you can make use of Firebase Test Lab for running tests on your app against devices in the cloud as well as Firebase App Distribution to allow you distribute your app to testers.
To learn more about some of the other services available in Firebase to help you create fantastic mobile apps check out the article I wrote below on 15 reasons to use Firebase in your mobile app.
Google Cloud Resources
Same as the warning above for Firebase, we will be using Google Cloud resources such as Service Accounts in this tutorial. To create Google Cloud resources you will need a Google account.
Google Play Console
The final part of this tutorial will involve distributing a change to an existing app in the Google Play Console from a Jenkins job. If you want to follow along for this part of the tutorial you will need a Google Play Developer Account, if you don’t already have this you will need to create an account which will incur a $25 USD registration fee.
Part 1: Installation and Configuration of Jenkins
The first part of the tutorial will involve setting up Jenkins on our local machine to allow us to create an automation pipeline to build and test our Android app which will be covered in the next section.
By the end of Part 1 of this tutorial the goal is to have achieved the following.
- Complete the installation of Jenkins
- Granted access to an admin user in your Jenkins instance to allow you to create projects
- Configure Jenkin’s access to the following tools and binaries
- Java JDK
- Android SDK
- Gradle
- Git
- Installed the following Jenkins plugins
- All suggested plugins on first time installation
- 3 additional required Jenkins plugins
Downloading Jenkins
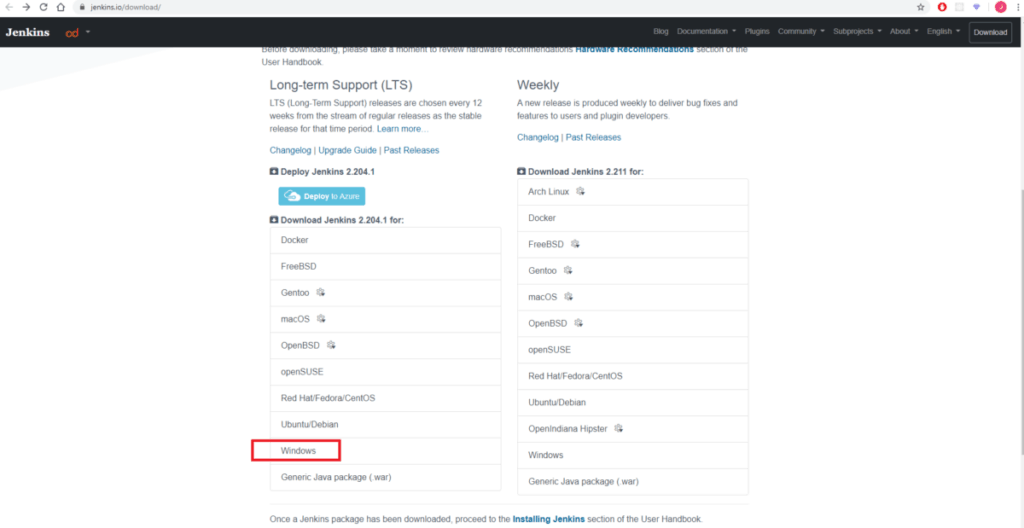
To download Jenkins, navigate to the downloads page on the Jenkins website.
On the downloads page, select the LTS option for your operating system. I will be doing this tutorial in Windows so I will select the Windows LTS version as per the screenshot below.
Installing Jenkins
From there the Jenkins Windows Installer will automatically download. Once the download is complete extract the installer from the zip file then run the installer.
Once the installer is complete it will take you to Jenkins that is accessed via your web browser. It will show an “Unlock Jenkins” screen asking you to locate the initial admin password that was created during the installation to enter into the “Administrator password” field. Follow these steps shown in the browser to proceed.
Once you have unlocked Jenkins it will take you to a “Customize Jenkins” screen, select the option to “Install suggested plugins” then it will start automatically downloading and installing a set of recommended plugins for Jenkins.
After those plugins have been installed it will take you to “Create First Admin User” screen. Populate the details requested which you will use to log in to Jenkins then select “Save and Continue”.
In the “Instance Configuration” screen, leave the defaults unless you require a different URL for Jenkins then select “Save and Finish”.
Then you should see a “Jenkins is ready!” screen, select “Start Using Jenkins”.
Configuring Jenkins
As per the Pre-requisites section, the Java JDK, the Android SDK, Gradle and Git should already be installed on your local machine. We will configuring Jenkins to use these tools and applications in this section.
From the home page in Jenkins select “Manage Jenkins” in the left side bar and select “Configure System”. Scroll to the “Global properties” section and check “Environment variables”.
Add environment variables for JAVA_HOME, ANDROID_HOME and GRADLE_USER_HOME following the table below and “Apply” and “Save” the changes.
| Environment Variable | Expected Value | Sample Value |
|---|---|---|
| JAVA_HOME | The path to the Java JDK on your local machine | D:\Android Studio\jre |
| ANDROID_HOME | The path to the Android SDK on your local machine | C:\Users\Jarrod\AppData\Local\Android\Sdk |
| GRADLE_USER_HOME | The path to the Gradle user home directory on your local machine | C:\Users\Jarrod.gradle |
Select “Manage Jenkins” again, then select “Global Tool Configuration”. In the “Git” section enter the “Path to Git executable” the select “Apply” and “Save”.

Installing Additional Jenkins Plugins
We will be installing the three additional Jenkins Plugins below to allow us to complete this tutorial.
- Android Signing Plugin – https://plugins.jenkins.io/android-signing
- Copy Artifact Plugin – https://plugins.jenkins.io/copyartifact
- Google Play Android Publisher Plugin – https://plugins.jenkins.io/google-play-android-publisher
To install these plugins in Jenkins follow these steps for each of the plugins above.
- Navigate to the home screen in Jenkins
- Select “Manage Jenkins”
- Select “Manage Plugins”
- Select “Available”
- Enter the Plugin name in the “Filter” search box
- Find the matching Plugin in the search results and check the check box next to the Plugin name and select “Install without restart”
Part 2: Building and Signing your Android app in Jenkins
Part 2 of this tutorial will cover creating an automation pipeline in Jenkins to get our app’s source code, build the app using Gradle, run unit and instrumentation tests then sign our APK to allow us to distribute it later.
By the end of Part 2 of this tutorial the goal is to have achieved the following.
- Created and ran our first freestyle project in Jenkins
- Retrieved our source code for our app from GitHub in our Jenkins project
- Created a Firebase project through the Firebase Console
- Built the app in our Jenkins project using Gradle
- Ran unit tests in our Jenkins project using Gradle
- Ran instrumentation tests (that leverage any connected device or emulator) in our Jenkins project
- Signed the APK, built previously in Jenkins, for distribution in our Jenkins project using Gradle
Checkout Source Code in Jenkins
For this tutorial I will be using an Android app that searches for books using the Google Books API that I previously created in a tutorial for the Model View ViewModel blog post.
If would like to learn more about how the the Book Searchr App was created using the Model View ViewModel design pattern with Retrofit2 to call the Google Books API check out the article below.
You don’t have to use my code for this tutorial, you can use the source code for an app you have created if you wish. The source code for the Book Searchr App is is hosted in a public GitHub repository available at the link below.
https://github.com/learntodroid/MVVM-REST-API
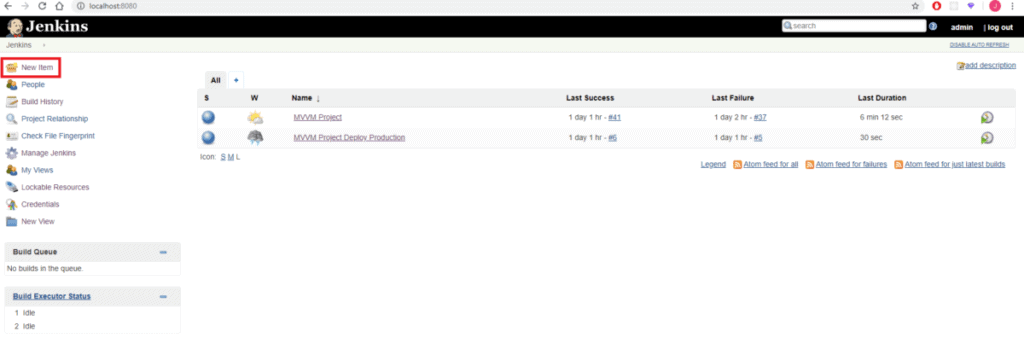
First we will create a new Freestyle Project in Jenkins. Navigate to the home page then select “New Item” in the left side bar.
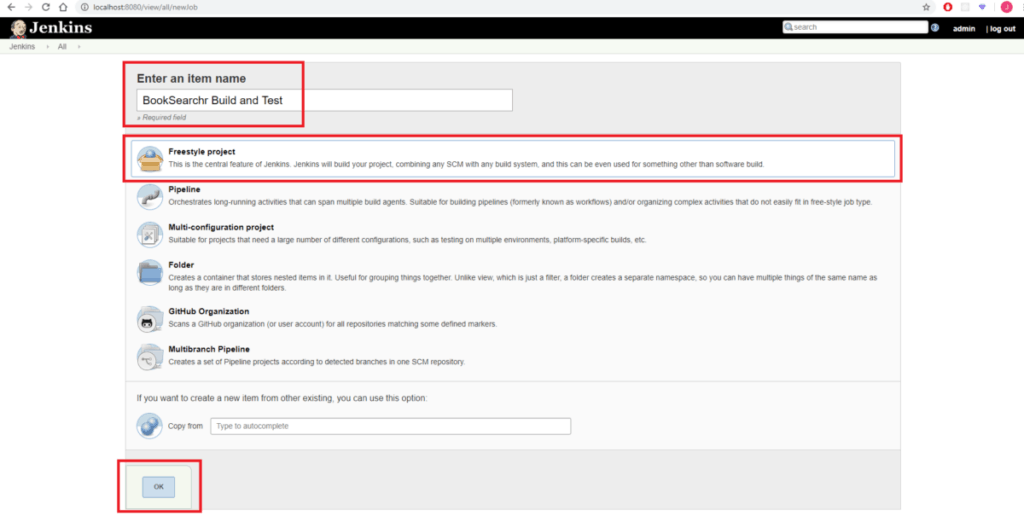
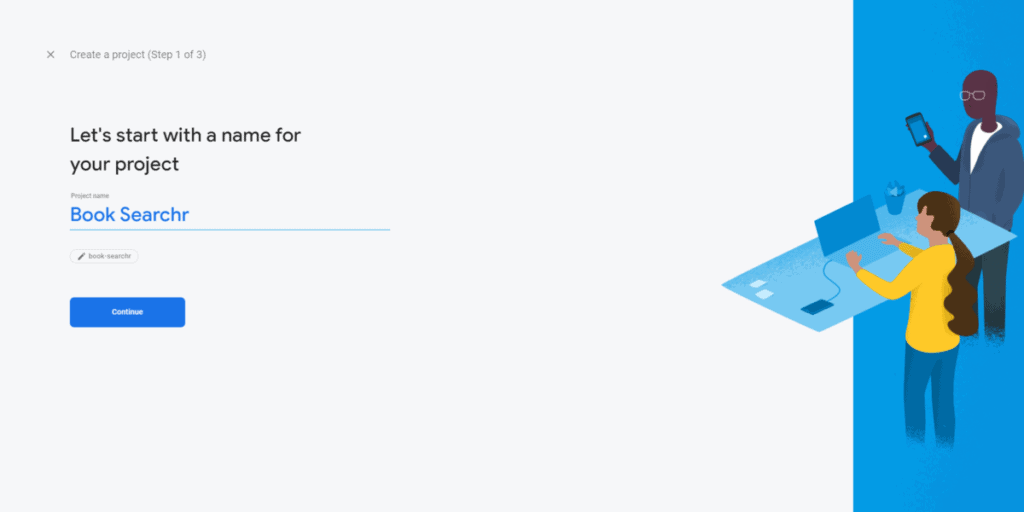
Then we will enter a name for the project, then select “Freestyle project” then click the “OK” button.
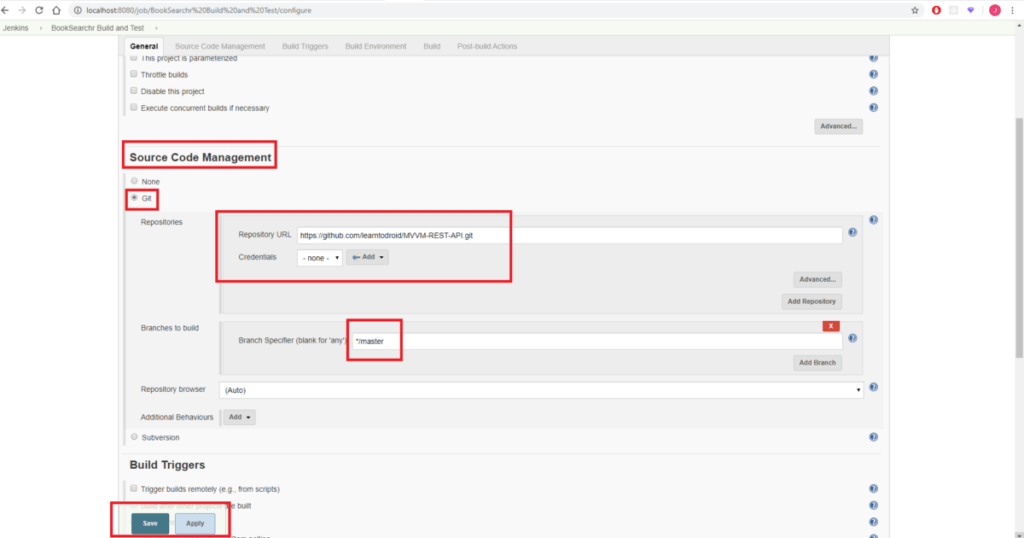
Next we will scroll to the “Source Code Management” section, select the “Git” radio button and enter the “Repository URL” of the GitHub repository. Credentials can be added into Jenkins if your repository is private. Also the “Branch to build” needs to be entered. Once this information is entered select “Apply” and “Save”.
Creating a Firebase Project
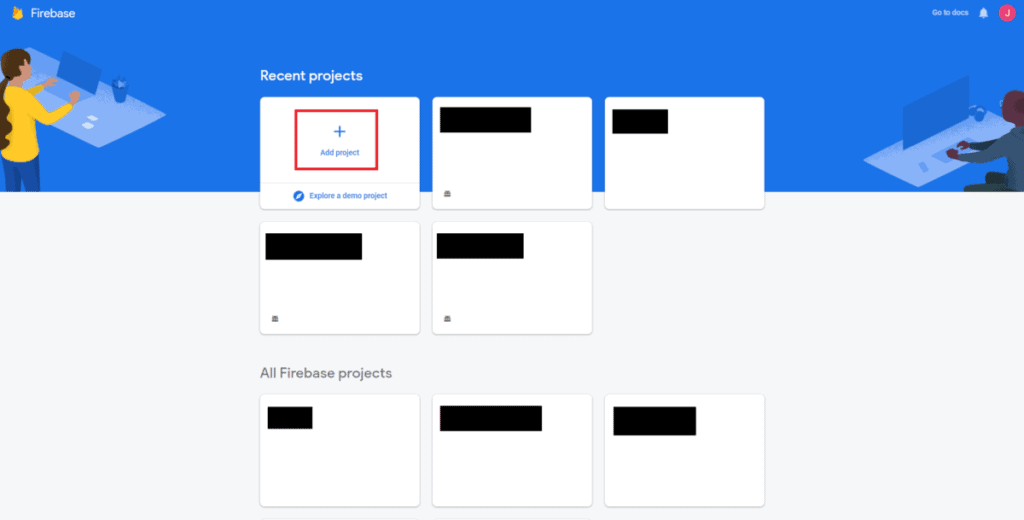
A Firebase project will be required before we can build our app. To create a new Firebase project perform the steps below.
1) Navigate to the Firebase console in the web browser at https://console.firebase.google.com/

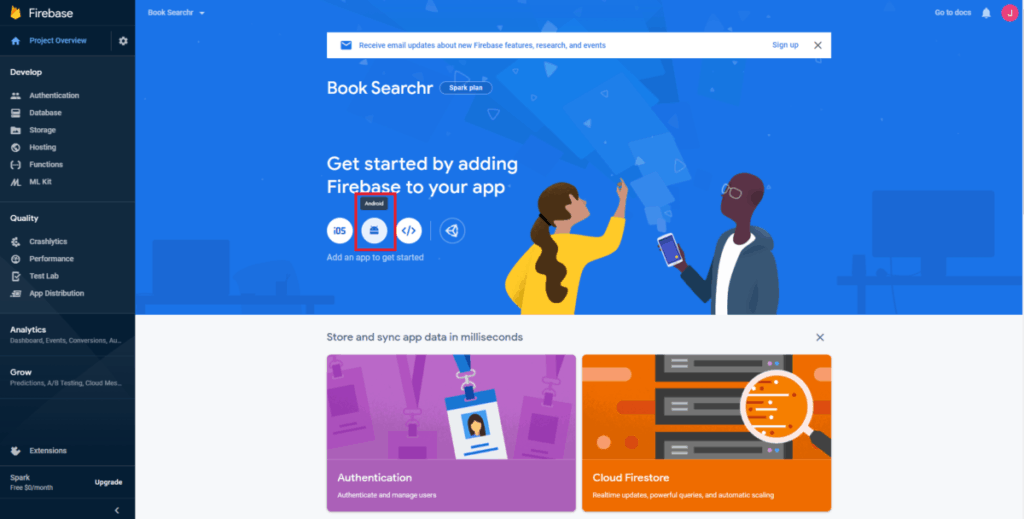
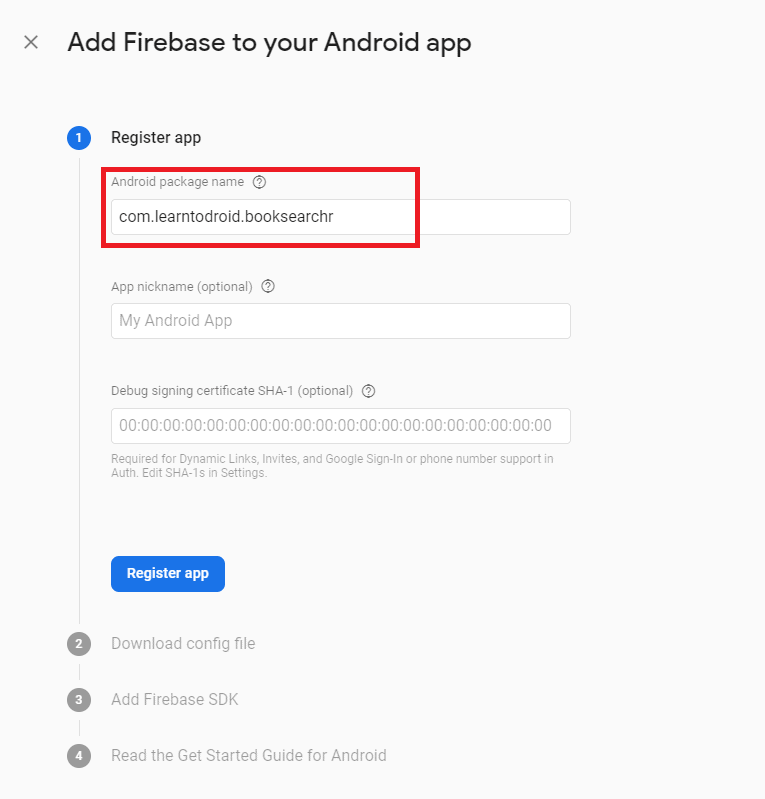
Adding your Android app to Firebase
After your Firebase project has been created the next step is to add your Android app to your Firebase project. To add your Android app your Firebase project perform the steps below.
1) Navigate to the Firebase console in the web browser at https://console.firebase.google.com/
7) Select “Next” then “Continue to console”
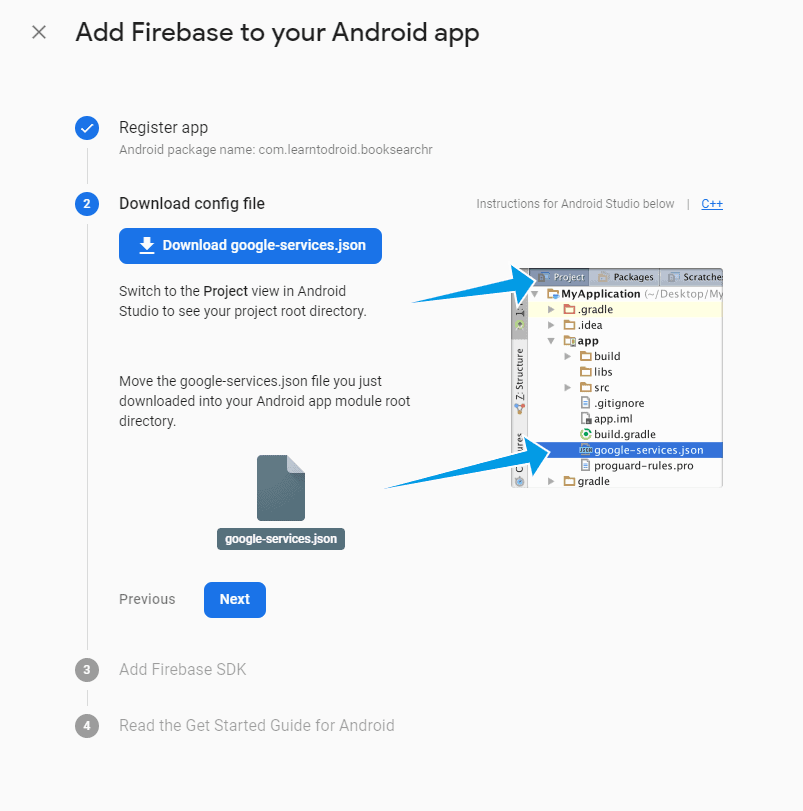
Using the Firebase “google-services.json” file in Jenkins
In the previous section when we added our Android app to our Firebase project we download a “google-services.json” file that we imported into our project into the app folder visible in Android Studio.
The “google-services.json” contains sensitive information that should not be kept inside GitHub (especially a public repo) for security reasons.
We will be requiring the “google-services.json” to be available in Jenkins workspace when we build our app using Gradle.
To achieve this we will add the “google-services.json” as a secret file inside the credentials manager in Jenkins using the steps below.
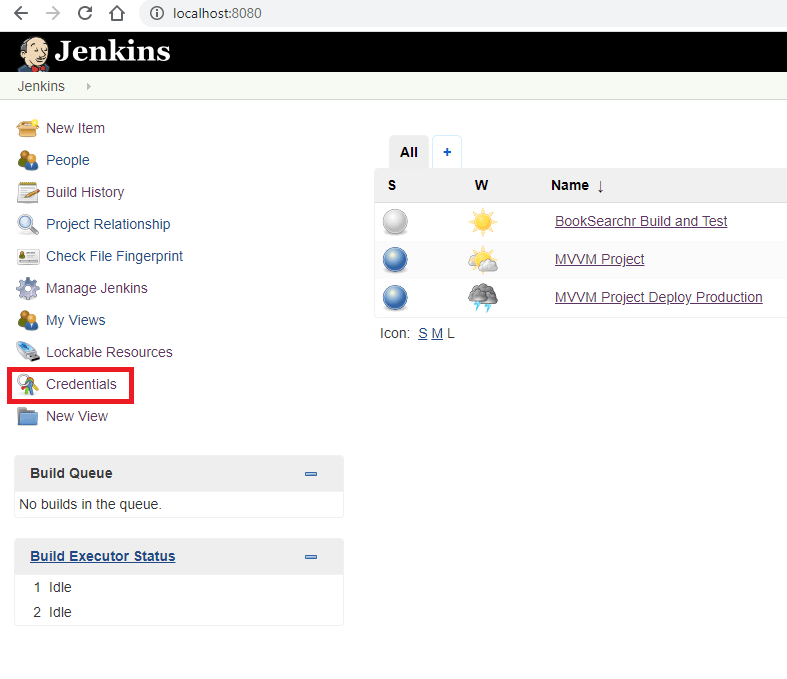
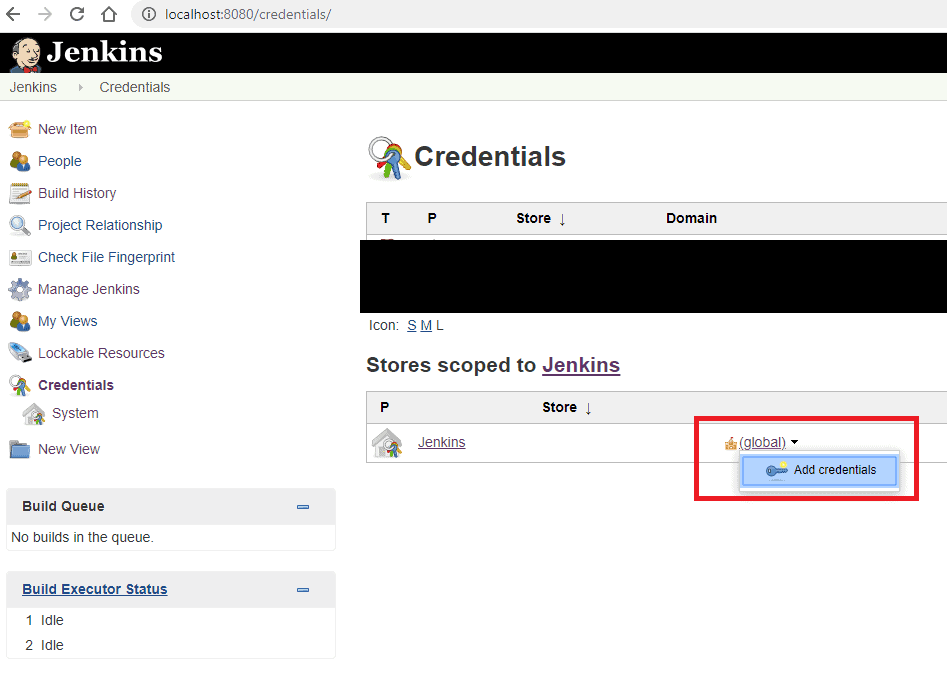
- Navigate to the home page in Jenkins, select “Credentials”
- Add a new set of credentials
- Set the “Kind” as “Secret file”
- Select the “google-services.json” file previously created from the file browser
- Enter an ID and Description and select “OK”
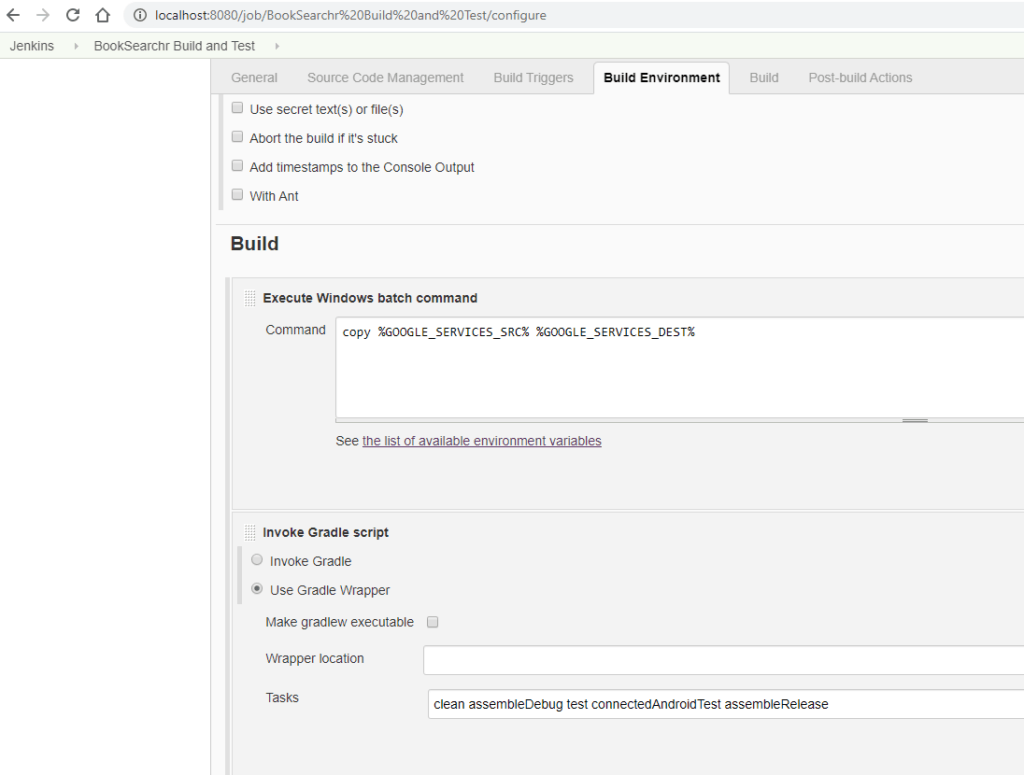
Next go to your Jenkins project you have previously created and do the following.
- In the “Build environment” section, check the “Use secret text(s) or file(s)” check box
- In the “Bindings” section, add a “Secret file” and give it a variable name and select the “google-service.json” credentials previously added in Jenkins
- In the “Build” section, add an “Execute Windows batch command” step and enter Command 1 from below
- Select “Apply” and “Save”
Command 1
Note: make sure your variable name for the secret file is the same in the command as it is shown in the bindings section. Also make sure the correct location in your Jenkins workspace is provided.
copy "%GOOGLE_SERVICES_SRC%" "C:\Program Files (x86)\Jenkins\workspace\BookSearchr Build and Test\app\google-services.json"
Use Gradle to Build then Run Unit and Instrumentation Tests
Navigate to the home page, select your project from the list of projects then select “Configure”.
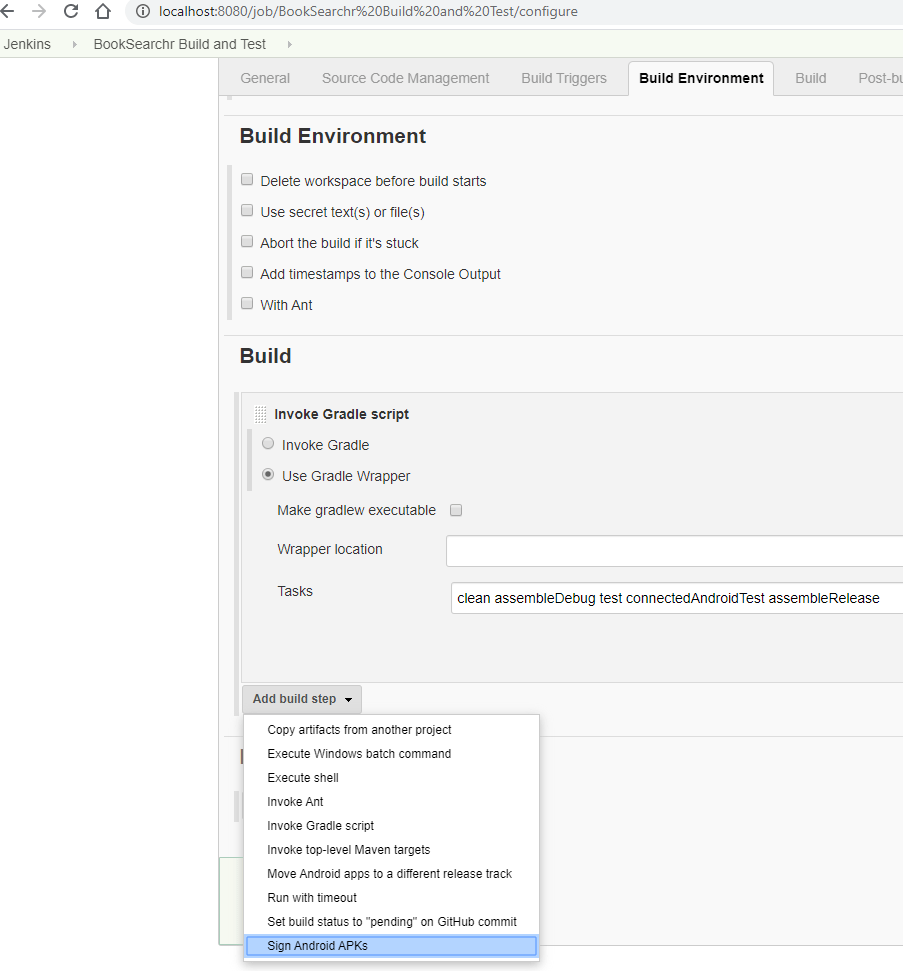
Scroll down to the “Build” section and select “Add build step” then “Invoke Gradle script”.
Select the “Use Gradle Wrapper” radio button, and enter the following into the tasks section.
clean assembleDebug test connectedAndroidTest assembleRelease
Then select “Apply” and “Save”.
Select “Build Now” and verify in the logs the build is completing.
This Gradle command will build your project, run any unit tests, then run any instrumentation tests on to any device or emulator connected to the machine running your Jenkins build server. Multiple APKs we be created from this Gradle command which we will use later in the tutorial to sign and distribute.
If you want to learn more about what unit tests or instrumentation tests are check out the following post on wrote on how to test your Android app before publishing.
Sign APKs for Distribution
In the later stages of this tutorial you will need to distribute your APK for the purposes of testing and releasing it to production for your users to download from the Google Play Store. In both these cases you will need to sign your APK first.
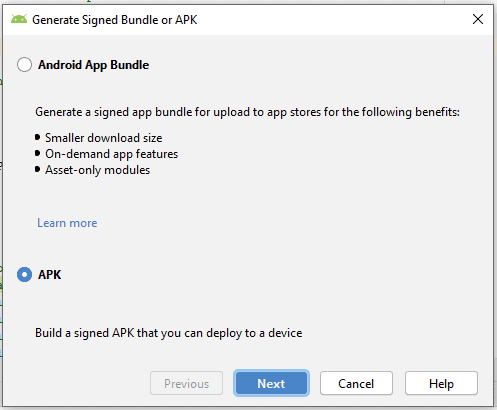
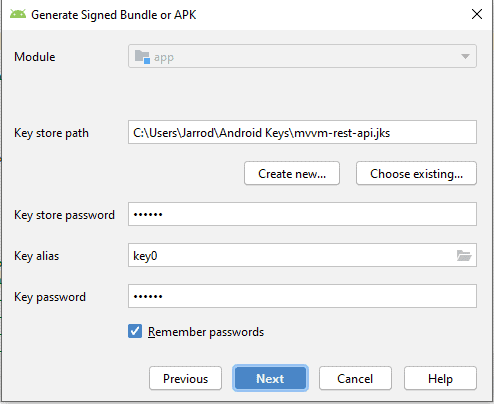
First we need to use Android Studio to generate the keys we will be using for signing our APK, follow the steps below to create the signing keys.
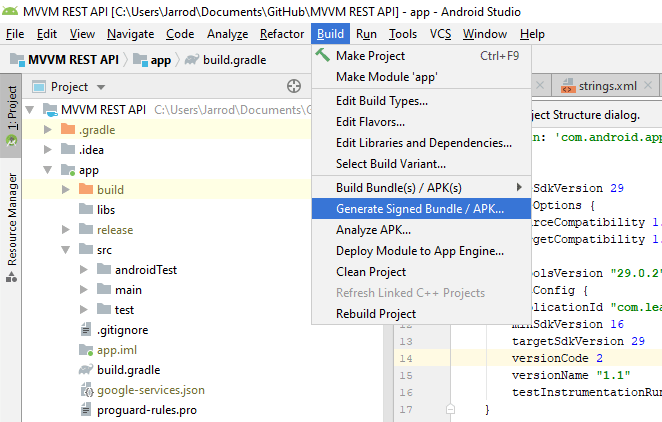
2) Select the “Generate Signed Bundle / APK” menu item
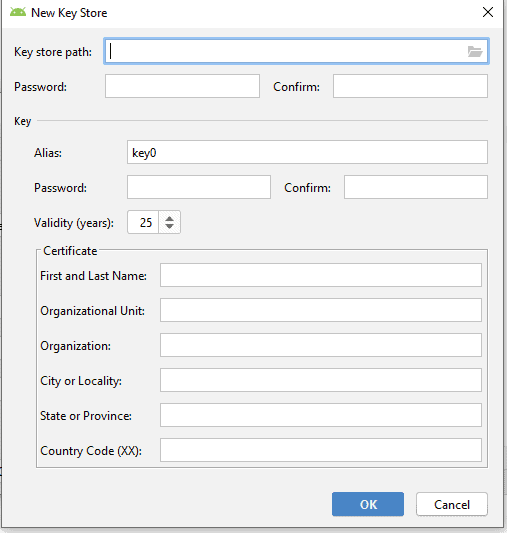
6) Select “OK” when complete
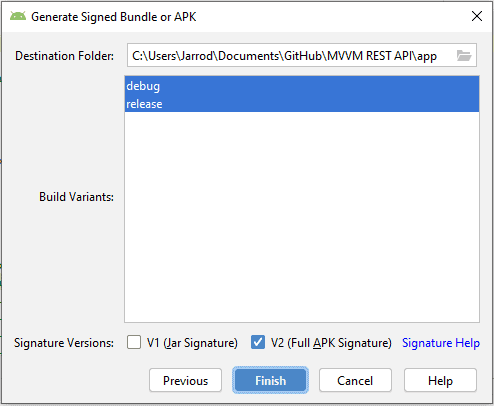
9) Select “V2 (Full APK Signature)” checkbox
10) Select “Finish”
This will generate a signed APK and your keys used to sign your APK will be available in the directory you specified when generating the new key store.
These keys will be given to Jenkins to sign APKs, before we set the credentials up in Jenkins we will need to convert them into a format understood by the Android Signing Plugin installed earlier in the tutorial.
At the command line use the following command to convert the key store you have generated to a format used by the Android Signing Plugin.
// first change directory to the directory containing the
// key store you have previously generated above
keytool -importkeystore -srckeystore {INSERT_JKS_FILE_NAME} -srcstoretype JKS -deststoretype PKCS12 -destkeystore {INSERT_DESTINATION_FILE_NAME}
Next we will add these credentials to Jenkins for use by the Android Signing Plugin, follow the steps below to add the credentials into Jenkins.
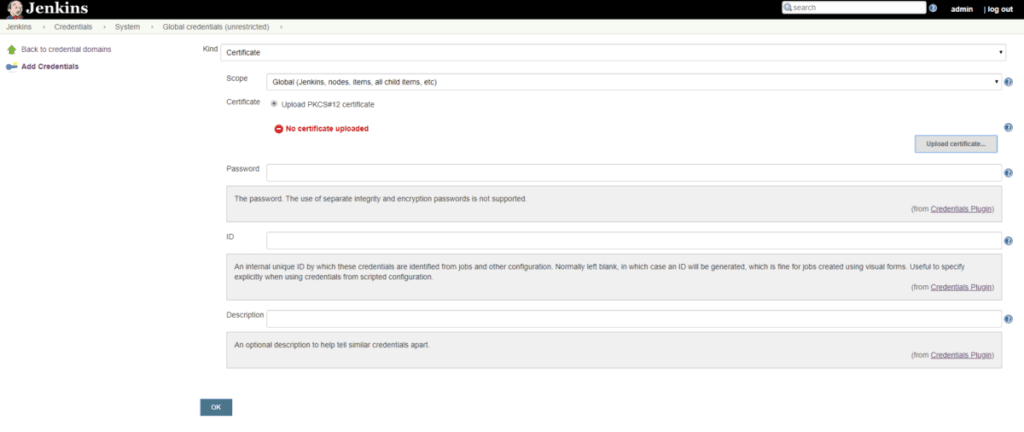
4) Select the radio button to “Upload PKCS#12 certificate”, select the file generated by keytool to convert the key store using the file browser
5) Provide a Password, ID and Description for the Certificate then select “OK”
Now for the last step of this part of the tutorial we will configure the project we have created in Jenkins to add a build step to sign the APK using the Android Signing Jenkins Plugin.
Navigate to the home page in Jenkins, select your project, then select “Configure” in the left side bar and scroll to the “Build” section. After the “Invoke Grade script”, select “Add build step” and select “Sign Android APKs”.
In the “Sign Android APKs” section do the following.

- Select the “Advanced” button
- Check “Skip Zipalign”
- Select the “Output to unsigned APK sibling” radio button
- For the “Key Store” Select the Certificate you previously added to Jenkins
- Enter the “Key Alias” used when generating the key store in Android Studio
app/build/outputs/apk/debug/app-debug.apk, app/build/outputs/apk/androidTest/debug/app-debug-androidTest.apk, app/build/outputs/apk/release/app-release-unsigned.apk
- For the “APKs to Sign” provide the following comma separated value
- Check “Archive Signed APKs”
- Select “Apply” and “Save”
Select “Build Now” and verify in the logs the build is completing and the APKs are being signed. After the build has complete successfully you should see 3 signed APKs as artifacts from your build.
Part 3: Integrate with Firebase Test Lab for Testing Against Devices in the Cloud
Part 3 of this tutorial will cover integrating our Jenkins project to use Firebase Test Lab to execute tests against devices in the cloud after the Android app has been built and signed.
By the end of Part 3 of this tutorial the goal is to have achieved the following.
- Created Google Cloud Service Account and enable access to Google APIs we will use for testing
- Installed the gcloud command line interface
- Execute tests against the Firebase Test Lab from our existing Jenkins job
Create a Google Cloud Service Account
A Google Cloud Service Account is required for the Jenkins job to interact with the Firebase Test Lab using the Google Cloud command line interface.
To create a Google Cloud Service Account peform the following steps.
- Navigate to the Google Cloud Console https://console.cloud.google.com/home/dashboard
- In the top navigation bar to the right of “Google Cloud Platform”, select the project that you have previously created in the Firebase Console, you may need to use the “ALL” view and use the search functionality to find your project
- Hover over “IAM & admin” in the left navigation bar, then select “Service accounts”
- Select “CREATE SERVICE ACCOUNT”
- Give the Service Account a name and select “Create”
- Give the Service Account the “Editor” role and select “Continue”
- Select “CREATE KEY”, select the JSON format and download the key
- Navigate to the Google API Library at the following URL https://console.developers.google.com/apis/library and make sure the correct project is selected
- Search for the Cloud Testing API and enable it
- Search for the Cloud Tool Results API and enable it
Download the Google Cloud Command Line Interface
The Google Cloud command line interface (i.e. gcloud) is required to execute tests using the Firebase Test Lab. Follow the steps below to install the gcloud CLI on your local machine.
- Navigate to the relevant quick start page for gcloud at https://cloud.google.com/sdk/docs/quickstarts
- Follow the instructions to download and install the gcloud CLI
Update the Jenkins Project to use the Firebase Test Lab
Now for the final step in this part of the tutorial, we will be updating the project in Jenkins to use the Google Cloud service account credentials with the gcloud CLI to run instrumentation tests for your Android app against devices in the cloud using Firebase Test Lab for the Firebase project we have created.
- Add the gcloud binary to the PATH used by Jenkins
- Navigate to the home page in Jenkins, select “Manage Jenkins”, select “Configure System”
- Add an environment variable with the name “PATH” and provide the path to the gcloud binary
- Select “Apply” and “Save”
- Add the Google Cloud Service Account key as Credentials in Jenkins
- Navigate to the home page in Jenkins, select “Credentials”
- Add a new set of credentials
- Set the “Kind” as “Secret file”
- Select the Google Cloud Service Account key previously created from the file browser
- Enter an ID and Description and select “OK”
- Update your Jenkins project to execute instrumentation tests against devices hosted in the cloud using Firebase Test Lab
- Navigate to the home in page in Jenkins, select your existing Jenkins project
- In the “Build environment” section, make sure the “Use secret text(s) or file(s)” check box is checked
- In the “Bindings” section, add a “Secret file” and give it a variable name and select the credentials previously added in Jenkins for the Google Cloud Service Account
- In the “Build” section after the step to sign the APKs, add an “Execute Windows batch command” step and enter Command 1 from below
- Add another “Execute Windows batch command” step and enter Command 2 from below
- Add another “Execute Windows batch command” step and enter Command 3 from below
- Select “Apply” and “Save”
Command 1
Note: make sure the environment variable name matches the name you selected
gcloud auth activate-service-account --key-file "%GOOGLE_CLOUD_SERVICE_ACCOUNT_KEY%"
Command 2
Note: replace “book-search” with your project ID which can be located in the Google Cloud Console
gcloud config set project book-searchr
Command 3
gcloud firebase test android run --app ./app/build/outputs/apk/debug/app-debug-signed.apk --test ./app/build/outputs/apk/androidTest/debug/app-debug-androidTest-signed.apk
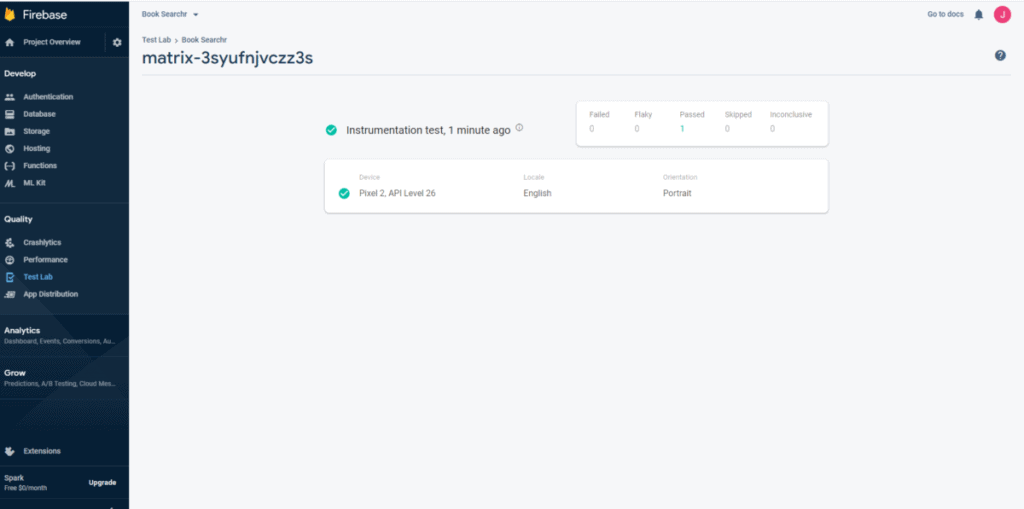
Run the Jenkins Build and View the Test Results in Firebase Test Lab
Run your Jenkins Build and take a look at the results in Firebase Test Lab for your Firebase project at the following link https://console.firebase.google.com/u/0/project/book-searchr/testlab/histories
Part 4: Distribute App to Testers with Firebase App Distribution
Part 4 of this tutorial will cover integrating our Jenkins project to use Firebase App Distribution to share our Android app to testers allowing them to receive an email notification to download the app from the App Tester app on Android, test out the app and provide feedback to the developers.
By the end of Part 4 of this tutorial the goal is to have achieved the following.
- Upload our app for distribution in Firebase App Distribution from our Jenkins
- Automate an email notification to our testers to try out the app
- Try the app we have built using the App Tester app for Android
Updating the Jenkins to Distribute the App using Firebase App Distribution
Follow the steps below to integration with Firebase App Distribution from our Jenkins job to share our app with testers.
- Navigate to the home screen in Jenkins
- Select your Jenkins project
- Add an “Execute Windows batch command” build step at the end of the current of build steps and enter the following command
- Select “Apply” and “Save”
firebase appdistribution:distribute ./app/build/outputs/apk/release/app-release.apk --app <A> --release-notes "Bug fixes and improvements" --testers "<B>"
- Replace <A> with your Firebase App ID, this can be located in “Project settings” inside the Firebase Console
- Replace <B> with a comma seperated email list for testers that will be trying testing your app
Learn more about what commands you can use with Firebase App Distribution in the online documentation.
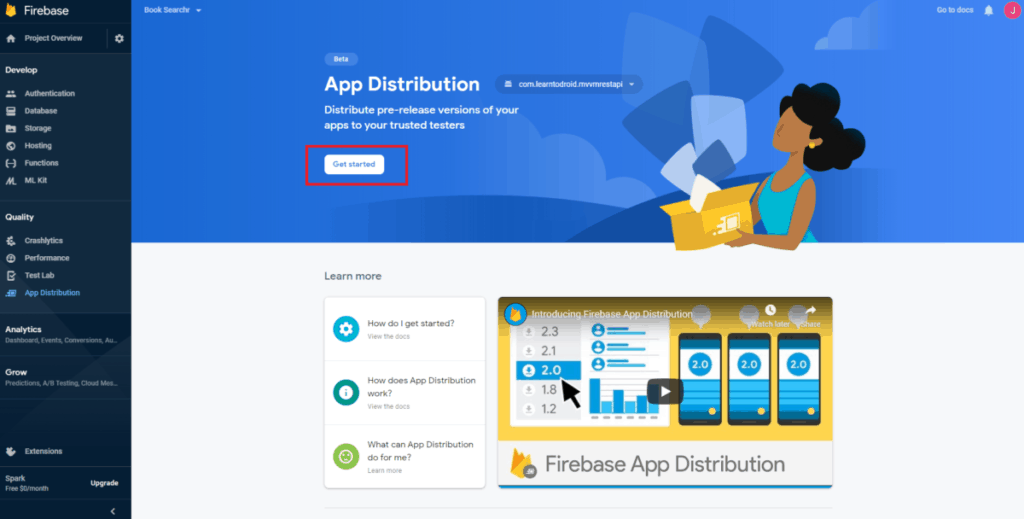
Test your App using Firebase App Distribution
Before you will be able to distribute your app to testers, you will need to access the Firebase App Distribution for your project in the Firebase Console and select “Get started”.
If you want to test your App using Firebase App Distribution make sure you include your email address with the tests in the command from the section above.
Run your build via Jenkins and if it is successful you should receive an email from Firebase to test out your app.
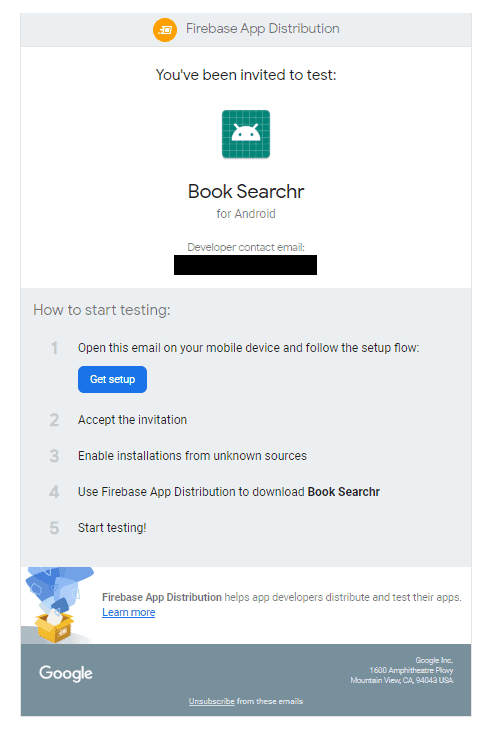
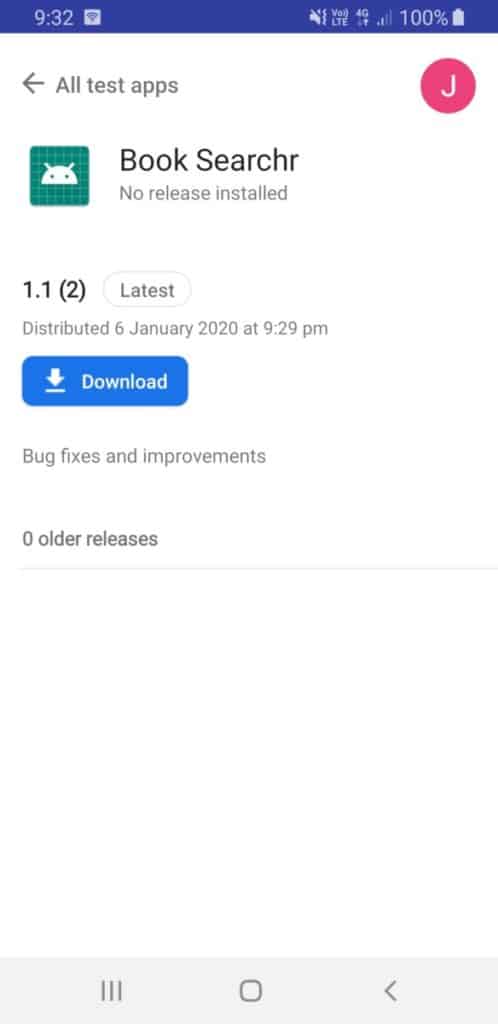
Follow the link in the email on your Android device and download the App Tester app on Android, then log in to the App Tester app to locate your app distribution. From there you can install your app on your device and test it out.
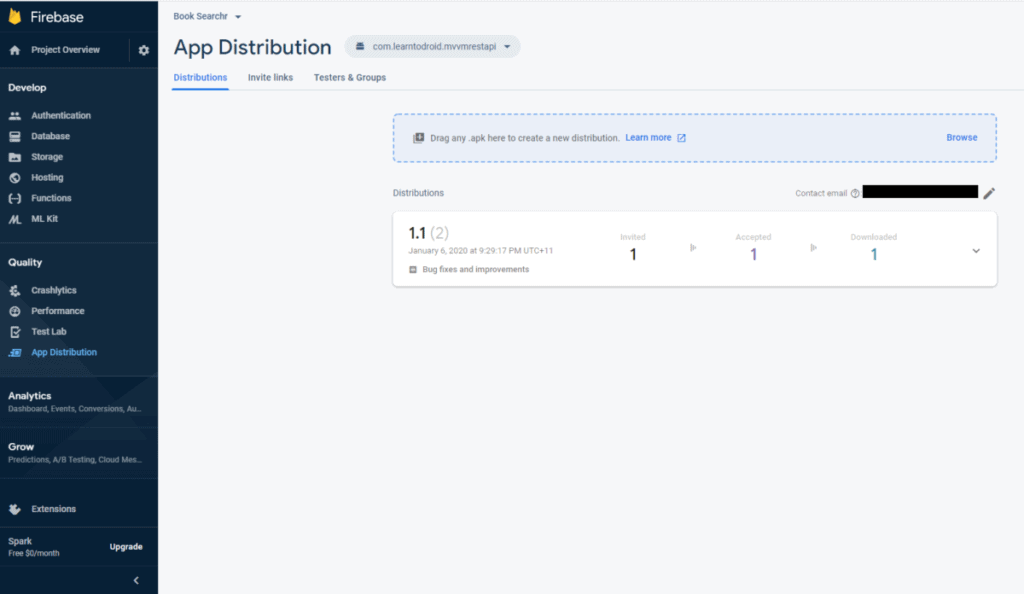
In the Firebase console in the App Distribution section, you can view a dashboard showing which of your testers have downloaded your app to test.
Part 5: Release a New Version of your App to Production
Part 5 is the final part of this tutorial and will cover deploying a change to an Android to production in the Google Play Console via Jenkins.
For the purposes of this part of the tutorial I am going to assume you already have an app deployed to production and we will be making a change to that app, rather showing you how to launch your app to production for the first time as that is a length process.
By the end of Part 5 of this tutorial the goal is to have achieved the following.
- Deploy a new version of your app built by Jenkins to production in the Google Play Store
Obtaining API Access to Deploy to the Google Play Console
We will need API access from the Google Play Console to deploy a new version of our app to production. Follow the steps below to create the API credentials to the Google Play Console.
- Log in to the Google Play Console – https://developer.android.com/distribute/console
- Select “Settings” in the left navigation bar
- Select “API access” in the left navigation bar
- In the “Service Accounts” section select “CREATE SERVICE ACCOUNT”
- Navigate to the Google Cloud Console and create a new service account (the same way we have done previously in this article) and download the key in P12 format
- Once you have finished generating the Service Account, in the “API access” screen in the Google Play Console check that the Service Account has permissions to the following
- Edit store listing
- Pricing & distribution
- Manage Production APKs
- Manage Alpha & Beta APKs
Setting up Google Play Console API Access Credentials in Jenkins
Now we will set up the API credentials for the Google Play Console inside Jenkins by following these steps.
- Navigate to the home page in Jenkins, select “Credentials”
- Add a new set of credentials
- Set the “Kind” as “Google Service Account from private key”
- Enter a project name
- Select the P12 key option and upload the P12 file you downloaded in the previous section
- Enter an email address
- Select “OK”
Creating a new Job in Jenkins to deploy to the Google Play Console
The last step of this part of the tutorial is to create a new project in Jenkins to handle the deployment to Google Play Console. Follow the steps below to create this new project.
- Navigate to the home page in Jenkins
- Select “New Item”, enter a “Project name”, select “Freestyle project” and select “OK”
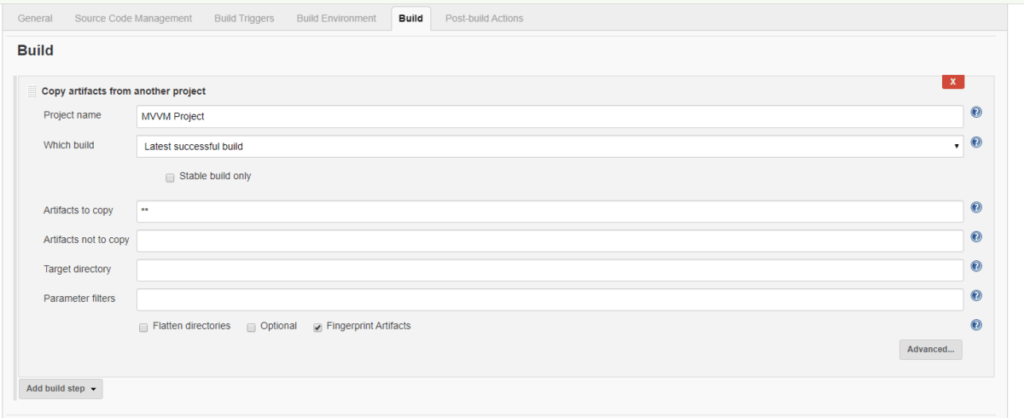
- Scroll to the “Build” section, select “Add build step” and select “Copy Artifacts from another project”
- Set the “Project name” as the project responsible for building your Android app
- For “While build”, select the “Latest successful build”
- For “Artifacts to copy”, enter ** to copy all artifacts
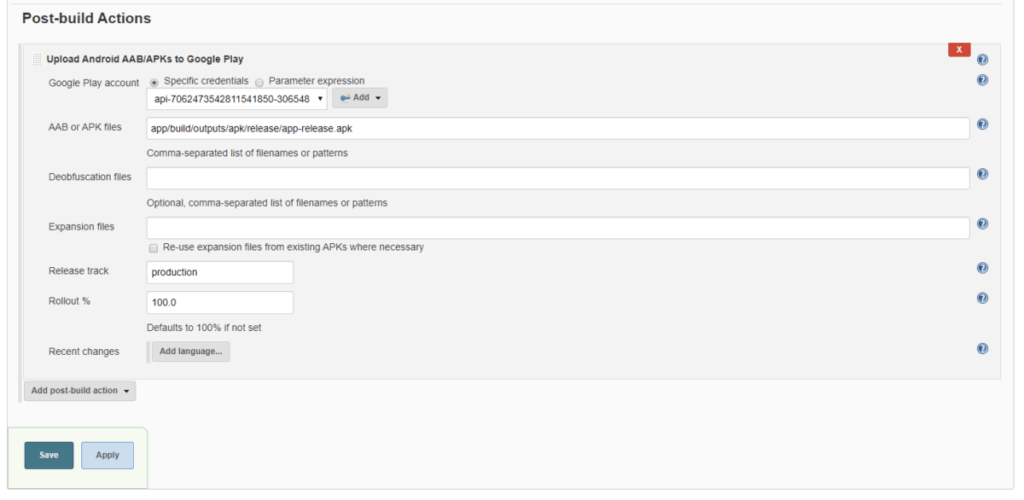
- In the “Post-build Actions” section, select “Add post-build action” and select “Upload Android AAB/APKs to Google Play”
- For the “Google Play account”, select the appropriate credentials from Jenkins
- For the “AAB or APK files”, enter app/build/outputs/apk/release/app-release.apk
- For the “Release track”, enter production
- For the “Rollout %”, enter 100.0
- Select “Apply” and “Save”
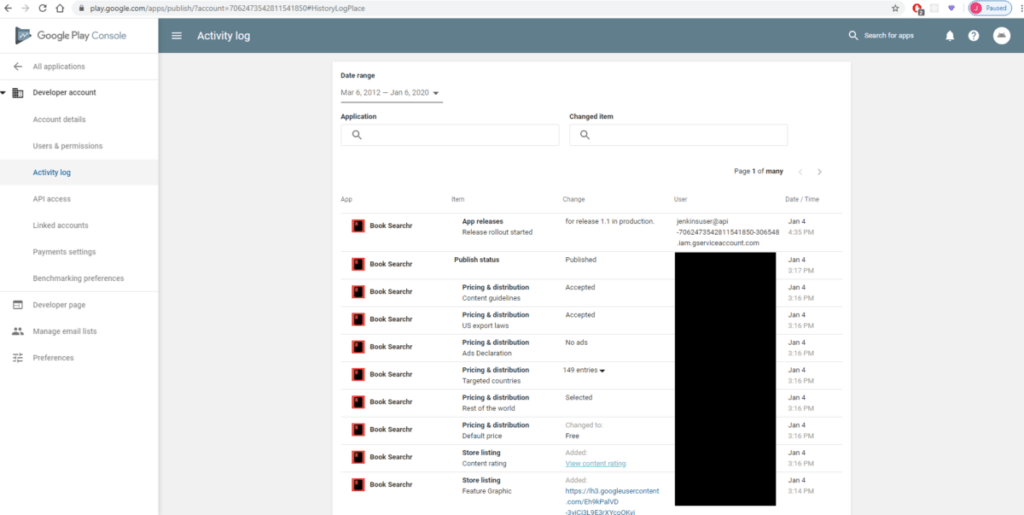
Now you are in a position to run this new project and you should see a new version of your app get deployed to the Google Play Store.
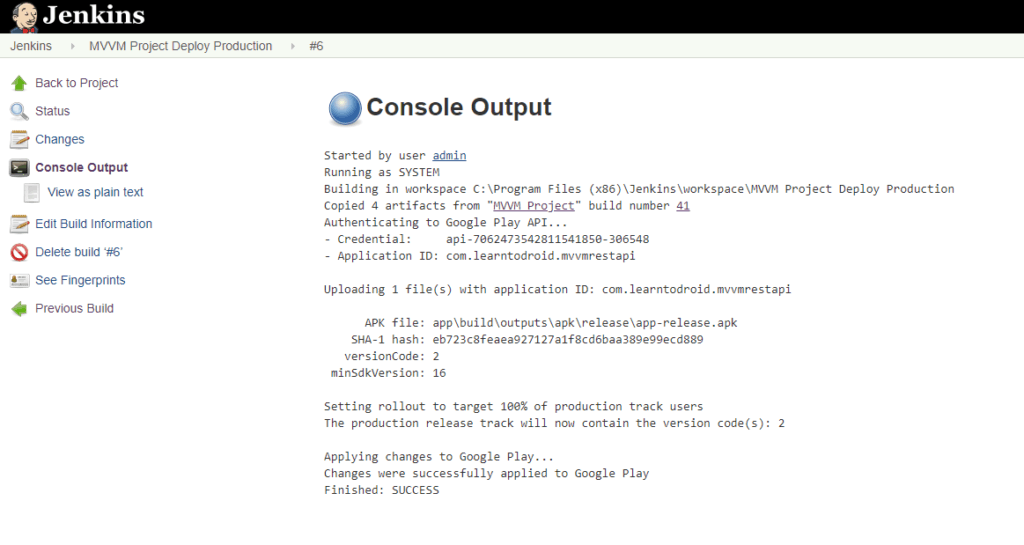
Remember to increment your build version inside the app’s build.gradle file when making a deployment or your new version may be rejected.