
For my second app in the series of posts on how to create different types of apps from scratch, I have put together a tutorial on how to build a wallpaper app for Android.
In addition to showing you how to create an Android app in to set the wallpaper we will also cover how to create an interactive live wallpaper app.
I have published the source code used for this tutorial written in Java in GitHub which you are free to clone and use.
https://github.com/learntodroid/WallpaperAppTutorial
Wallpaper Android App Tutorial
Summary of the Wallpaper App
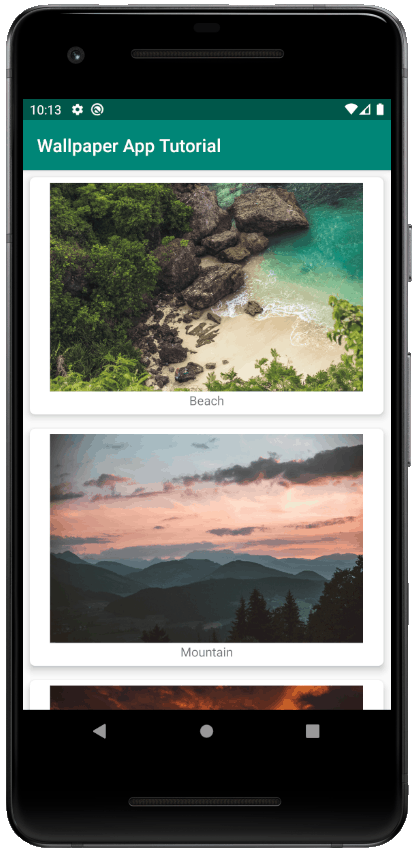
The wallpaper Android app we will be creating will contain a vertical scrolling RecyclerView. This RecyclerView will contain a list of cards for the each wallpaper. The wallpaper card will show an image of the wallpaper and a title underneath.
When the wallpaper card image is selected, it will set the wallpaper on the device to the image selected.
Take a look at a screenshot of wallpaper Android App we will be creating below.
Step 1: Requesting Permissions in the Android Manifest
We will need to request the following two Android permissions in the manifest file for our Android wallpaper app to work.
As will be loading images for the internet to be used for selecting the wallpaper we will need to the INTERNET permission enabled.
To set an image as the wallpaper on the Android device we will require the SET_WALLPAPER permission to be granted in the Android manifest.
See a sample Android Manifest below requesting the INTERNET and SET_WALLPAPER permissions for use in the wallpaper Android app.
Step 2: Downloading Gradle Dependencies
In this tutorial for building an app to set the wallpaper on the device we will be using Jetpack navigation component for navigating between fragments in our Android app. We will also be using the image loading library Glide to load wallpaper images from the internet.
To learn more about the Jetpack navigation component and how to use it to move between fragments check out the post I wrote below.
To learn more about the Glide image loading library, check out the post I wrote that contains a tutorial covering how to use the Glide library with examples written in Java.
See the sample app level build.gradle containing the dependencies for the Jetpack navigation component and Glide.
Step 3: Setting up RecyclerView to Display a Gallery of Wallpapers
In this section of the tutorial we will be setting up a fragment inside an activity that will contain a RecyclerView. This RecyclerView will show a card for each wallpaper, each card will contain an image of the wallpaper (loaded using Glide) and a textual description.
We will first create a model class for the Wallpaper that will contain a String for the URI of the image on the Internet and a String for the title of the wallpaper. See the code sample for the Wallpaper class below.
Next we will create an interface that will contain methods that will be invoked when a wallpaper image is selected within any of the cards in the RecyclerView. See the code sample for the WallpaperSelectListener interface below.
Now we will create a ViewHolder class to be used within the RecyclerView for the showing each card containing a wallpaper. In the bind(…) method of the WallpaperViewHolder we will perform the following on the wallpaper card.
- Set the text of the wallpaper title TextView
- Load the image of the wallpaper from the Internet into the ImageView
- Set an OnClickListener to the ImageView containing the wallpaper to invoke the onWallpaperSelect(Wallpaper) method on the WallpaperSelectListener
See the code sample for the WallpaperViewHolder class below.
Next we will create the RecyclerView adapter class for showing the wallpapers in the RecyclerView. See the code sample for the WallpaperGalleryRecyclerAdapter class below.
Now we will create the fragment class that will contain the RecyclerView of the wallpapers. You will see in the onCreate(…) method of the fragment class we are creating a List of Wallpaper objects using wallpaper images from the free to use stock photo website pexels.com. Once the list is created we create the WallpaperGalleryRecyclerAdapter and pass the list of wallpapers to the custom RecyclerView adapter using the setWallpapers(List<Wallpaper>) method.
In the onCreateView(…) method of the fragment we set up the RecylcerView by setting the layout manager and the adapter containing the list of wallpapers objects.
See the code sample for the WallpapersListFragment class below.
The final part of this step of this section of the tutorial is to set up the WallpapersListFragment to be shown in the navigation graph within the activity. First you will need to add a NavHostFragment to the layout resource of the main activity.
After that you will need to create a navigation resource for the navigation graph.

Then you will need to add the WallpapersListFragment destination to the navigation graph as the start destination using the navigation editor in Android Studio shown in the screenshot below.
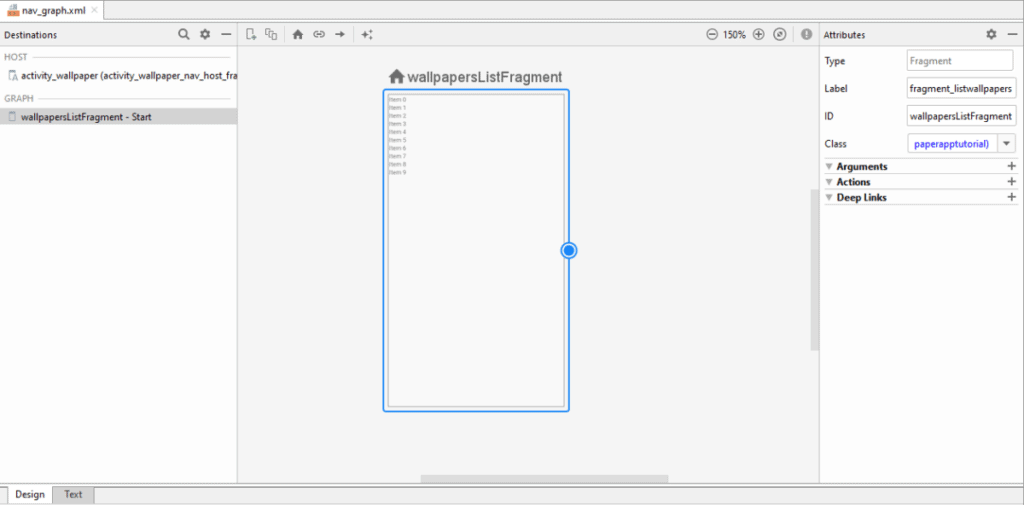
If you have troubles with any of the steps regarding the Jetpack navigation component, have a look at the post I wrote on the navigation component referenced in the Download Gradle Dependencies section of this post that goes into much greater detail.
Step 4: Setting the Wallpaper using the WallpaperManager
Android offers a WallpaperManager class in the package android.app.WallpaperManager released under Android Eclair (Android API Level 5).
The WallpaperManager class provide access to the wallpaper on the device and for getting the current wallpaper and dimensions and changing the wallpaper.
How to Set the Wallpaper Image using the WallpaperManager
To set the wallpaper image using the WallpaperManager we can use the setBitmap(Bitmap) method from the WallpaperManager. Using Glide we can load an image from a URI on the internet and retrieve the Bitmap for that image, then pass that Bitmap as a parameter to the setBitmap(Bitmap) method to set the new wallpaper.
See the code excerpt below for setting the wallpaper using the setBitmap(Bitmap) method from the WallpaperManager.
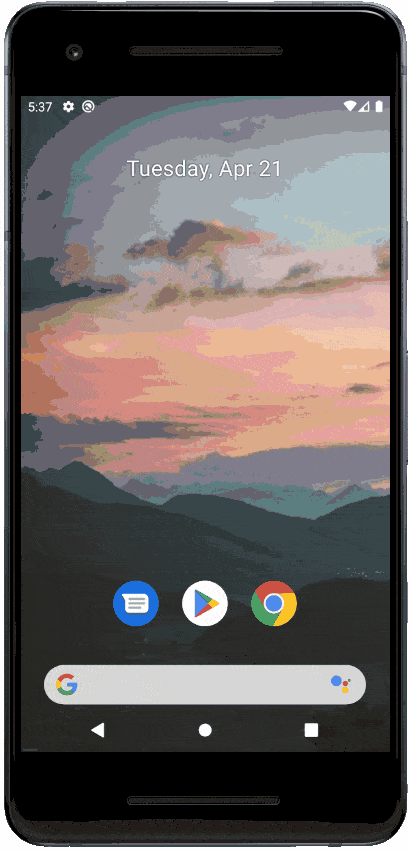
I have created a screen capture below showing setting the wallpaper image using the setBitmap(Bitmap) method on the WallpaperManager. One thing you may notice is that because the select image for the Wallpaper is too large the wallpaper image automatically gets cropped from the left side of the image.
How to Set and Center Crop the Wallpaper Image using the WallpaperManager
It is also possible to perform a center crop of the image to be used for setting the wallpaper using the setBitmap(Bitmap, Rect, boolean) method of the WallpaperManager class.
The setBitmap(Bitmap, Rect, boolean) method of the WallpaperManager class takes three parameters.
The first parameter is a Bitmap of the wallpaper image, we obtain a Bitmap of the wallpaper image using the Glide library to load the image from a URI.
The second parameter is a Rect object from the android.graphics.Rect package which is what we use to specify the bounds we will use to crop the image. To determine the Rect to be used for cropping the image we will compare the dimensions of the image to be used as the wallpaper to the dimensions of the screen in pixels. If the height or width of the image is larger than the screen dimensions then we will adjust the start and end coordinates of the Rect using a mathematical formula shown in the code excerpt below.
The third parameter is a boolean method used for allowing the operating system to backup the wallpaper image to allow it to be restored on a device.
See the code excerpt below for center cropping a wallpaper image then setting it as the system wallpaper using the setBitmap(Bitmap, Rect, boolean) method from the WallpaperManager.
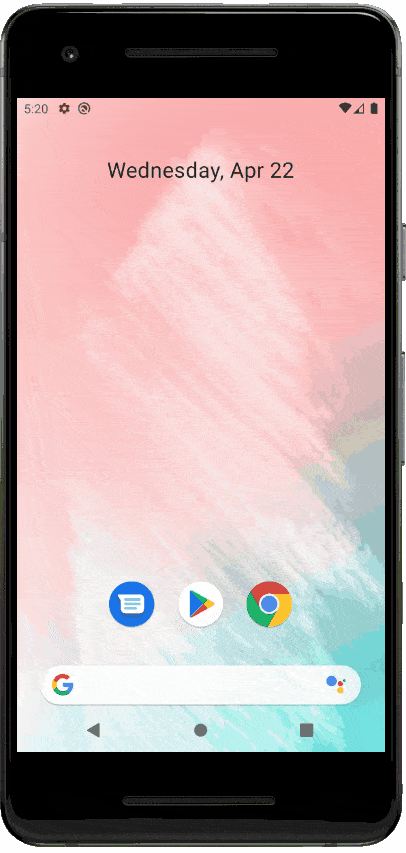
I have created a screen capture below showing setting the wallpaper image using the setBitmap(Bitmap, Rect, boolean) method of the WallpaperManager. As you can see, as the image of the wallpaper is larger than the screen dimensions of the device, the image gets cropped from the center.
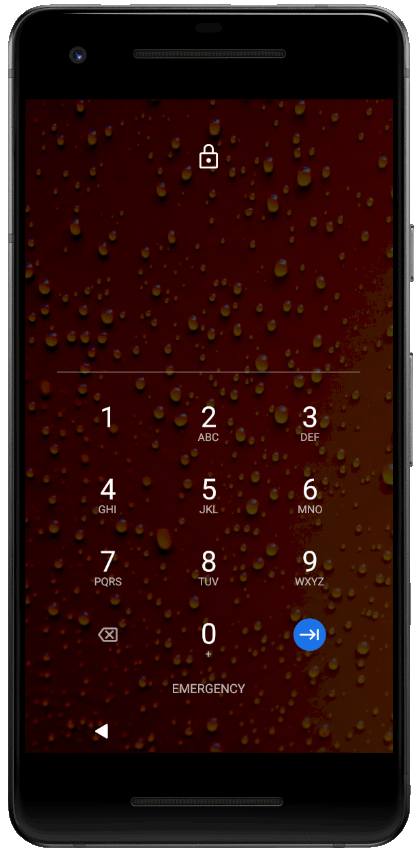
How to Set Wallpaper Image for the Lock Screen using the WallpaperManager
See the code excerpt below for setting a wallpaper image as the wallpaper of the lock screen using the setBitmap(Bitmap, Rect, boolean, int) method from the WallpaperManager class.
The Bitmap, Rect and boolean parameters to the setBitmap(Bitmap, Rect, boolean, int) method are the same as described in the previous section covering how to center crop and set a wallpaper image.
The forth parameter in the setBitmap(Bitmap, Rect, boolean, int) is a flag used for advising whether to set the system wallpaper image (using the FLAG_SYSTEM flag) or the lock screen image (using the FLAG_LOCK flag).
See the screenshot below of showing the lock screen wallpaper being set using the setBitmap(Bitmap, Rect, boolean, int) method from the WallpaperManager class.
Live Interactive Android Wallpaper App Tutorial
Summary of the Live Wallpaper App
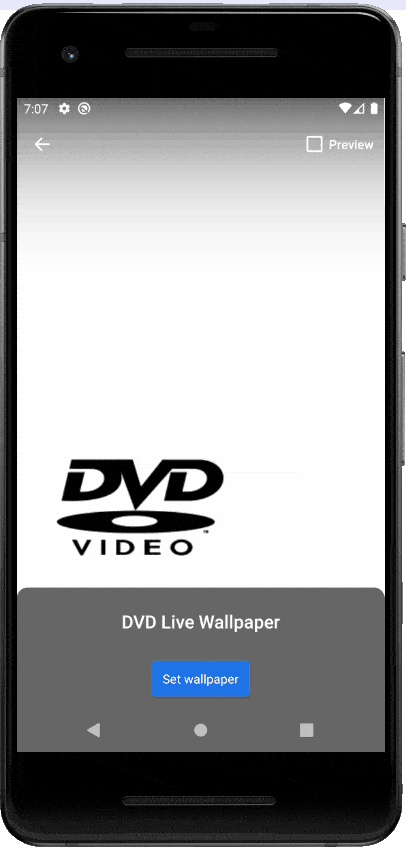
We will be building a live wallpaper app based around a scene from the US television series The Office where the whole office is mesmerized by the animation of the DVD logo shown on the TV while Michael is running an office meeting.
The live wallpaper we will be creating will just use single black and white color image for the DVD logo. It will animate the DVD logo using five different speeds adjusted when the user clicks on the live wallpaper. When the DVD logo collides with an edge of the screen it will change direction of the picture like in the clip above from The Office.
See a sample screen capture of the live wallpaper containing the animated DVD logo below.
Step 1: Importing the DVD Logo to Use as a Bitmap
In the first step of the tutorial for creating a live interactive wallpaper in Android we will be importing the DVD logo to use as Bitmap later on in the tutorial.
Download the PNG file of the DVD video logo image below.
To import it into the Android Project in Android Studio first create a “raw” resource directory in the “res” folder by right clicking on the “res” folder, selecting “New”, “Android Resource Directory” then setting the “Resource type” of the Android resource directory to “raw” then click the “OK” button. Then copy the downloaded DVD video logo image and paste it into the “raw” directory inside the “res” folder.
Step 2: Creating a Helper Class for Handling 2D Vectors
Next we will create a helper class for handling vectors with an x and y value. This two dimensional vector class will be used for tracking the position of the DVD logo in the wallpaper as well as the velocity the logo is moving at in the x and y direction.
See the code sample for the Vector2f class below.
Step 3: Implement the Wallpaper Service and Engine
In this step of the tutorial we will be creating two classes. The MyWallpaperService class and the MyWallpaperEngine class.
Creating the Custom Wallpaper Engine Class
The MyWallpaperEngine class will be implement as an inner class inside the MyWallpaperService class. It will extend the Engine class from WallpaperService.
The MyWallpaperEngine class will be responsible for drawing the Bitmap of the DVD logo on a canvas and updating is permission at a set interval using a velocity. The MyWallpaperEngine class will also contain a method for handling the user touch events on the wallpaper and use a mathematical calculation based on the position of the DVD logo to bounce the logo off the edges of the screen when it comes in contact with them.
The following methods will be overridden in the MyWallpaperEngine class.
- onVisibilityChanged(boolean)
- onSurfaceChanged(SurfaceHolder, int, int, int)
- onSurfaceDestroyed(SurfaceHolder)
- onTouchEvent(MotionEvent)
Also we will implement the following methods in the MyWallpaperEngine class to manage updating and displaying the DVD logo on screen.
- applySpeed()
- handleCollisions()
- draw()
- drawBitmap(Canvas)
The applySpeed() method is used to switch between five different speeds of the DVD logo that is triggered when the user touches the screen. The speed is managed using a two dimension vector called velocity which have values for the x and y direction. When the speed is changed the direction of the movement of the logo is preserved by using the sign of the number representing the velocity in the x direction and the velocity in the y direction in the calculation of the new velocity.
The handleCollisions() method is called at every frame of the live wallpaper and will check if the position of the logo has collided with any of the screen bounds. If there is a collision it will change the direction of the logo by negating the velocity in either the x or y direction based on whether the collision has occured.
Creating the Custom Wallpaper Service Class
The MyWallpaperService will be responsible for displaying the live wallpaper behind any Android applications shown on top of it on a device.
The MyWallpaperService class will extend the WallpaperService class and will instantiate the MyWallpaperEngine in the overridden onCreateEngine() method. The MyWallpaperService will be referenced in next step inside the manifest file as a service.
See the code of the MyWallpaperService and MyWallpaperEngine classes below.
Step 4: Updating the App Manifest
Prior to updating the app’s manifest file we will need to create an XML resource that will be used in the app’s manifest. This XML file will need to be created and placed inside the “res/xml” directory of your Android Project.
See the XML file called mywallpaper.xml below.
Next we will make update updates to the manifest file for the Android app.
We will need to use the “uses-feature” tag inside the manifest file and request the use of the “android.software.live_wallpaper” feature.
We will also need to add the service to the manifest inside the “application” tag using the “service” tag.
This service tag will have an attribute called “android:name” that will contain the value of the wallpaper service class we created. It will also request to use the permission “android.permission.BIND_WALLPAPER” using the “android:permission” attribute.
Inside the service tag we will require an intent filter with the action of “android.service.wallpaper.WallpaperService” and a metadata tag with the attribute “android:name” set to “android.service.wallpaper” and the “android:resource” tag set to “@xml/mywallpaper”.
See the sample AndroidManifest.xml file below.
Step 5: Launch the Live Wallpaper from the Fragment using an Intent
For the final step of the tutorial for creating an interactive live wallpaper app in Android, we will be creating the fragment class that will set the live wallpaper when a button gets clicked.
We will create a fragment class called LiveWallpaperFragment, in the layout resource for the fragment class it will contain a button that will be used for setting the live wallpaper.
In the fragment class we will add an OnClickListener to the button. When a click event is detected on the button we will create an Intent with the “WallpaperManager.ACTION_CHANGE_LIVE_WALLPAPER” action. We will also put an extra on the Intent with the key “WallpaperManager.EXTRA_LIVE_WALLPAPER_COMPONENT” that will reference the MyWallpaperService class we created for the live wallpaper. After we have set up the Intent we will launch it using the startActivity(Intent) method.
See the code sample for the LiveWallpaperFragment class below.
Before running your Android app to test it works, make you have added the new fragment you created in this section to the navigation graph as the new start destination.